Angular Localization and Internationalization (i18n) Guide
Angular localization is not a trivial translation task. Yes, you need it to render translatable strings in a target language, but Angular i18n goes beyond that.
Let me show you.
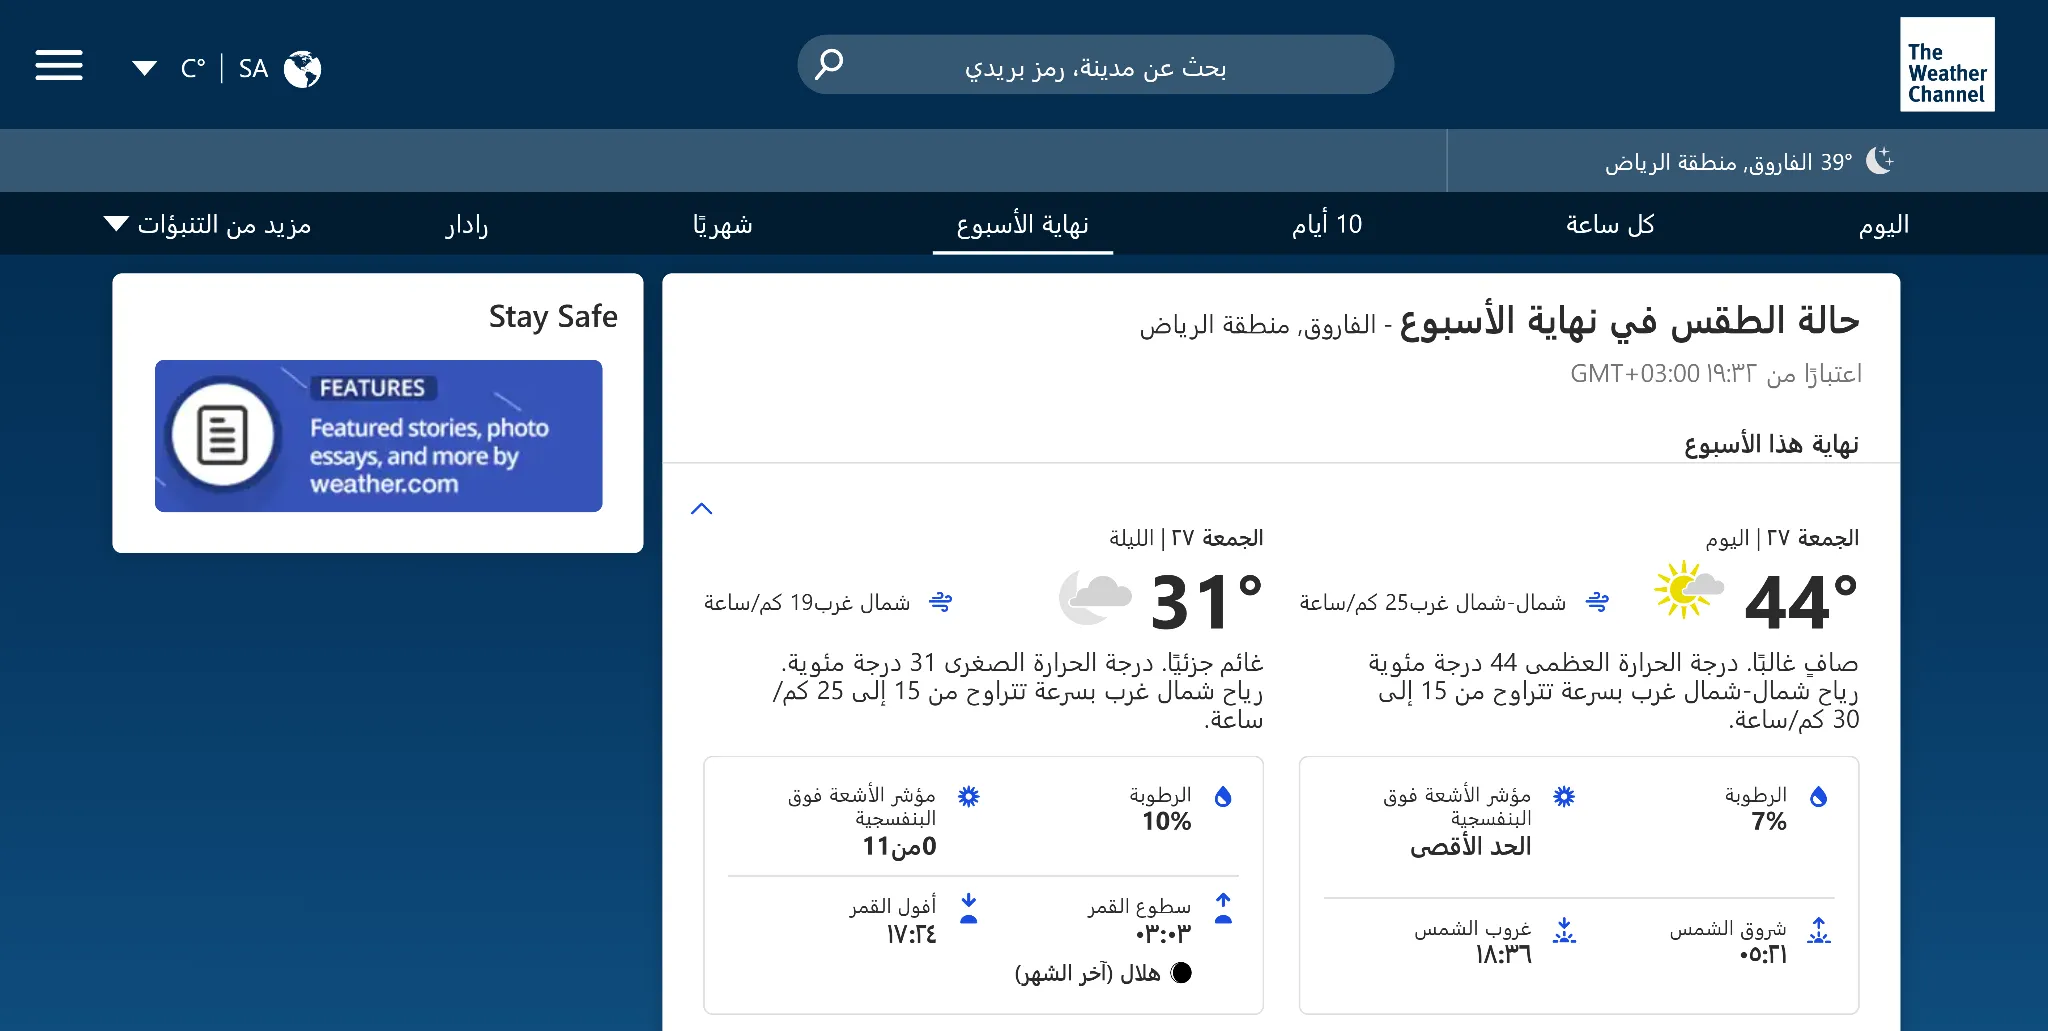
Noticed the untranslated image on the left?
It doesn’t end there. Here you can also see the untranslated button, untranslated string, and unlocalized units of measurement.

Yikes!
To fully localize and internationalize your Angular app, you need not only to serve users to translate text, but also ensure they get local numbers, dates, and currencies. You also need to localize images and plurals. And for some of your app users even accommodate layout changes for right-to-left languages.
The task is certainly daunting, but let’s make it manageable.
Understanding the terminology
Before jumping into the code, let's define two key terms:
-
Internationalization (i18n) involves designing your app to support various languages and dialects. This means separating translatable content and preparing the app for bidirectional text.
-
Localization (l10n) takes the i18n process further by creating versions of your project for different regions. It involves translating content and adapting it to local customs and preferences.
Getting started with Angular app localization
Angular has built-in internationalization (i18n) tools that make localization a breeze. Let's break down the process:
- Install dependencies
- Configure the application
- Mark the HTML tags for translation
- Extract translatable text in messages.xlf file
- Translate the text and localize for supported regions
- Merge translations back into your app
- Translate numbers, dates, and currencies
- Serve your app in different locales
Step 1: Installing dependencies
First, we need to install the Angular localize package. Run the following command in your project directory:
root@localhost ~# ng add @angular/localize

ℹ Using package manager: npm
✔ Found compatible package version: @angular/localize@18.0.5.
✔ Package information loaded.

The package @angular/localize@18.0.5 will be installed and executed.
Would you like to proceed? (Y/n)
When prompted, reply Y to proceed with the installation.
Step 2: Configuring the application
Next, open the angular.json file to specify which locales we'll support. Under the projects section, add an i18n property and an architect property like below:
/* angular.json */
{
  "projects": {
    "your-app": {
      / Other configuration... */
      "i18n": {
        "sourceLocale": "en-US",
        "locales": {
          "es": "src/locale/messages.es.xlf"
        }
      },
      "architect": {
        "build": {
          "options": {
            /* Other options... */
            "localize": ["es"]
          },
          "configurations": {
            "es": {
              "aot": true,
              "outputPath": "dist/your-app-es/",
              "i18nFile": "src/locale/messages.es.xlf",
              "i18nFormat": "xlf",
              "i18nLocale": "es"
            }
          }
        },
      }
    }
  }
}
Note: Remove the comments enclosed within /* */ for the JSON to work.
This configuration tells Angular to build the Spanish locale when localizing the application. Remember that you can only preview one locale at a time with ng serve, even if you add multiple locales.
Step 3: Marking text for translation in your HTML
Now it’s time to mark the text in your application that needs translation. Angular uses the i18n attribute for this purpose.
In your component templates (like app.component.html), add the i18n attribute to elements containing text that needs translation:
/* src/app/app.component.html */

<h1 i18n>Welcome to our app</h1>
<p i18n>Thank you for using our service</p>
For attributes that need translation, like image alt text, use i18n-attributeName. In this case, I’m using i18n-alt to translate the alt text.
<img src="path/to/image.jpg" i18n-alt alt="Product image"\>
For dates and currencies, use Angular’s built-in pipes, which support locale-specific formatting:
<p>{{ orderDate | date }}</p>
<p>{{ totalAmount | currency }}</p>
Once you’ve added the i18n attributes and pipes to your HTML file, move to your component class (like app.component.ts) and use $localize to set the strings for translation:
/* src/app/app.component.ts */
import { Component } from '@angular/core';

@Component({
  selector: 'app-root',
  templateUrl: './app.component.html',
  styleUrls: ['./app.component.css']
})
export class AppComponent {
  title = $localizeWelcome;
}
When marking text for translation, make sure to identify all user-visible text in your code. Look for:
- Menu items
- Navigation items
- Field labels
- Prompts
- Buttons
- Messages
- Page titles
- Legal text
- Contact information
You’ll be surprised how much translatable text your app contains. It will take a lot of time to separate it from the executable code, but the effort is worth it. Even a single untranslated button or page title can create a choppy user experience.
Step 4: Extracting translatable text
You’ve marked all user-visible text for translation. Great job! Now, you can extract it using the Angular CLI.
Run this command to generate the translation file automatically:
root@localhost ~# ng extract-i18n
Depending on the size of your project, it may take a couple of seconds. Then, you should see an output similar to this:
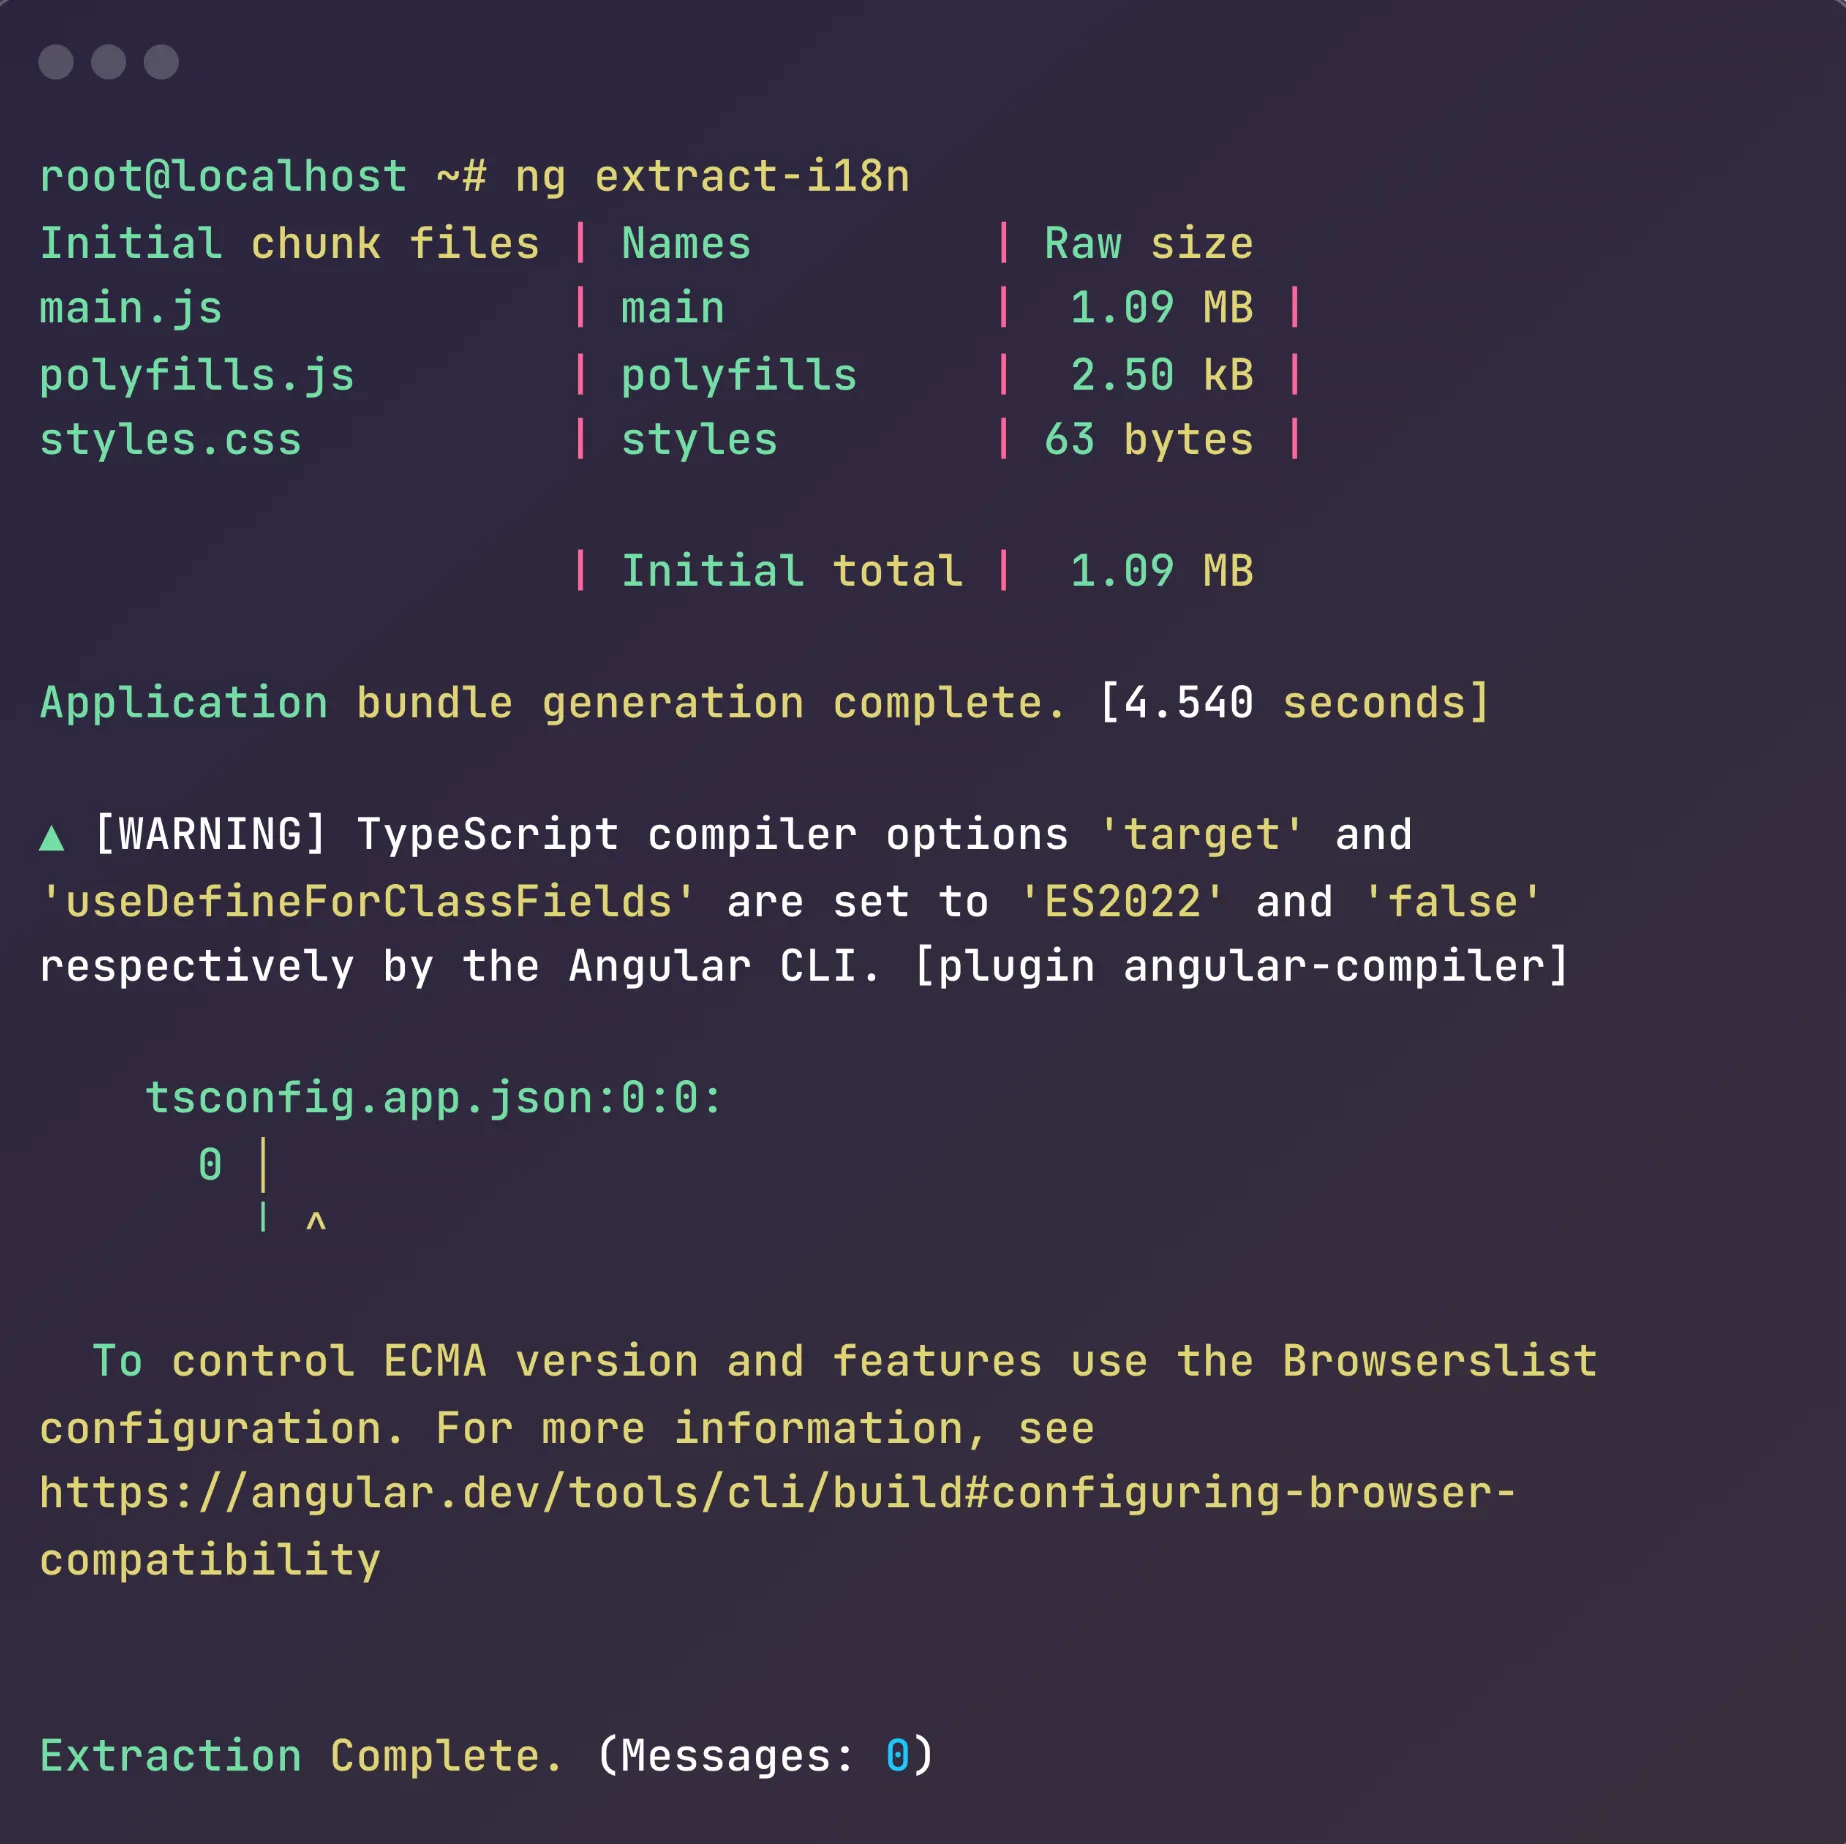
This command creates a messages.xlf file in the src/locale directory, containing all the marked text in a format that translators can work with.
Step 5: Angular app text translation
Now everything is ready to translate the extracted text.
Start by making a copy of messages.xlf for each language you want to support—for example, messages.es.xlf for Spanish.
Then, next to each <source> element add a <target> element with translated text:
<!-- src/locale/messages.es.xlf -->

<?xml version="1.0" encoding="UTF-8" ?>
<xliff version="1.2" xmlns="urn:oasis:names:tc:xliff:document:1.2">
  <file source-language="en-US" datatype="plaintext" original="ng2.template">
    <body>
      <trans-unit id="welcomeMessage" datatype="html">
        <source>Welcome to our app</source>
        <target>Bienvenido a nuestra aplicación</target>
      </trans-unit>
      <!-- Add more translated units here -->
    </body>
  </file>
</xliff>
After spending all that time marking user-visible text, you won’t be surprised to learn that manually copy-pasting text into Google Translate isn’t feasible. Especially if you localize your app into multiple languages.
Similarly, you don’t want to send your XLIFF files to translators who either won’t take on the project or may unintentionally modify attributes or strings.
What you need here is a professional platform, like Centus, where translators, editors, and designers can work simultaneously to localize your Angular app.
Let me show you how it’s done:
First, sign up to Centus and create a new project
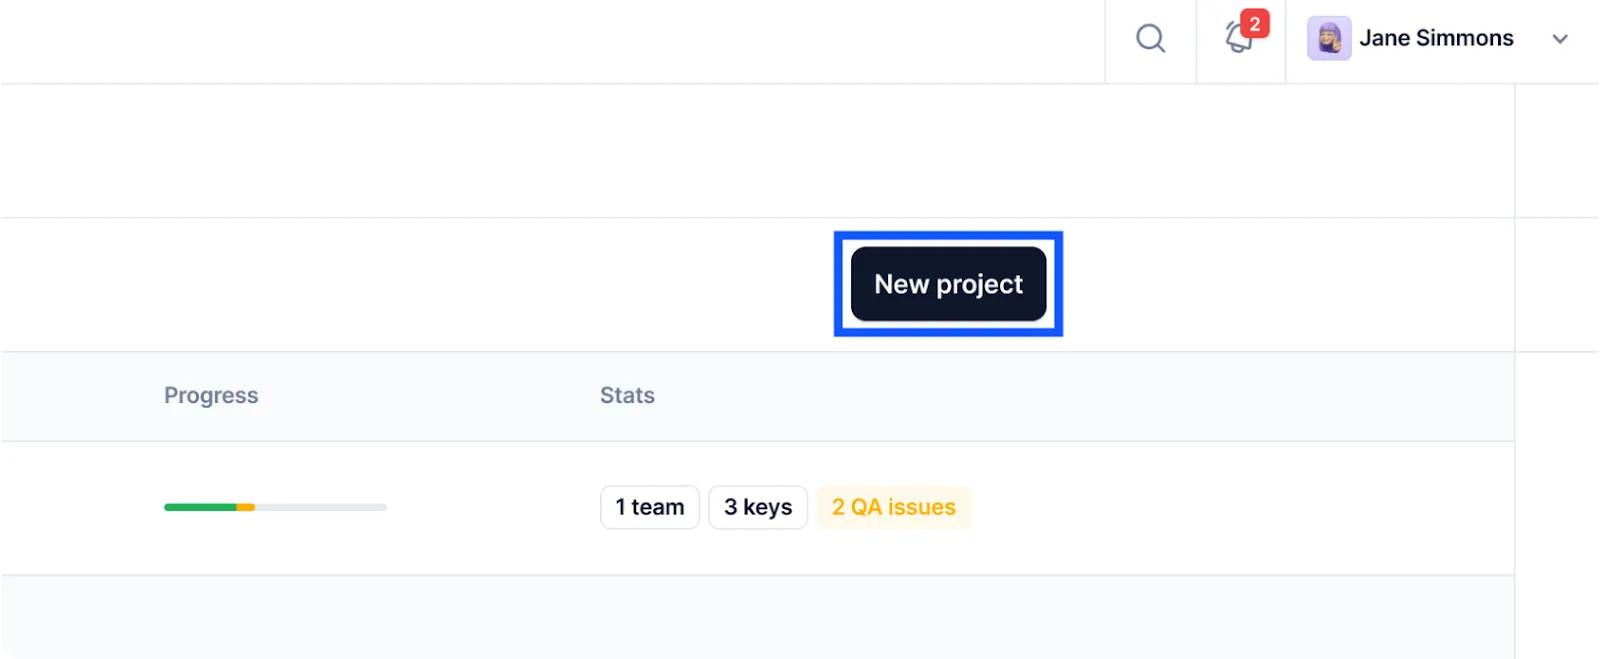
Next, you’ll be prompted to enter project details. Name your project and set Software as your project type. Then, select the base language i.e., the original language of your app.
Make sure to select the correct local corresponding to the source-language in your XLIFF file. For example, English (en), English (en_US), or English (en_ZA). However, if necessary, you can change the base language later.

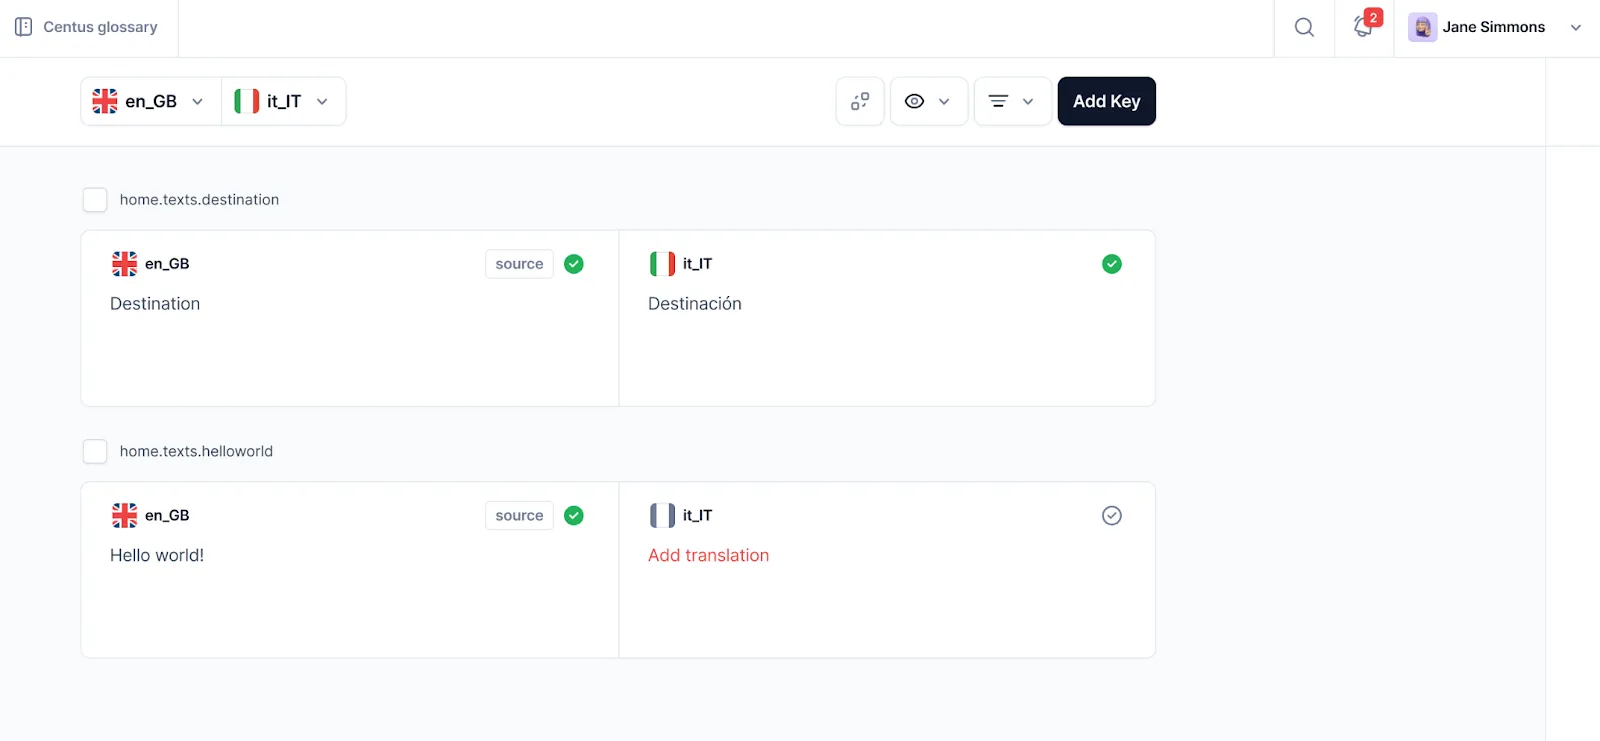
Alright, now you have a project where you can translate your XLIFF files into multiple languages simultaneously. To add the files, go to the Imports section and click Select a file.
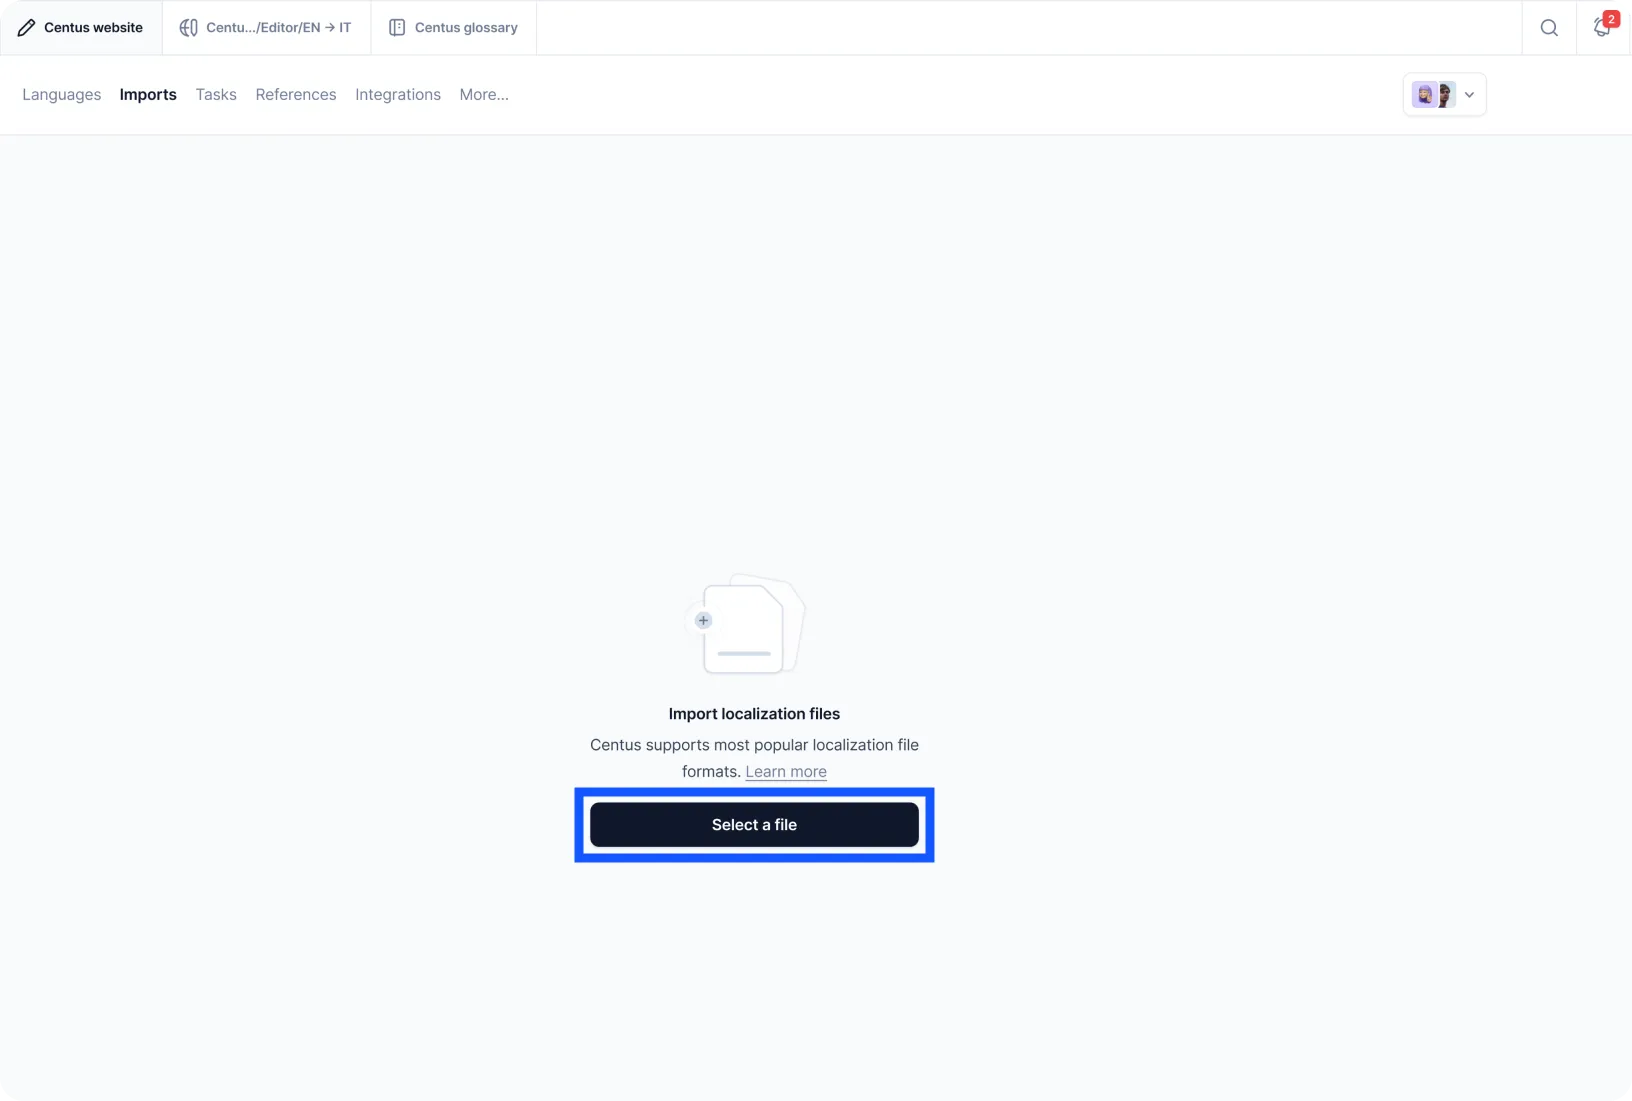
This is where the translation process starts.
Your XLIFF files are added to Centus and automatically segmented into strings. Instead of XLIFF files with unfamiliar structure, your translators will see this convenient Editor.
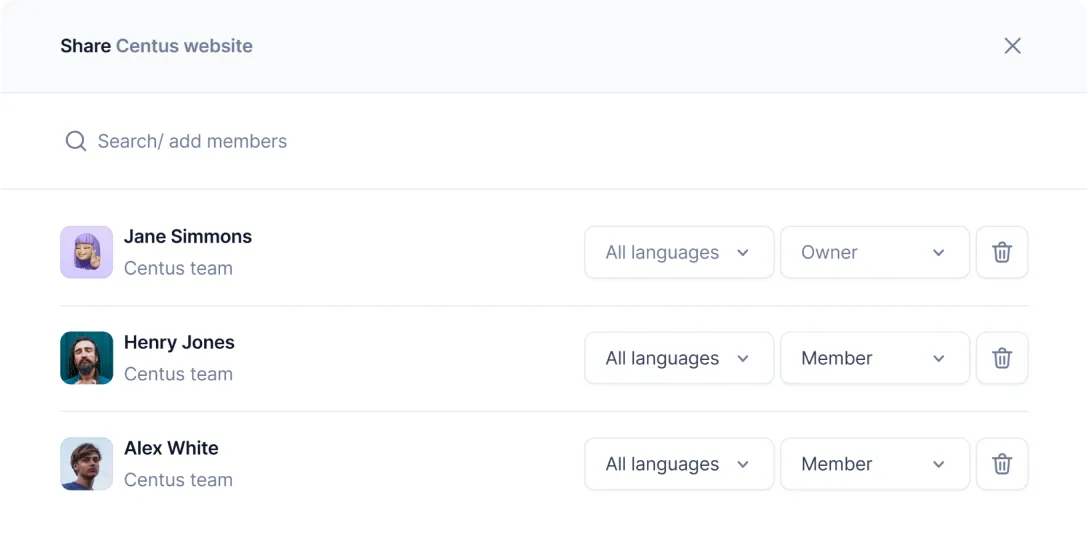
Speaking of translators, let’s add them to your project.
In the dashboard, navigate to the Contributors section and click Add people. Enter contributors’ details and choose their roles.
Pro tip: Learn how to find professional translators for your Angular localization project.
To save time and money, your translators can use Google Translate, DeepL translate, or Microsoft Translate. After batch translation, they can edit strings manually to ensure their accuracy.
For best results, add to your project editors who can review translated strings and leave comments.
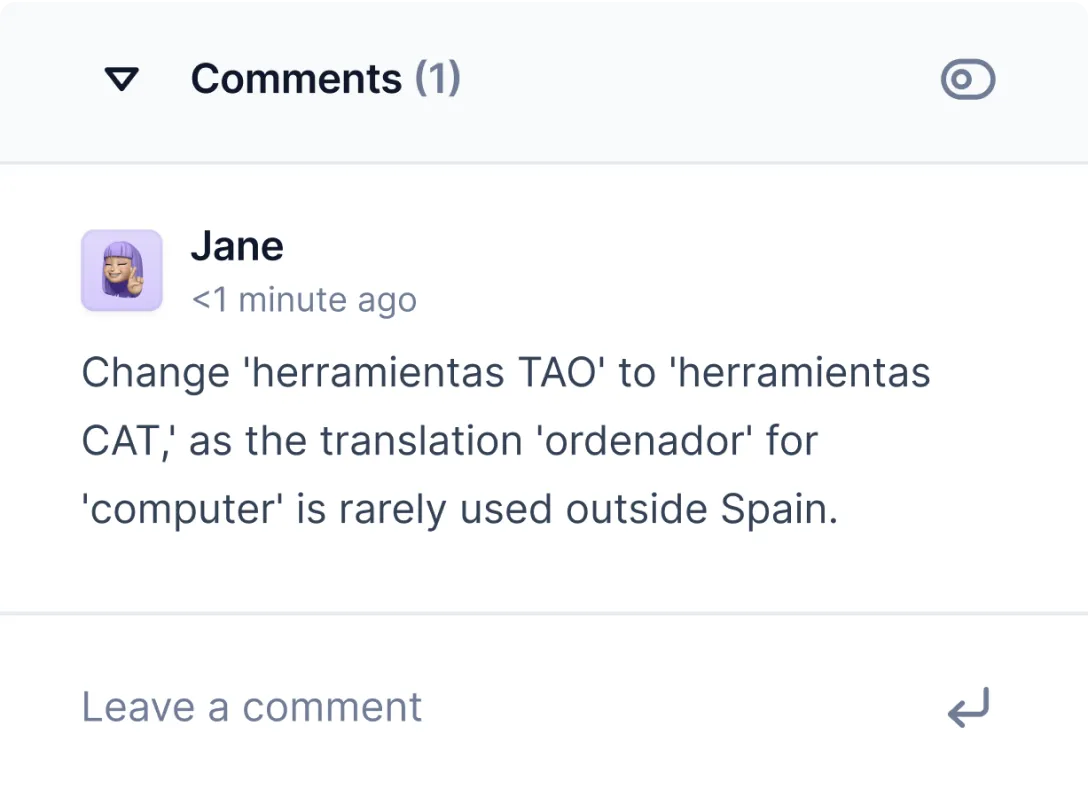
In collaboration with your designers, the editors can also shorten translations that don’t fit buttons.
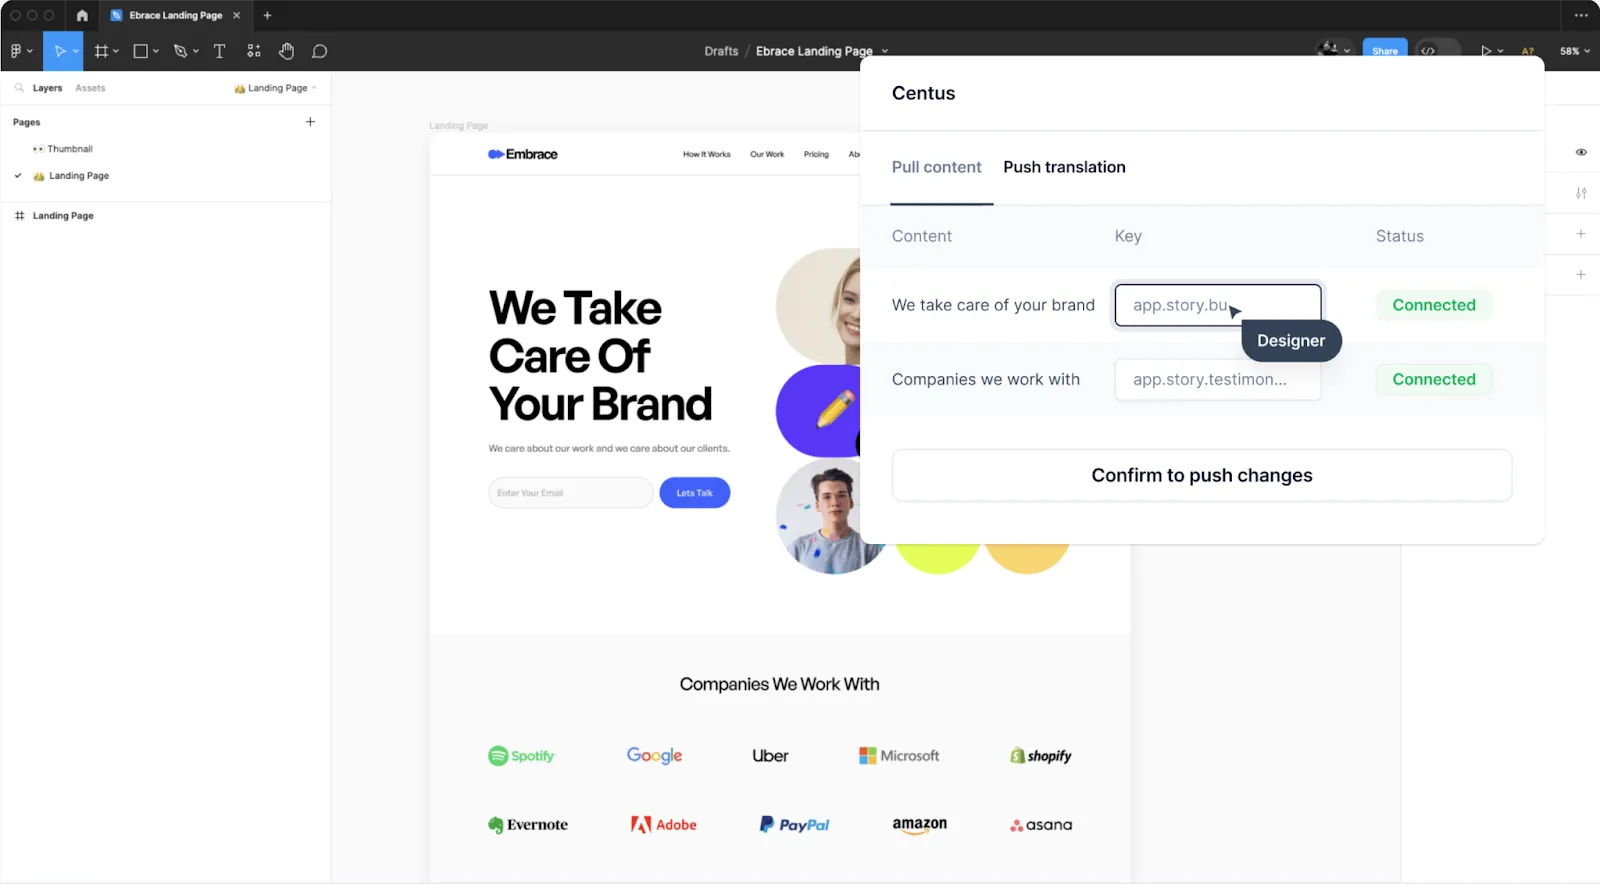
To check if the translated text fits buttons, your designers can use a simple Centus plugin for Figma. With this, they can automatically import translations into their designs and adjust them to avoid truncated or overlapping text.
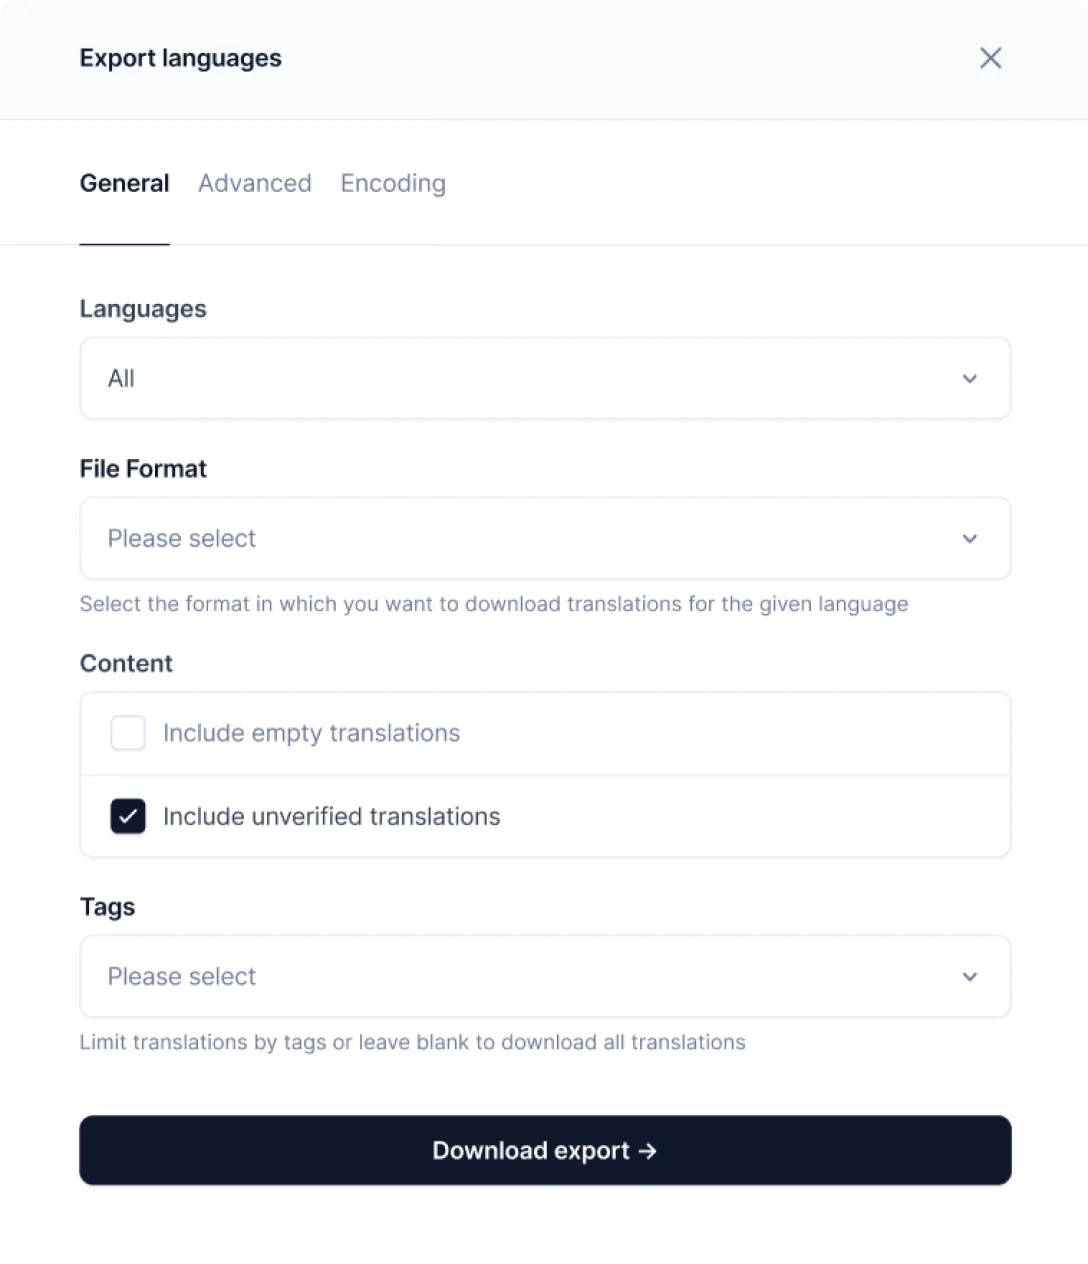
When translations are ready and approved, navigate to the Export section and choose languages, content, and file format. Then, click Download export.
That’s it! You can now merge the translated files.
Step 6: Merging translations
The translations will auto-merge when you build or serve your application for a specific locale. However, you need to add the messages file locations for each locale in your angular.json:
/* angular.json */
{
  "projects": {
    "your-app": {
      "architect": {
        "build": {
          "options": {
            "localize": ["es"]
          },
          "configurations": {
            "es": {
              "aot": true,
              "outputPath": "dist/your-app-es/",
              "i18nFile": "src/locale/messages.es.xlf",
              "i18nFormat": "xlf",
              "i18nLocale": "es"
            }
          }
        }
      }
    }
  }
}
This tells Angular where to find the translation files and how to use them.
Step 7: Translating numbers, dates, and currencies
Text translation is just the beginning. Angular’s i18n capabilities include formatting numbers, dates, and currencies according to local conventions.
For example, to display a date in the user’s locale:
<p\>{{ today \| date }}\</p\>
This will automatically format the date based on the current locale. In the US, it might display as 4/13/2023, while in Germany, it could be shown as 13.4.2023.
Similarly, for numbers and currencies:
<p>{{ price | number }}</p>
<p>{{ price | currency }}</p>
These pipes automatically format numbers and currencies according to local conventions, handling decimal separators, thousand separators, and currency symbols.
Step 8: Serving your localized app
Finally, you’re ready to serve your app in different languages! Use the --configuration flag with the ng serve command:
ng serve --configuration=es
Your app will be run on localhost:4200 by default, and if everything goes well, your translated text should appear on the web page now.
Exploring advanced Angular i18n techniques
Let's dive into advanced Angular i18n techniques to improve your app’s internationalization. I'll cover custom translation IDs, pluralization and gender handling, and route path translation.
Creating custom IDs
Custom translation IDs boost manageability and reduce conflicts. They offer stability, clarity, and easier updates. To use them, add a custom ID to the i18n attribute:
<h1 i18n=“@@mainHeader”>Welcome to our app!</h1>
<p> i18n=“@@introText”>This is an internationalized Angular application.</p>

<button i18n=“@@submitButton”>Submit</button>
Your XLF file will look like this:
<?xml version="1.0" encoding="UTF-8" ?>
<xliff version="1.2" xmlns="urn:oasis:names:tc:xliff:document:1.2">
  <file source-language="en" datatype="plaintext" original="ng2.template">
    <body>
      <trans-unit id="mainHeader" datatype="html">
        <source>Welcome to our app!</source>
        <target>Bienvenido a nuestra aplicación!</target>
      </trans-unit>
      <trans-unit id="introText" datatype="html">
        <source>This is an internationalized Angular application.</source>
        <target>Esta es una aplicación Angular internacionalizada.</target>
      </trans-unit>
      <trans-unit id="submitButton" datatype="html">
        <source>Submit</source>
        <target>Enviar</target>
      </trans-unit>
    </body>
  </file>
</xliff>
Once this is all set, you can then extract the translation file using this command:
ng extract-i18n
Reasons to use custom IDs
- Stability: If you change "Welcome to our app!" to "Welcome to our application!", the custom ID mainHeader remains the same, preserving existing translations.
- Clarity: The custom IDs (mainHeader, introText, submitButton) indicate where these strings are used in the application.
- Easier updates: You can modify the source text without affecting translations if the meaning remains the same.
- Consistency: Ensures the same string is translated consistently across the application, even if used in multiple places.
But the thing is, custom IDs can get messy when multiple developers are working on implementing these translations—mainly due to the naming conventions.
To ensure things stay manageable even when the project scales, remember to follow a consistent naming convention, include component or page names for context, and use descriptive names indicating the purpose of the translated text.
Pluralization in Angular
Languages have varying rules for pluralization and gender. Luckily, Angular provides tools to handle pluralization for your app.
Use the plural ICU (International Components for Unicode) message for pluralization:
<p i18n>
  Updated {minutes, plural,
    =0 {just now}
    =1 {one minute ago}
    other {{{minutes}} minutes ago}
  }
</p>
Gender-specific translations
For gender-specific translations, you can use the same ICU message format to display the required information without having to create an entirely new block for each gender:
<p i18n>
  {gender, select,
    male {He}
    female {She}
    other {They}
  } will attend the meeting.
</p>
Combining pluralization and gender select
You can also combine both the gender and pluralization formations into one block allowing you to create complex sentence structures without requiring independent blocks for each.
<p i18n>
  {gender, select,
    male {He has}
    female {She has}
    other {They have}
  } {count, plural,
    =0 {no messages}
    =1 {one message}
    other {{{count}} messages}
  }.
</p>
Translate route paths
Translating route paths creates localized URLs, improving user experience and SEO. Start by defining routes with a translatable title in app-routing.module.ts:
const routes: Routes = [
  {
    path: 'about',
    component: AboutComponent,
    title: $localizeAbout Us
  },
  // ... other routes
];
Create a custom URL serializer to handle translated routes:
import { DefaultUrlSerializer, UrlTree } from '@angular/router';

export class LocalizedUrlSerializer extends DefaultUrlSerializer {
  parse(url: string): UrlTree {
    const langUrl = url.replace('/sobre-nosotros', '/about');
    return super.parse(langUrl);
  }

  serialize(tree: UrlTree): string {
    const url = super.serialize(tree);
    return url.replace('/about', '/sobre-nosotros');
  }
}
Register the custom serializer in app.module.ts:
import { UrlSerializer } from '@angular/router';
import { LocalizedUrlSerializer } from './localized-url-serializer';

@NgModule({
  // ...
  providers: [
    { provide: UrlSerializer, useClass: LocalizedUrlSerializer }
  ],
  // ...
})
export class AppModule { }
When navigating, use the translated path:
this.router.navigate(['/sobre-nosotros']);
Keep these tips in mind when implementing translated routes:
- Ensure that all necessary routes are included in your custom serializer.
- Be cautious with route parameters, as they might need special handling.
- Remember to update your sitemap and any hardcoded links to reflect the translated URLs.
Handling RTL languages
Localization may also involve handling right-to-left (RTL) languages like Arabic, Hebrew, or Persian depending on the geographics where your app is served.
To ensure a smooth user experience in RTL languages, you need to modify not just how the text is displayed, but also how the animations show up and how that affects the direction of writing.
Here are some of the CSS tweaks you could make to enable and properly showcase these languages in your application.
1. Use the dir attribute
Start with the dir attribute on your <html> tag:
<html dir="rtl" lang="ar"\>
Or set it dynamically:
document.documentElement.dir = this.isRtl ? 'rtl' : 'ltr';
2. Use CSS logical properties
CSS logical properties make RTL support a breeze with single lines of code. Here are some of the logical properties you could use when dealing with RTL support issues.
| Physical Property | Logical Property |
|---|---|
| margin-left | margin-inline-start |
| margin-right | margin-inline-end |
| padding-left | padding-inline-start |
| padding-right | padding-inline-end |
| border-left | border-inline-start |
| border-right | border-inline-end |
You can start by replacing margin-left with margin-inline-start, padding-right with padding-inline-end, and so on to let your HTML automatically handle the spacing and display for RTL languages.
.div {
  margin-inline-start: 10px;
  padding-inline-end: 20px;
}
3. Flexbox and grid for layout
Flexbox and grid layouts adjust automatically for RTL. You can use them for your responsive designs:
.container {
  display: flex;
  flex-direction: row;
}
4. Transform and transition properties
Another choice is to use transform and transition properties with negative values when your app is translated into an RTL language. For instance:
.slide-in {
  transform: translateX(100%);
}

[dir="rtl"] .slide-in {
  transform: translateX(-100%);
}
5. Images and icons
If required, mirror images and icons using the transform property. While this may not always be required, some images, may need transforming. Here’s an example:
[dir="rtl"] .icon {
  transform: scaleX(-1);
}
6. Text alignment
The CSS text-align property allows you to set start and end alignments. This means, the text will either be left-aligned (start) or right-aligned (end) in whichever container you set the property for.
Here’s an example:
.text-container {
  text-align: start;
}
But while these may work well for the HTML part of the website, they may not fully address the challenges Angular apps experience.
Angular-specific RTL challenges and solutions
Angular offers a few different ways in which you can handle the complexities that accompany RTL languages—including requiring completely different animations, mirror images, etc.
1. Dynamically loading stylesheets
Angular lets you dynamically load stylesheets. The benefit? Faster loading apps since you only load the styles that are required for that language.
@Component({
  selector: 'app-root',
  templateUrl: './app.component.html',
  styleUrls: ['./app.component.css', './app.component.rtl.css']
})
export class AppComponent {
  @HostBinding('class.rtl') isRtl = false;

  switchToRtl() {
    this.isRtl = true;
    document.dir = 'rtl';
  }
}
2. Angular Material with built-in RTL support
Angular Material has built-in RTL support. You can enable it with the dir attribute:
<body dir="rtl">
  <mat-sidenav-container>
    <!-- App content -->
  </mat-sidenav-container>
</body>
3. Create custom directives and use them in templates
You can also create custom directives to handle RTL
@Directive({
  selector: '[appRtl]'
})
export class RtlDirective {
  @Input() set appRtl(isRtl: boolean) {
    this.setRtlStyles(isRtl);
  }

  constructor(private el: ElementRef, private renderer: Renderer2) {}

  private setRtlStyles(isRtl: boolean) {
    if (isRtl) {
      this.renderer.addClass(this.el.nativeElement, 'rtl');
    } else {
      this.renderer.removeClass(this.el.nativeElement, 'rtl');
    }
  }
}
You can then use the directives in customized templates that help you display RTL languages easily.
<div [appRtl]="isRtlLanguage">
  <!-- Content here -->
</div>
4. Handling dynamic content
For dynamic content, ensure RTL styles apply:
@Component({
  selector: 'app-dynamic-content',
  template: '<div [innerHTML]="content"></div>'
})
export class DynamicContentComponent implements OnInit {
  @Input() content: string;

  constructor(private elementRef: ElementRef) {}

  ngOnInit() {
    if (document.dir === 'rtl') {
      this.elementRef.nativeElement.querySelectorAll('*').forEach(el => {
        el.style.direction = 'rtl';
      });
    }
  }
}
Create RTL-aware animations:
@Component({
  selector: 'app-slide-panel',
  template: `
    <div [@slideState]="isOpen ? 'open' : 'closed'">
      <!-- Panel content -->
    </div>
  `,
  animations: [
    trigger('slideState', [
      state('closed', style({ transform: 'translateX({{ closedX }})' })),
      state('open', style({ transform: 'translateX(0)' })),
      transition('closed => open', animate('300ms ease-in')),
      transition('open => closed', animate('300ms ease-out'))
    ])
  ]
})
export class SlidePanelComponent implements OnInit {
  @Input() isOpen = false;
  closedX: string;

  constructor() {}

  ngOnInit() {
    this.closedX = document.dir === 'rtl' ? '-100%' : '100%';
  }
}
5. RTL-aware animations
Test RTL layouts with automated tests:
import { ComponentFixture, TestBed } from '@angular/core/testing';
import { By } from '@angular/platform-browser';
import { YourComponent } from './your.component';

describe('YourComponent RTL', () => {
  let component: YourComponent;
  let fixture: ComponentFixture<YourComponent>;

  beforeEach(async () => {
    await TestBed.configureTestingModule({
      declarations: [ YourComponent ]
    }).compileComponents();

    fixture = TestBed.createComponent(YourComponent);
    component = fixture.componentInstance;
    document.dir = 'rtl';
    fixture.detectChanges();
  });

  it('should apply RTL styles', () => {
    const element = fixture.debugElement.query(By.css('.rtl-sensitive'));
    expect(getComputedStyle(element.nativeElement).direction).toBe('rtl');
  });

  // More RTL-specific tests
});
Implement these techniques throughout development to create Angular apps that work smoothly for RTL language users. Also, don’t forget to test your app with various RTL languages and devices to ensure correct appearance and functionality in all scenarios.
Angular’s dynamic language switching
Maybe you also want to allow users to dynamically switch the language. You can use the $localize function to load translations dynamically and let users pick a language via a dropdown menu.
Here’s a simple language switcher component:
/* src/app/language-switcher/language-switcher.component.ts */


import { Component } from '@angular/core';

@Component({
  selector: 'app-language-switcher',
  template:
    <select (change)="switchLanguage($event)">
      <option value="en">English</option>
      <option value="es">Español</option>
      <option value="fr">Français</option>
    </select>
})
export class LanguageSwitcherComponent {
  switchLanguage(event: Event) {
    const lang = (event.target as HTMLSelectElement).value;
    window.location.href = /${lang};
  }
}
Whenever the user switches the language from the dropdown, the app will automatically refresh the app and reload the contents in the selected language.
Angular localization best practices
For a smoother localization experience, follow these best practies. They have helped me save time and avoid frustration on more than one occasion, and I believe they will help you too.
1. Plan for localization before you begin writing the app
Why it’s important: Localizing your app after it is ready will lead to some complex changes since your developers have to go over each page of your app to implement the translations.
This increases the chances of introducing bugs into the code which may otherwise not be present.
Best practices:
- Plan internationalization (i18n) right when you begin development.
- If you don’t know which geographies you want to support yet, use placeholders for later and make them extensible.
- Design your app with internationalization in mind—some languages may require different Unicode characters that should show up correctly.
- Consider that localization is not just about translating words on a page, but also implementing cultural differences—for instance, localized versions of Google will always show the local festivals being celebrated on the homepage.
Benefits:
- Localization can be implemented consistently across the app
- You reduce the long-term technical debt
- Helps you add new languages without making too many changes down the line
2. Provide context for translators within the app code
Why it’s important: Translators often see isolated strings to work with. While it may work, most languages don’t translate well without context.
For instance, if you have a button to “Ship” products, without context, the German translation could be “Schiff”—a boat used to transport people. However, with context, the translator could use the word “versenden” (to send/to ship).
Best practice: Ask your developers to include context like:
- Where the text appears on the app
- What is the expected functionality
- Are there any character limitations
- What is the purpose of that section
Benefits:
- It will improve translation accuracy
- Reduces the need for clarification between translators and managers
- Helps maintain consistent terminology throughout the application
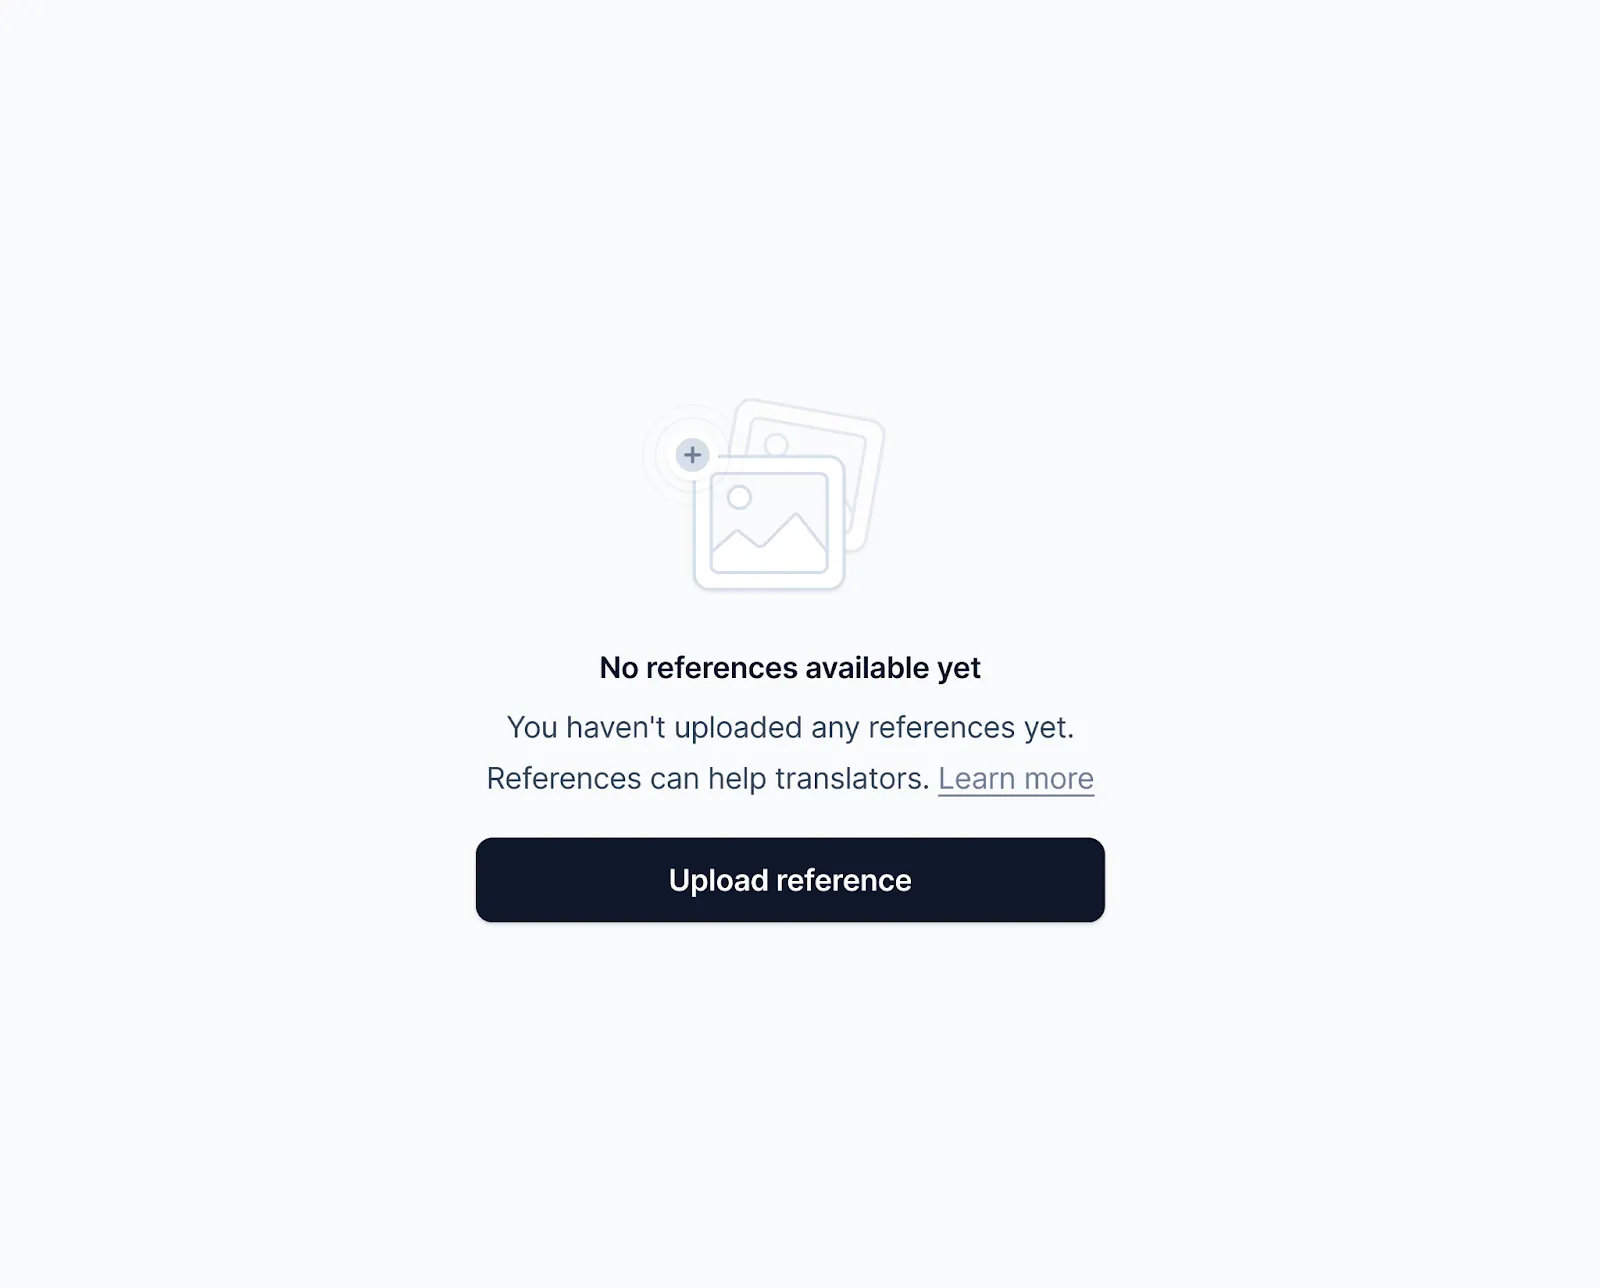
Most of the time, a line of text explaining an element’s purpose and location will suffice. But sometimes, to avoid misunderstandings, it’s better to provide your translators and editors with screenshots of your app.
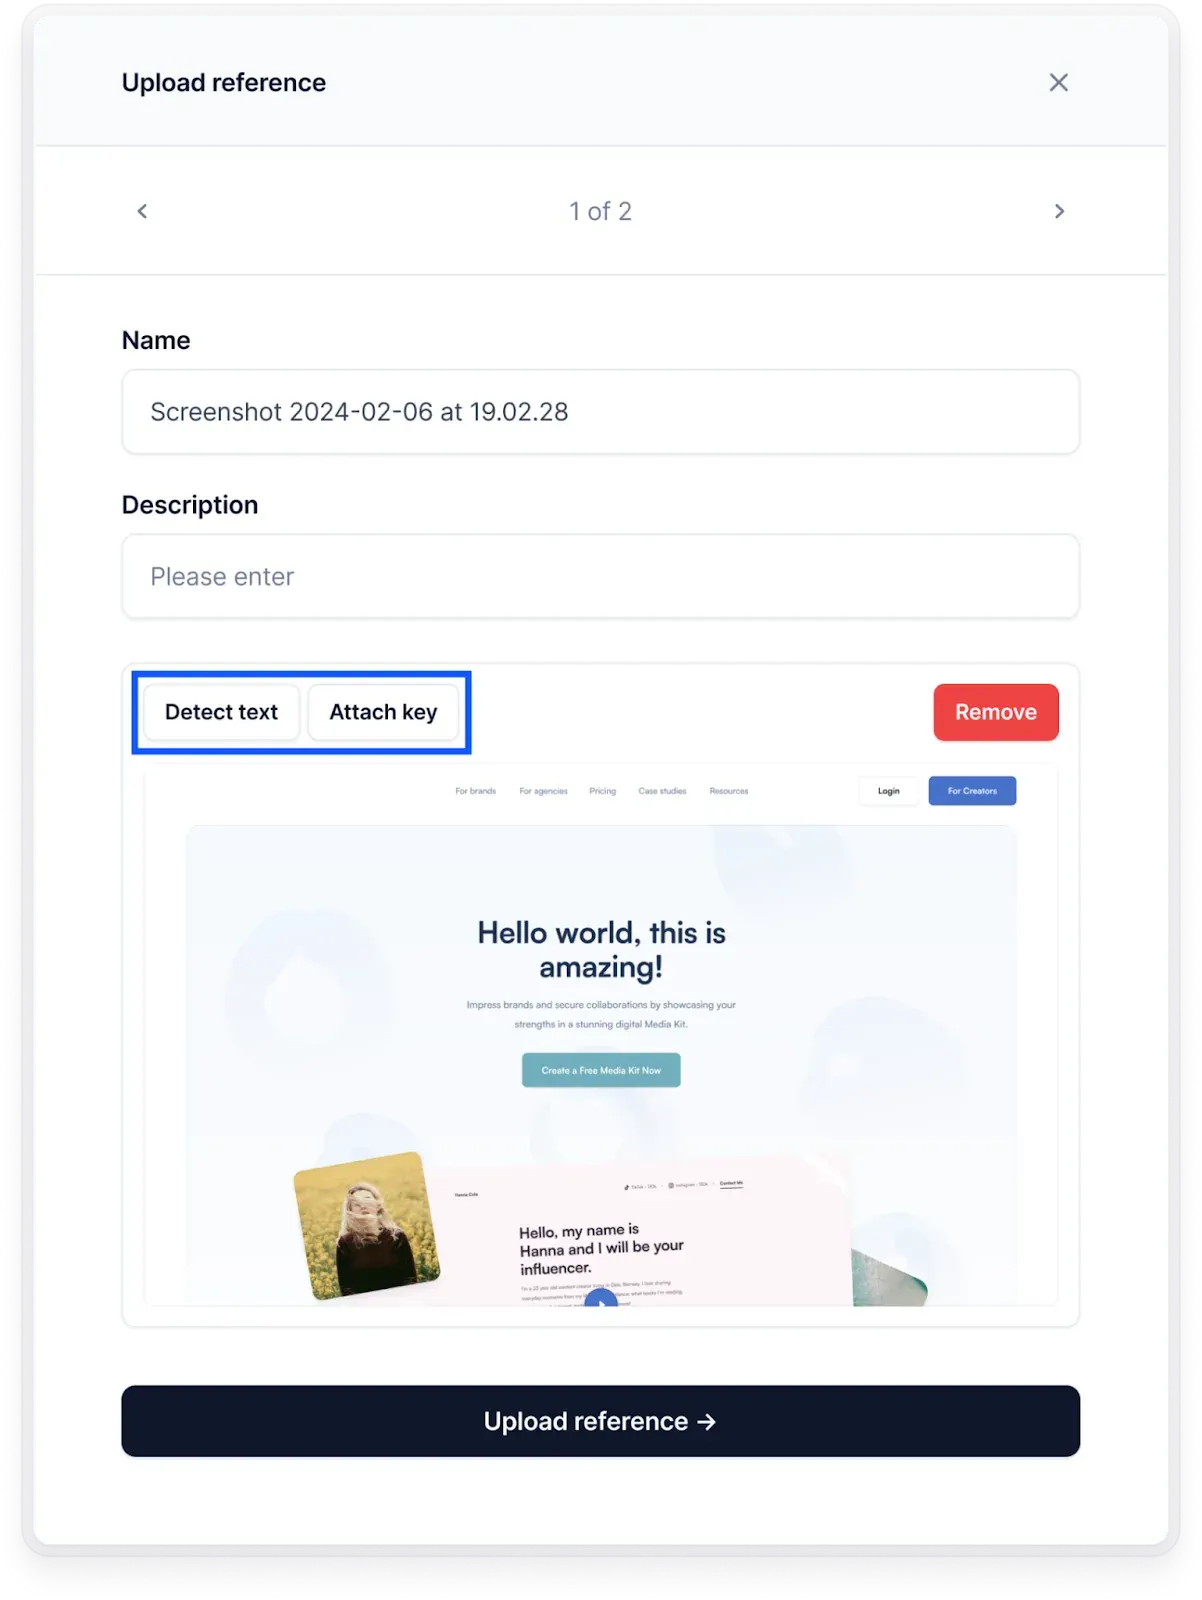
To share screenshots in the translation management platform Centus, go to the References section. There, click Upload reference to add screenshots from your computer.
After adding screenshots, click Detect text to automatically link screenshots with their corresponding strings. You can also click Attach key to do it manually.
Now your language experts will have enough context to accurate translate the app’s strings.
3. Use interpolation for dynamic content
Why it’s important: Sometimes you may want to use the same string with just a few words changed. However, simply concatenating multiple strings together won’t work.
For instance, if you have a string “will drive to his hometown”.
You cannot simply add a “He” or “She” to the sentence without changing the meaning. Here’s what the sentences will look like:
“He will drive to his hometown”
“She will drive to his hometown.”
These two sentences, while making sense, mean two different things. That’s the problem with simple concatenation and can lead to awkward sentences which is especially evident in non-English phrases.
Best practice: Use Angular’s built-in interpolation syntax ({{ }}) instead of string concatenation. It helps translators rearrange words and adjust grammar as needed for different languages.
Benefits:
- Gives translators the flexibility to create natural-sounding phrases
- Reduces the risk of grammatical errors in translations
- Makes it easier to handle languages with different word orders
4. Use ICU message format for complex translations
Why it’s important: Many languages have complex pluralization, gender, and grammar. And simple string replacement cannot handle these complexities.
Best practice: Use International Components for Unicode (ICU) formatted messages for handling these linguistic rules. The ICU syntax allows you to define different messages based on numeric values or other variables.
Benefits:
- ICU messaging helps your developers handle complex linguistic rules accurately
- It offers a standard way of dealing with pluralization across languages
- Allows for more natural and grammatically correct translations
5. Perform comprehensive testing across supported languages
Why it’s important: Different languages displayed on the same UI can cause unexpected artifacts leading to a bad user experience. For instance, right-to-left languages displayed on a UI primarily created for left-to-right text will disrupt the user experience.
Best practices:
- Perform localization testing in all supported languages
- Checking for layout issues caused by text expansion or contraction
- Verifying that all strings are properly translated
- Testing date, time, and number formatting in different locales
- Ensuring RTL (Right-to-Left) support works correctly
Benefits:
- Catches layout and functionality issues early
- Ensures a consistent user experience across all supported languages
- Helps identify missing or incorrect translations
Pro tip: Use Centus to automatically detect placeholder, bracket, email, number, and URL differences in the source and target text. Centus can also detect spelling, grammar, and punctuation errors.
6. Use a translation management system (TMS)
Why it’s important: If you run a small app with just a few pages, a TMS may not be necessary. But as you grow your app, managing these translations can become extremely difficult and overwhelming for your entire time.
Best practice: Tools like Centus help you manage these translations in a central location so everyone involved can collaborate without losing track of progress. They help you:
- Automatically pre-translate strings
- Translate and edit strings into multiple languages simultaneously
- Provide screenshots and context to translators right within the platform
- Adjust translations to fit UI/UX elements
- See translation progress and versions in real-time
7. Consider cultural differences in design
Why it’s important: Localization is more than translating text. You also need to consider cultural preferences and norms as they can significantly impact how people perceive your app. For instance, if you show people, remember to include individuals of different colors and ethnicities to keep your app inclusive.
Best practices:
- Every culture has different symbolism that means something to them
- Localize numbers, dates, and currencies
- Take note of all the topics that are considered taboo in the culture
- Localize UI/UX and images to fit the culture you plan to represent
Parting thoughts
Phew! It was quite a journey.
Now you should know how to prepare your XLIFF files and translate them using a professional localization management platform. Also, we’ve learned how to handle currencies, dates, numbers, and plurals.
Hopefully, it was worth your time.
Ready to internationalize your Angular app?
Get the week's best content!
By subscribing, you are agreeing to have your personal information managed in accordance with the terms of Centus Privacy Policy ->
Keep learning

21 min. read
Svelte i18n and Localization Made Easy

21 min. read
React App Localization and i18n: Advanced Guide

19 min. read
NextJS Internationalization: A Complete Walkthrough

25 min. read
Vue i18n and Localization: How to Localize a Vue App

18 min. read
JavaScript Localization Guide for Web Apps
22 min. read