I was dreading the thought of learning yet another framework. There are just so many of them these days that it seemed like an endless pursuit to me.
But I had to give it a shot. And it turns out, Svelte is different.
SvelteKit framework is simple—something I hadn't seen in a while. It’s a compiler that converts components into vanilla JS at build time so your app ships with fewer lines of code compared to other frameworks.
However, the irony of that simplicity is that while it’s easier to perform localization (l10n) and internationalization (i18n) in Svelte, it’s also easier to make mistakes. And since I’ve made my fair share of them, I can help you avoid yours.
This article is your ultimate guide to Svelte localization and internationalization. It distills everything I’ve learned about Svelte so that you can localize your app faster.
But first, the basics:
What is Svelte, and what is svelte i18n?
Unlike most Javascript frameworks that rely on the virtual DOM to manage reactivity, it compiles your code at build time into minimal, optimized Javascript code.
With this approach, Svelte apps offer exceptional performance, meaning they are not only lightweight but also very efficient and interactive with almost no latency.
Now, let’s do a quick overview of localization with Svelte.
Localization (or l10n) helps adapt your app for users speaking different languages and their cultural expectations.
With localization, you reformat dates, currencies, numbers, and units of measurement the way they expect. And you also adjust design and messages to align with the target culture.
There are a few popular libraries that you can use for Svelte localization:
-
Svelte-i18n is the most established Svelte localization library and provides extensive support for text translation, date, number, and currency formatting, and is compatible with both Svelte and SvelteKit.
-
Designed with the SvelteKit router in mind, the Sveltekit i18n library handles route-based localization effectively.
-
Svelte-i18n-lingui provides a standardized, component-based method for localization in Svelte applications; it is based on the LinguiJS i18n framework.
Let’s dig deeper.
2 Prerequisites for Svelte app localization
As a Svelte developer, you need these two things to start localizing your app:
- One of the available Svelte packages
- An app localization platform to translate strings
1. A Svelte localization package
While exploring the Svelte ecosystem, I found a lot of packages designed to make localization easy. The one that has gained the most traction is svelte-i18n, so that’s what we’ll use in our examples here.
Svelte-i18n makes translation management simple. It does so by using JSON files that help your app easily switch between different languages.
Here’s an example of what a hello-world implementation would look like:
<script>
  import { _ } from 'svelte-i18n';
</script>

<h1>{$_('hello.world')}</h1>
<p>{$_('app.description')}</p>
It was simple to implement and easy to start with for the demo app I was creating. I tested this with English and Spanish and it worked just fine.
However, after using it for a while, I noticed that managing it could become difficult as the app scales and the codebase becomes more complex.
2. An app localization platform
To translate your strings, you need something more sophisticated than Google Translate and Excel sheet. Trust me: I tried.
What you need for quick and accurate translation is an app localization platform, like Centus. The platform provides a simple web-interface for translating your JSON files into dozens of languages simultaneously.

Later in the article, I’ll show you how to translate your strings.
How to localize Svelte apps with the svelte-i18n package?
Remember I mentioned a demo app earlier? Here are the steps you can follow to create a similar hello-world app to learn localization. Let’s begin.
Step 1: Setup Svelte on your system
I’ll assume you already have NPM, Svelte, and other requirements all set up. If not, you can easily get to it by watching a Svelte beginners tutorial.
Let’s create a simple HelloWorld.svelte file in the src directory of our app.
<!-- HelloWorld.svelte -->
<script>
  export let name;
</script>
<h1>Hello {name}!</h1>
Now, in your App.svelte file, you need to import the HelloWorld as a component as I’ve done below:
<!-- App.svelte -->
<script>
  import HelloWorld from './HelloWorld.svelte';
</script>
<HelloWorld name="world" />
Now, start the app by running the command npm run dev and open the localhost address in your browser. You should see the “Hello world!” 👇
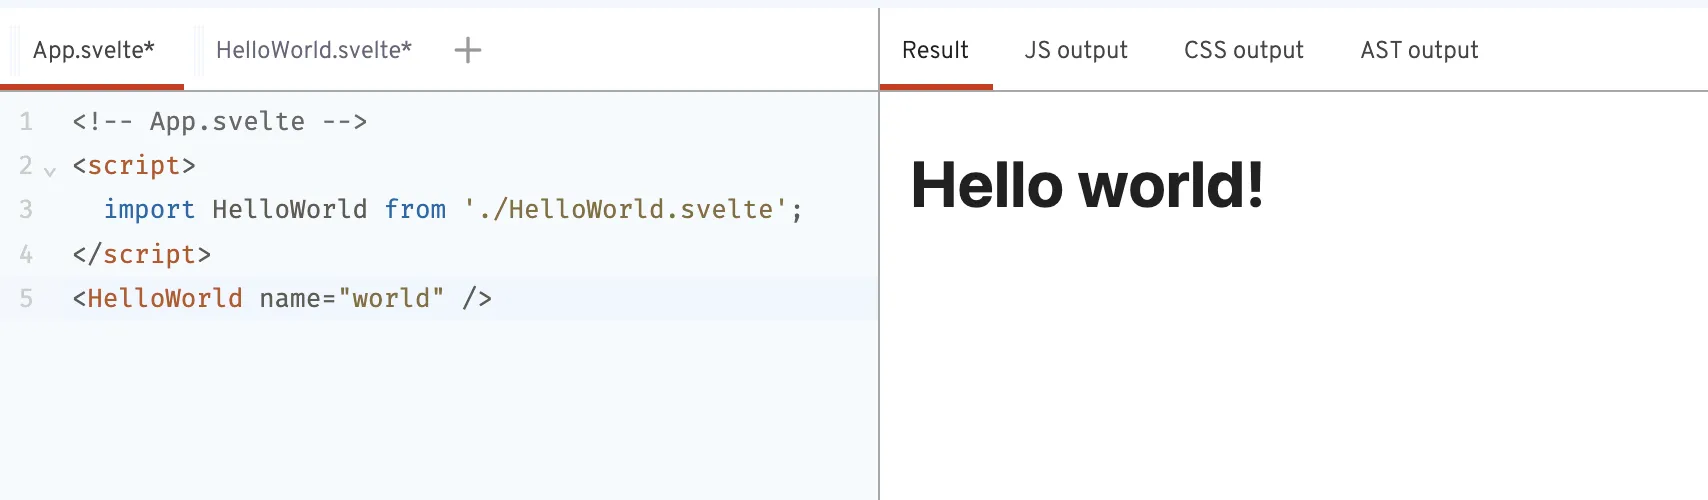
Note that in the App.svelte file we’re only passing the name to the HelloWorld component. Our Svelte localization will follow a similar method.
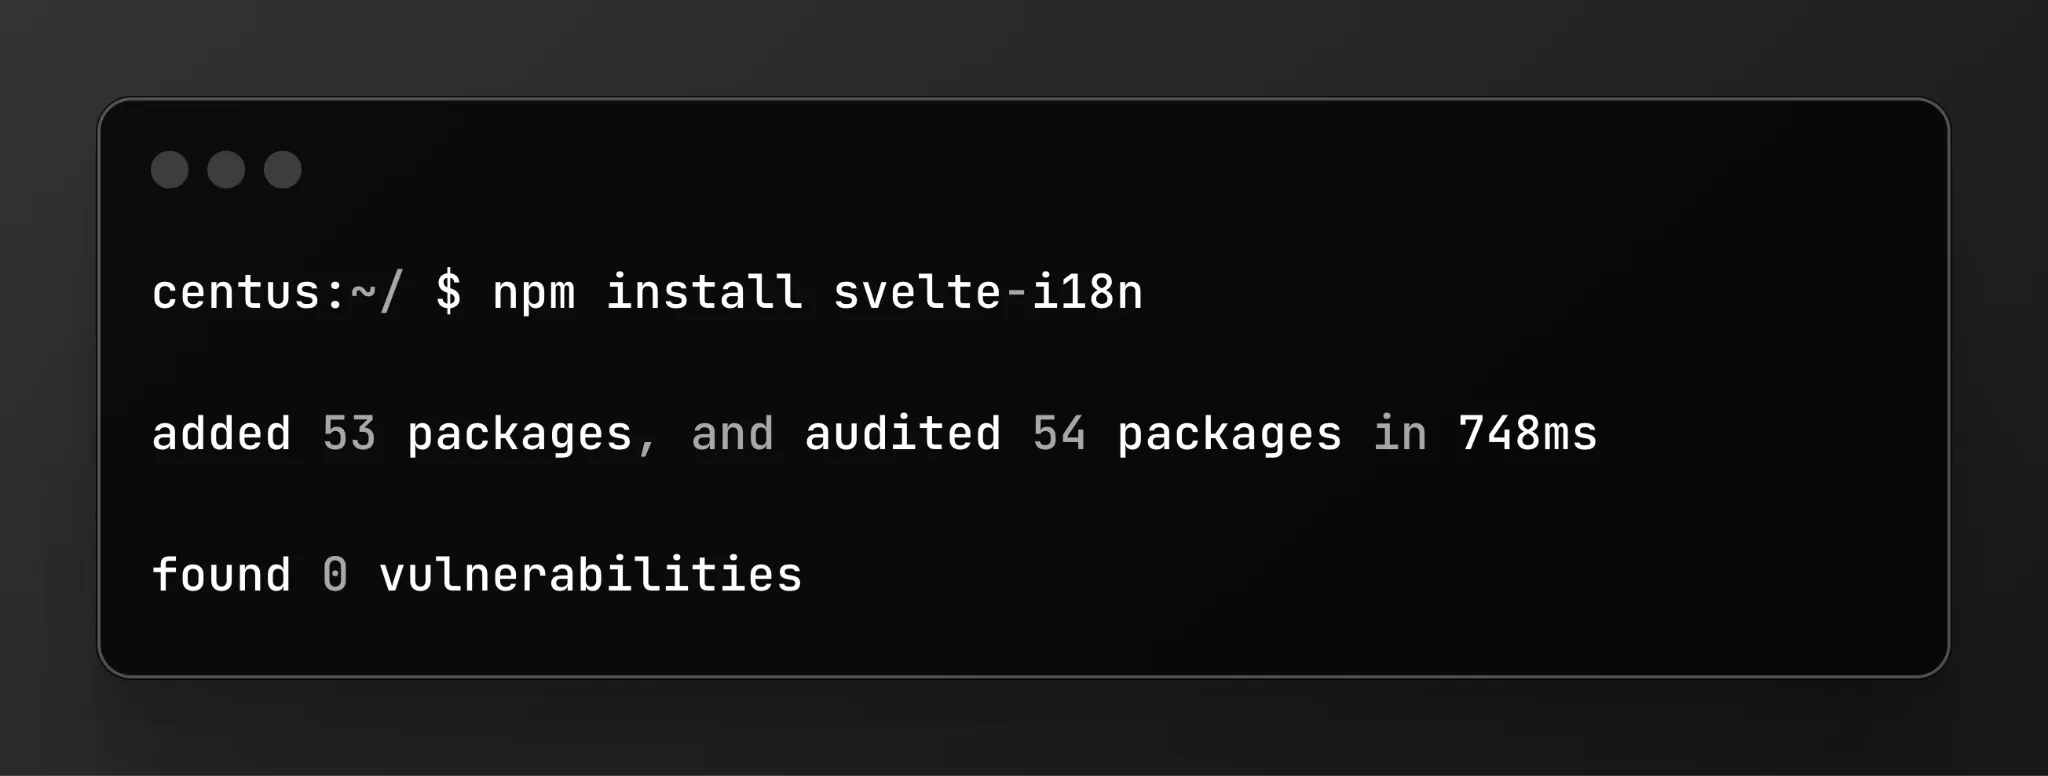
Step 2: Install svelte-i18n package
Now that you have Svelte ready, run the following command to install the svelte-i18n package:
Step 3: Create language files
In your src directory, create a directory locales. Inside locales, create two json files en.json and es.json.
Then copy-paste the file contents as below:
<!-- en.json -->
{
  "hello": "Hello {name}!"
}
<!-- es.json -->
{
  "hello": "¡Hola {name}!"
}
The above have a key-value pair where the key is “hello” in both cases. The key can be a single word or a set of words depending on the requirement.
Now, we have to configure svelte-i18n to fetch the information from these json files and also let the package know what the default and initial languages will be.
Here’s what the i18n.js file will look like 👇
// i18n.js
import { register, init } from 'svelte-i18n';
register('en', () => import('./locales/en.json'));
register('es', () => import('./locales/es.json'));
init({
  fallbackLocale: 'en',
  initialLocale: 'en',
});
I’ve set the fallbackLocale and initialLocale to English in this case. Configure it based on your custom requirements.
Step 4: Using translations in components
Congrats! You’ve completed the most fundamental Svelte app localization here.
Let's update our HelloWorld.svelte component to use the translations that we created above:
<!-- HelloWorld.svelte -->
<script>
  import { _ } from 'svelte-i18n';
  export let name;
</script>
<h1>{$_('hello', { name })}</h1>
We’ll import the _ function from svelte-i18n and use it to retrieve the translated string based on the hello key.
The {name} will not be translated as we allow the App.svelte to pass a value that doesn’t have a corresponding key in the JSON files.
Step 5: Add language selector buttons
What if you also want to give your users the option to switch languages? Here’s how I added a simplistic language selector that creates buttons based on array entries.
<!-- App.svelte -->
<script>
  import HelloWorld from './HelloWorld.svelte';
  import { locale } from 'svelte-i18n';
  const languages = [
    { code: 'en', name: 'English' },
    { code: 'es', name: 'Español' },
  ];
  function setLocale(newLocale) {
    locale.set(newLocale);
  }
</script>
<div>
  {#each languages as language}
    <button on:click={() => setLocale(language.code)}>
      {language.name}
    </button>
  {/each}
</div>
<HelloWorld name="world" />
You’ll see an array languages with the language code and name. This value of the name key will be displayed as the button text.
Then I used an #each expression to loop over the array and create buttons. You can add as many languages to the array as you need without changing any other part of the code.
Here’s what the output looks like right now. I haven’t added any styling to it as this is a proof-of-concept for both of us.

💡 Pro tip: Use a dropdown list to make it less cluttered when you have a larger list of languages.
That's it! You now have a basic Svelte app localized in English and Spanish using svelte-i18n. If you want to add more languages, simply follow the step 3 where you create a new language file and update the i18n.js to import the new JSON.
Handling right-to-left languages when localizing your Svelte app
After getting my basic localization working for left-to-right (LTR) languages like English and Spanish, I realized I needed to support right-to-left (RTL) languages such as Persian and Hebrew.
This required a bit more effort, but Svelte makes it quite manageable. Here's how:
1. Determine the text direction
First, you need to add a way for Svelte to determine if the language is RTL or LTR. I created a derived store that checks the active locale:
import { derived } from 'svelte/store';
import { locale } from 'svelte-i18n';
export const dir = derived(locale, $locale =>
  ['ar', 'he'].includes($locale) ? 'rtl' : 'ltr'
);
This store returns 'rtl' for Persian and Hebrew, and 'ltr' for all other languages. That does the job! So let’s move on to the next step.
2. Applying that direction to the HTML
We also need to ensure that the direction gets applied to the HTML. For that, I used the dir attribute on the root HTML element:
<script>
  import { dir } from './stores';
  import { locale } from 'svelte-i18n';
</script>

<svelte:head>
  <html lang={$locale} dir={$dir}>
</svelte:head>
3. Handling CSS for RTL and LTR languages separately
Simply switching the language will create messy-looking layouts. For instance, here’s an example of Alibaba website translated to Persian using Google Translate:
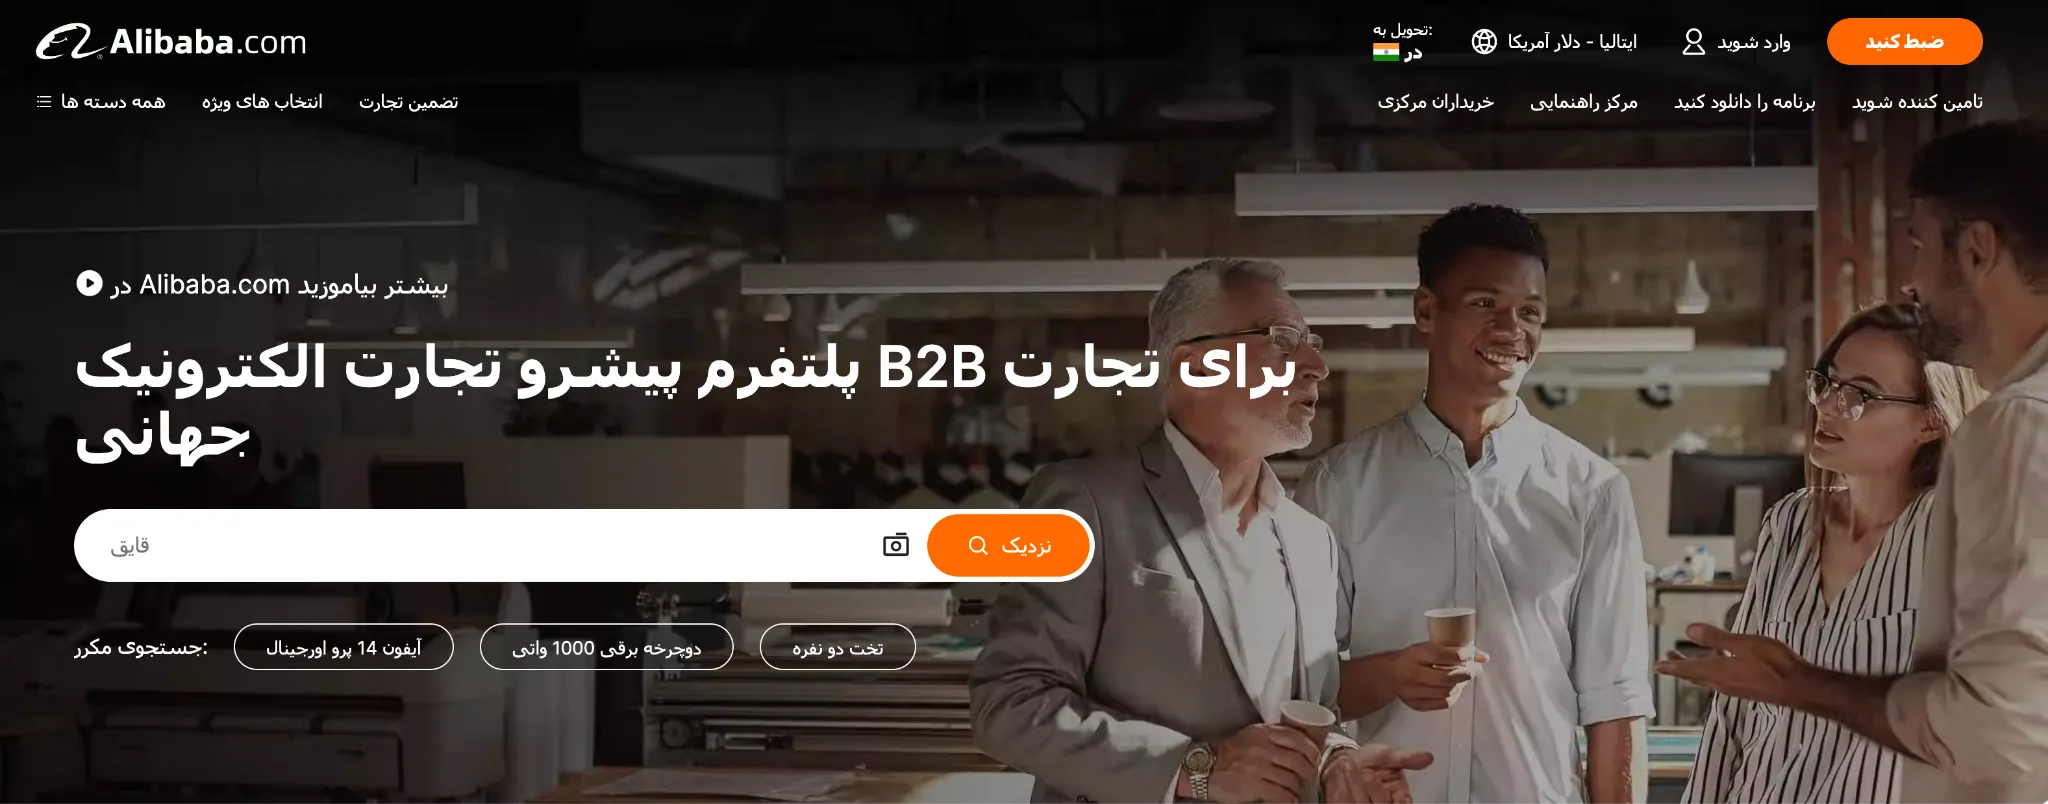
While it looks normal to us, the entire website reads wrong to a person who is used to reading from right to left.
For instance, the header should’ve been aligned on the right instead of left, the text inside the search bar should’ve been on the right and so on.
So, you need to flip your entire website to the opposite side to properly localize your website.
<script>
  import { dir } from './stores';
</script>

<div class:rtl={$dir === 'rtl'}>
  <!-- Component content -->
</div>

<style>
  div {
    padding-left: 20px;
  }
  .rtl {
    padding-left: 0;
    padding-right: 20px;
  }
</style>
Now, whenever the div has class rtl, the CSS will flip the page to fit the requirements.
Again, I’d like to remind you that these code snippets are simplistic samples and you’ll need to implement more robust solutions for your apps or websites.
4. Handle directional icons and images
I noticed that icons and images often needed to be mirrored in RTL layouts. My solution was to create separate components for LTR and RTL versions:
<script>
  import { dir } from './stores';
  import IconLTR from './IconLTR.svelte';
  import IconRTL from './IconRTL.svelte';
</script>

{#if $dir === 'rtl'}
  <IconRTL />
{:else}
  <IconLTR />
{/if}
5. Format numbers for RTL languages
Some RTL languages, like Persian, use different numerals. Here, Intl.NumberFormat came to my rescue:
const formatNumber = (number, locale) => {
  return new Intl.NumberFormat(locale).format(number);
};
As you can see, there’s more to RTL languages than just flipping text direction. It often required me to rethink my entire layout and user experience.
So, why would you need anything other than svelte-i18n?
You see, adding a new language requires you to create a new JSON file with the same key-value pairs for each language.
If the key changes in the code, the translation will not work for that section of your app and may even show the variable name as you can see on Alibaba’s homepage when translated to Italian.
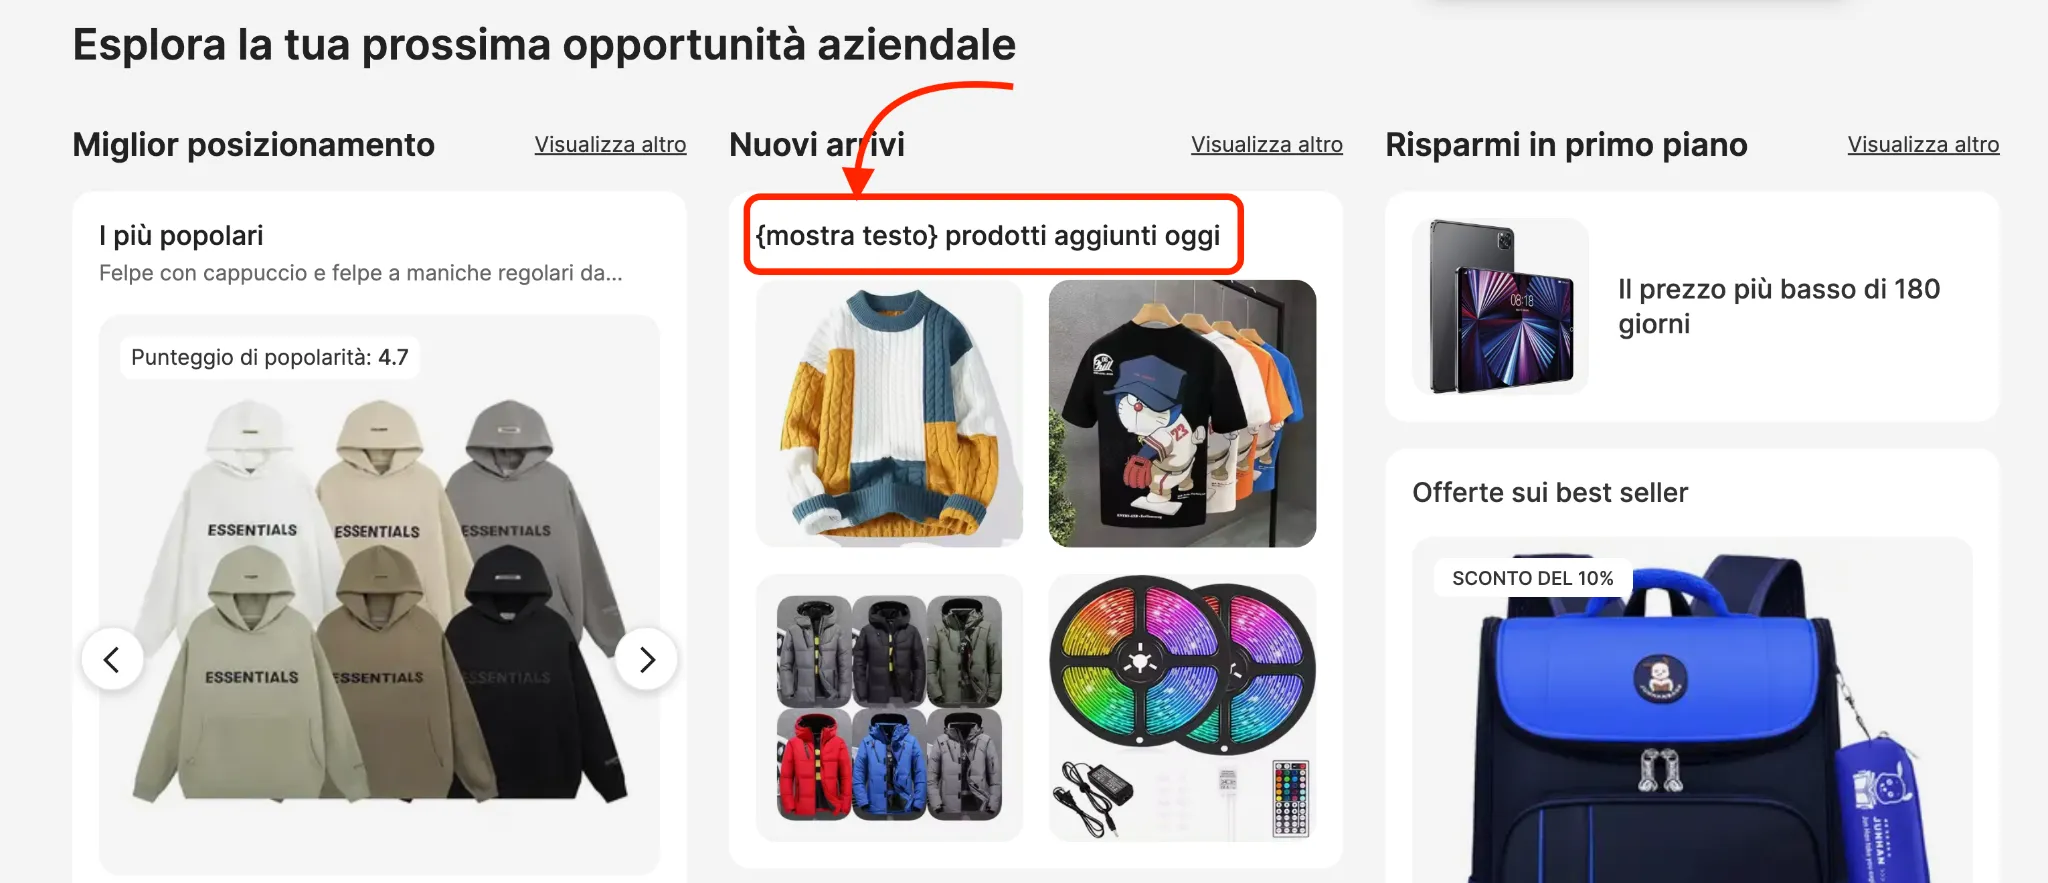
The English version says “109,000+ products added today”. The number is probably a key that was left untranslated causing it to show up on the website.
Consider how difficult it will be when every variable needs to be updated, every time you want to change or update something on your website.
It becomes extremely cumbersome extremely quickly.
How to make localization easy with Centus?
To overcome Svelte localization stumbles, try Centus.
Centus comes with CLI you can use to hand over strings to your language experts. They can translate and edit the strings in a simple web interface. And you can use it to manage the process.
Once the translations are ready, you can effortlessly sync them back to your project.
Let me show you how it works:
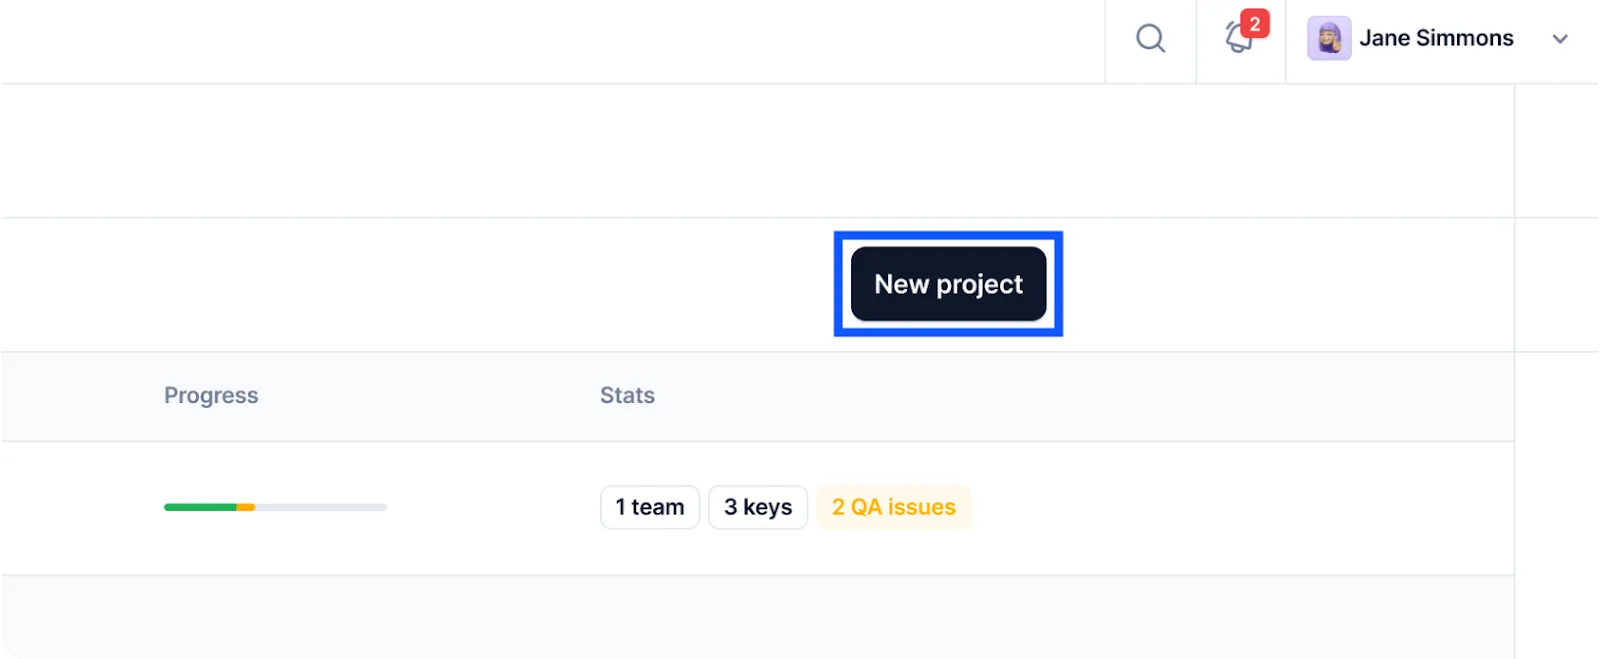
First, sign up to Centus and create a new project
Then, enter project details.
The name and base languages are up to you, but make sure to set Software as your project type.
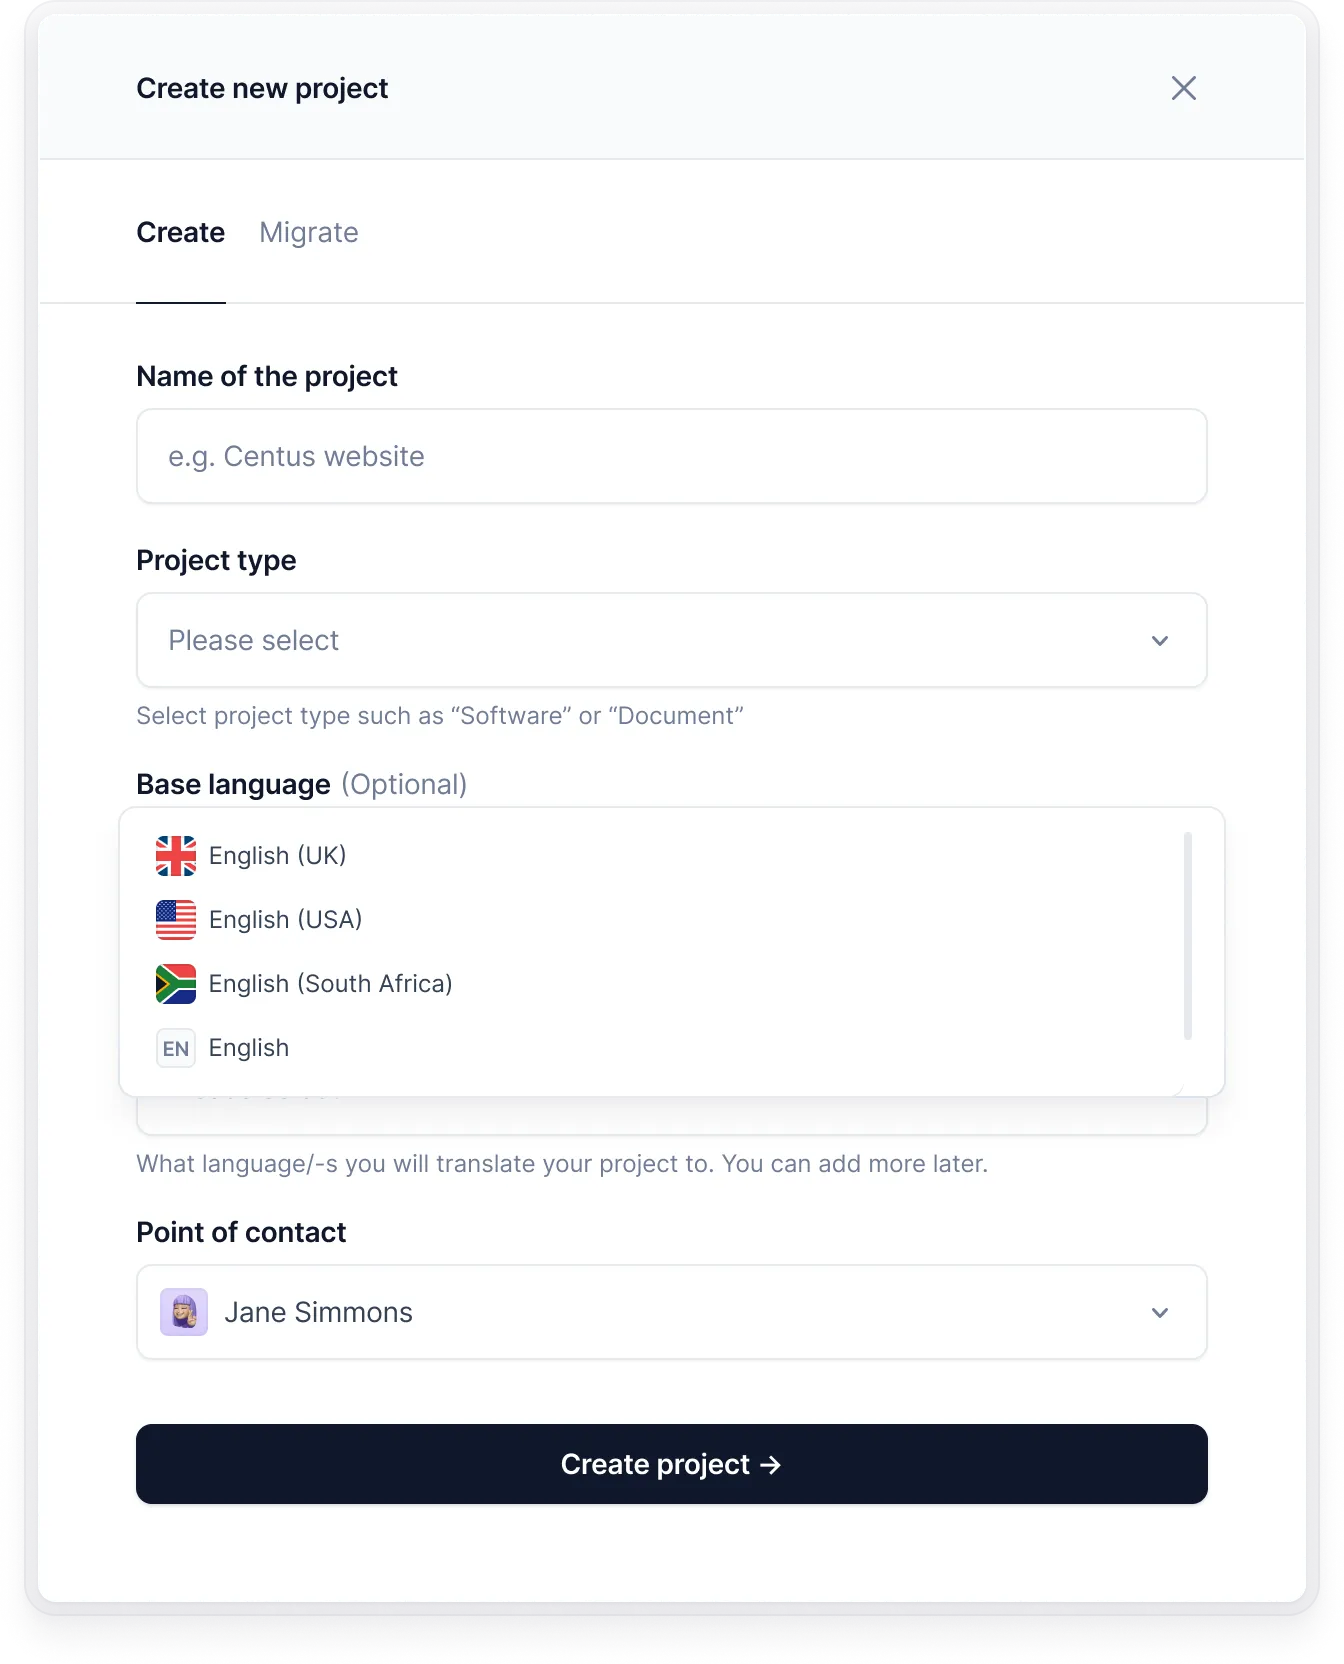
And there you go—your very first translation project in Centus.
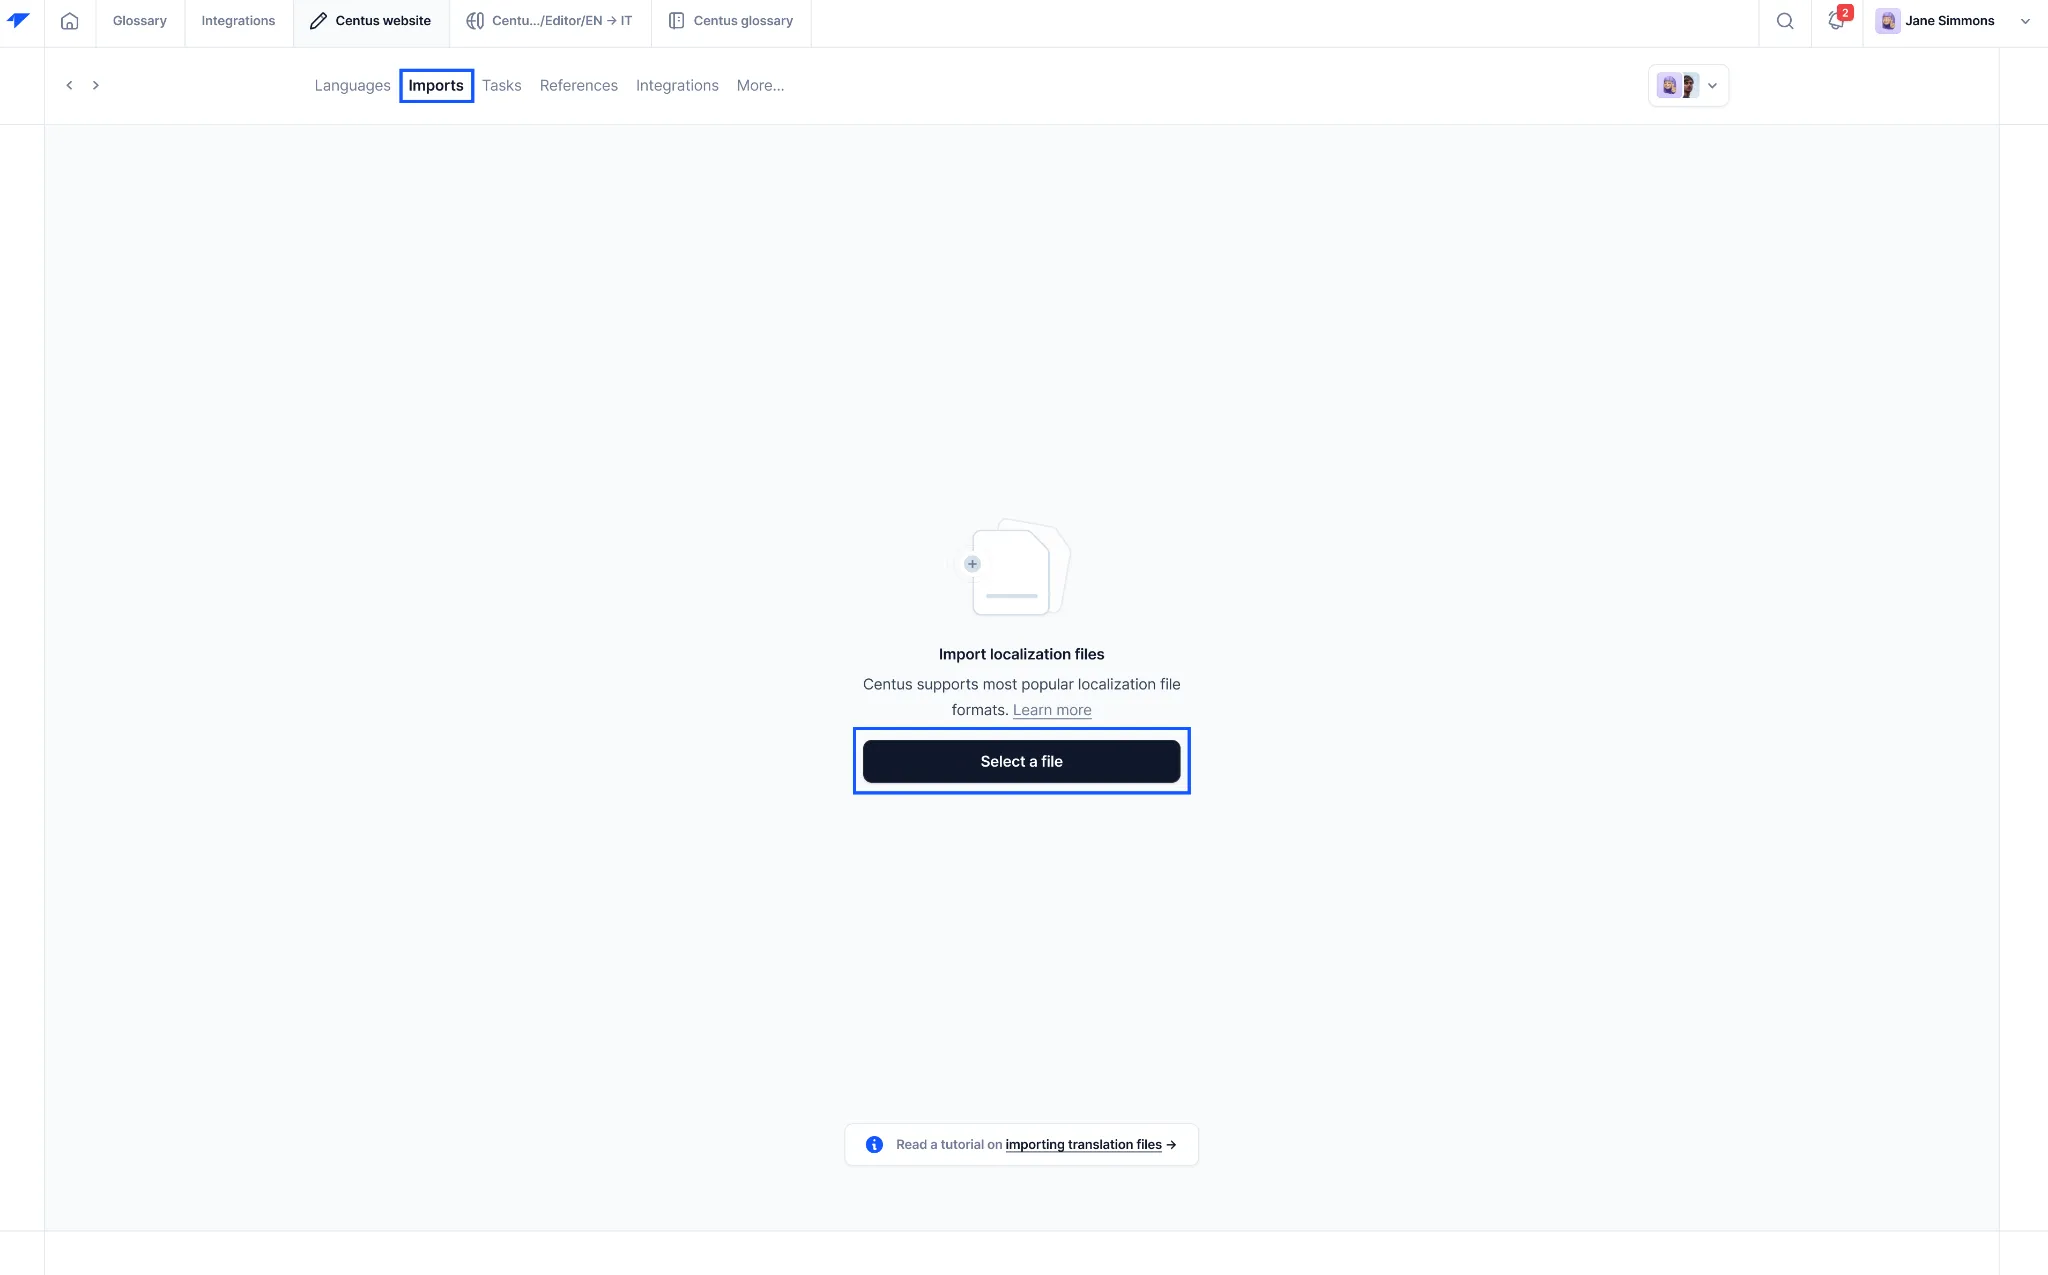
To add JSON files to the project, go to the Imports section and click Select a file.
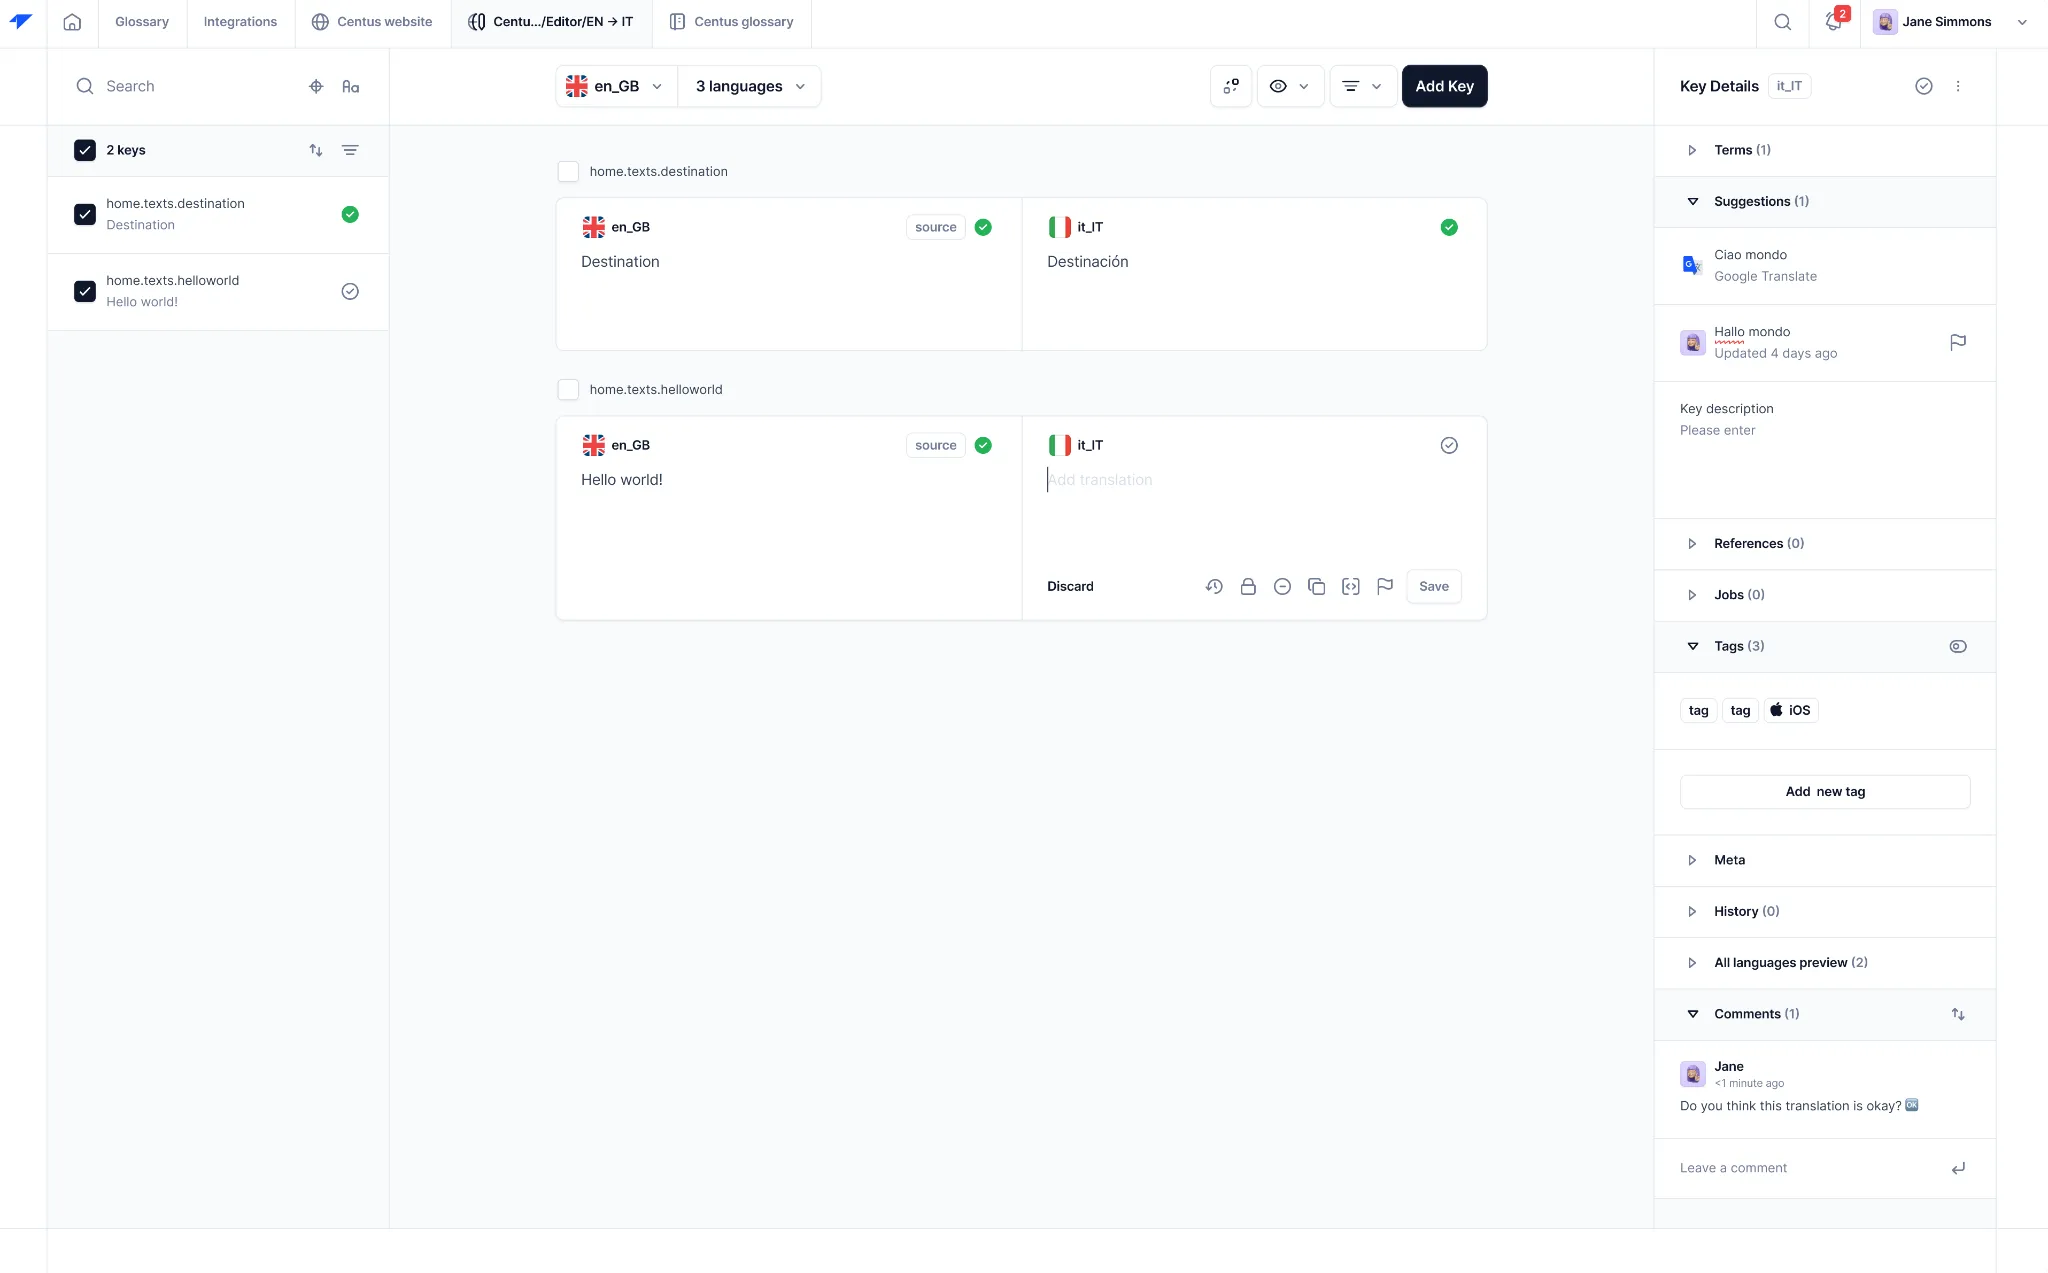
Now you should see your JSON file segmented into strings. Like this 👇
It’s time to hand over the project to language professionals. If you don’t have a freelance or in-house team yet, check Centus’ guide on how to find translators.
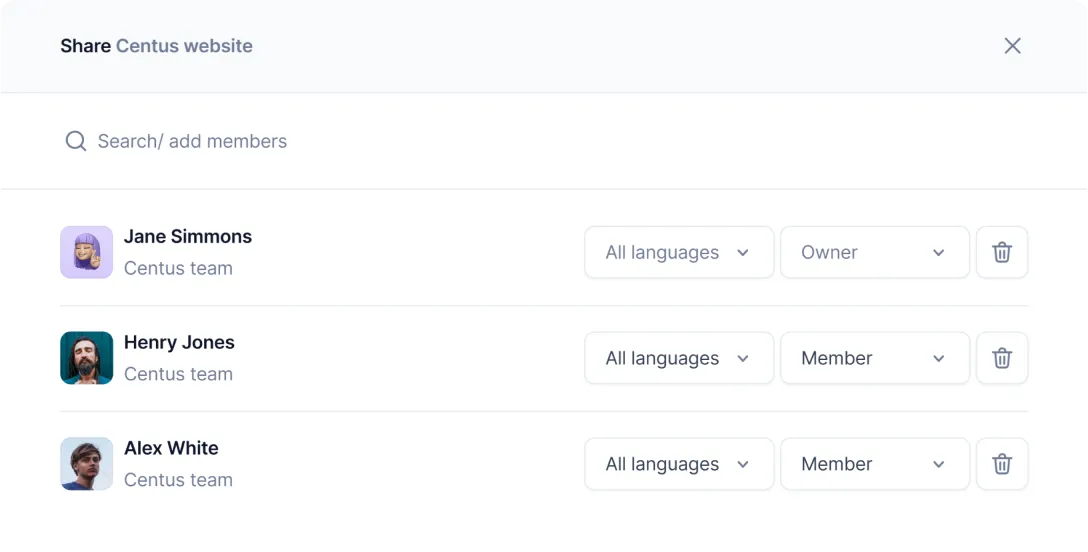
Once you have experts for your Svelte language translation project, head on to the Contributors section of the dashboard. There, click Add people and enter their details and roles.
You don’t want a 100% automatically generated Svelte translation. Because not a single translation engine can accurately translate ambiguous content.
Instead, ask your language professionals to batch translate the strings with Google Translate, DeepL translate, or Microsoft Translate and edit them manually.
Thus, you’ll save time and money, shipping your Svelte app much faster.
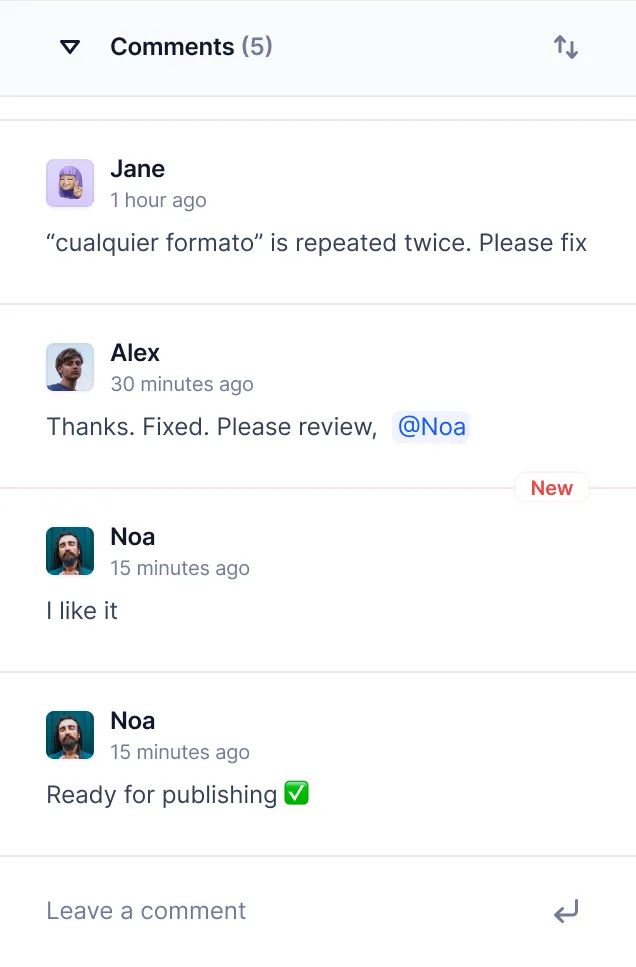
To avoid errors, add to your project editors who can review translated strings and leave comments.
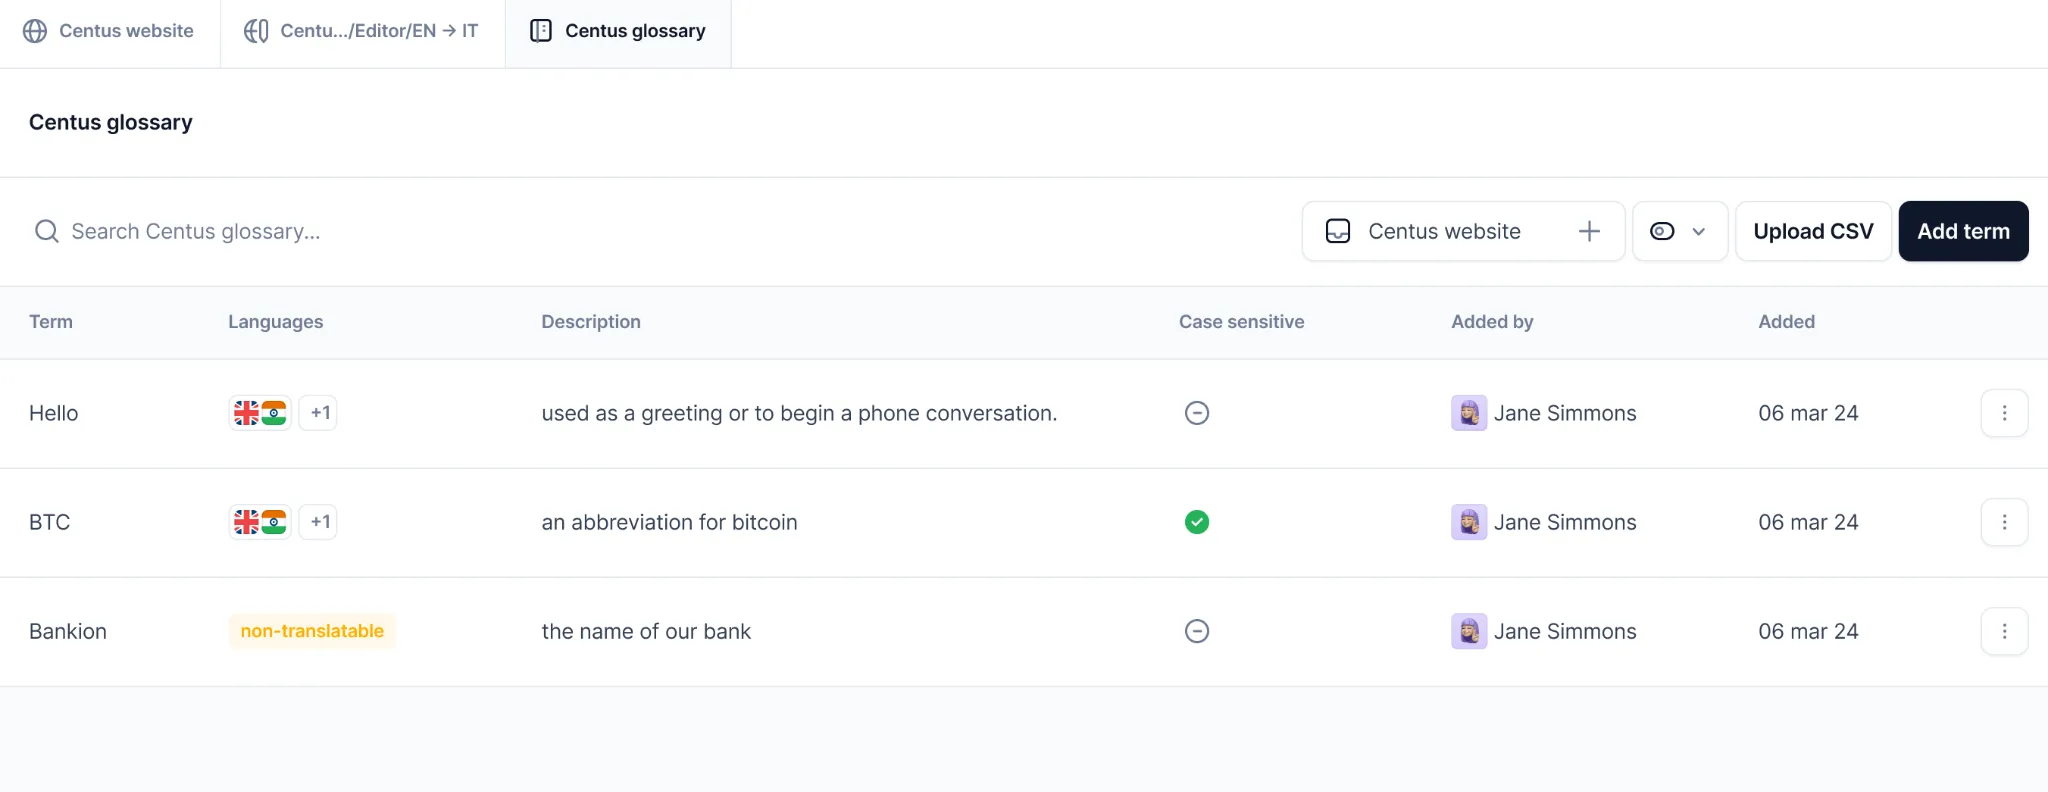
Another way to avoid errors is by using the Centus glossary. There, you can add descriptions for ambiguous strings helping your multilingual team translate them accurately.
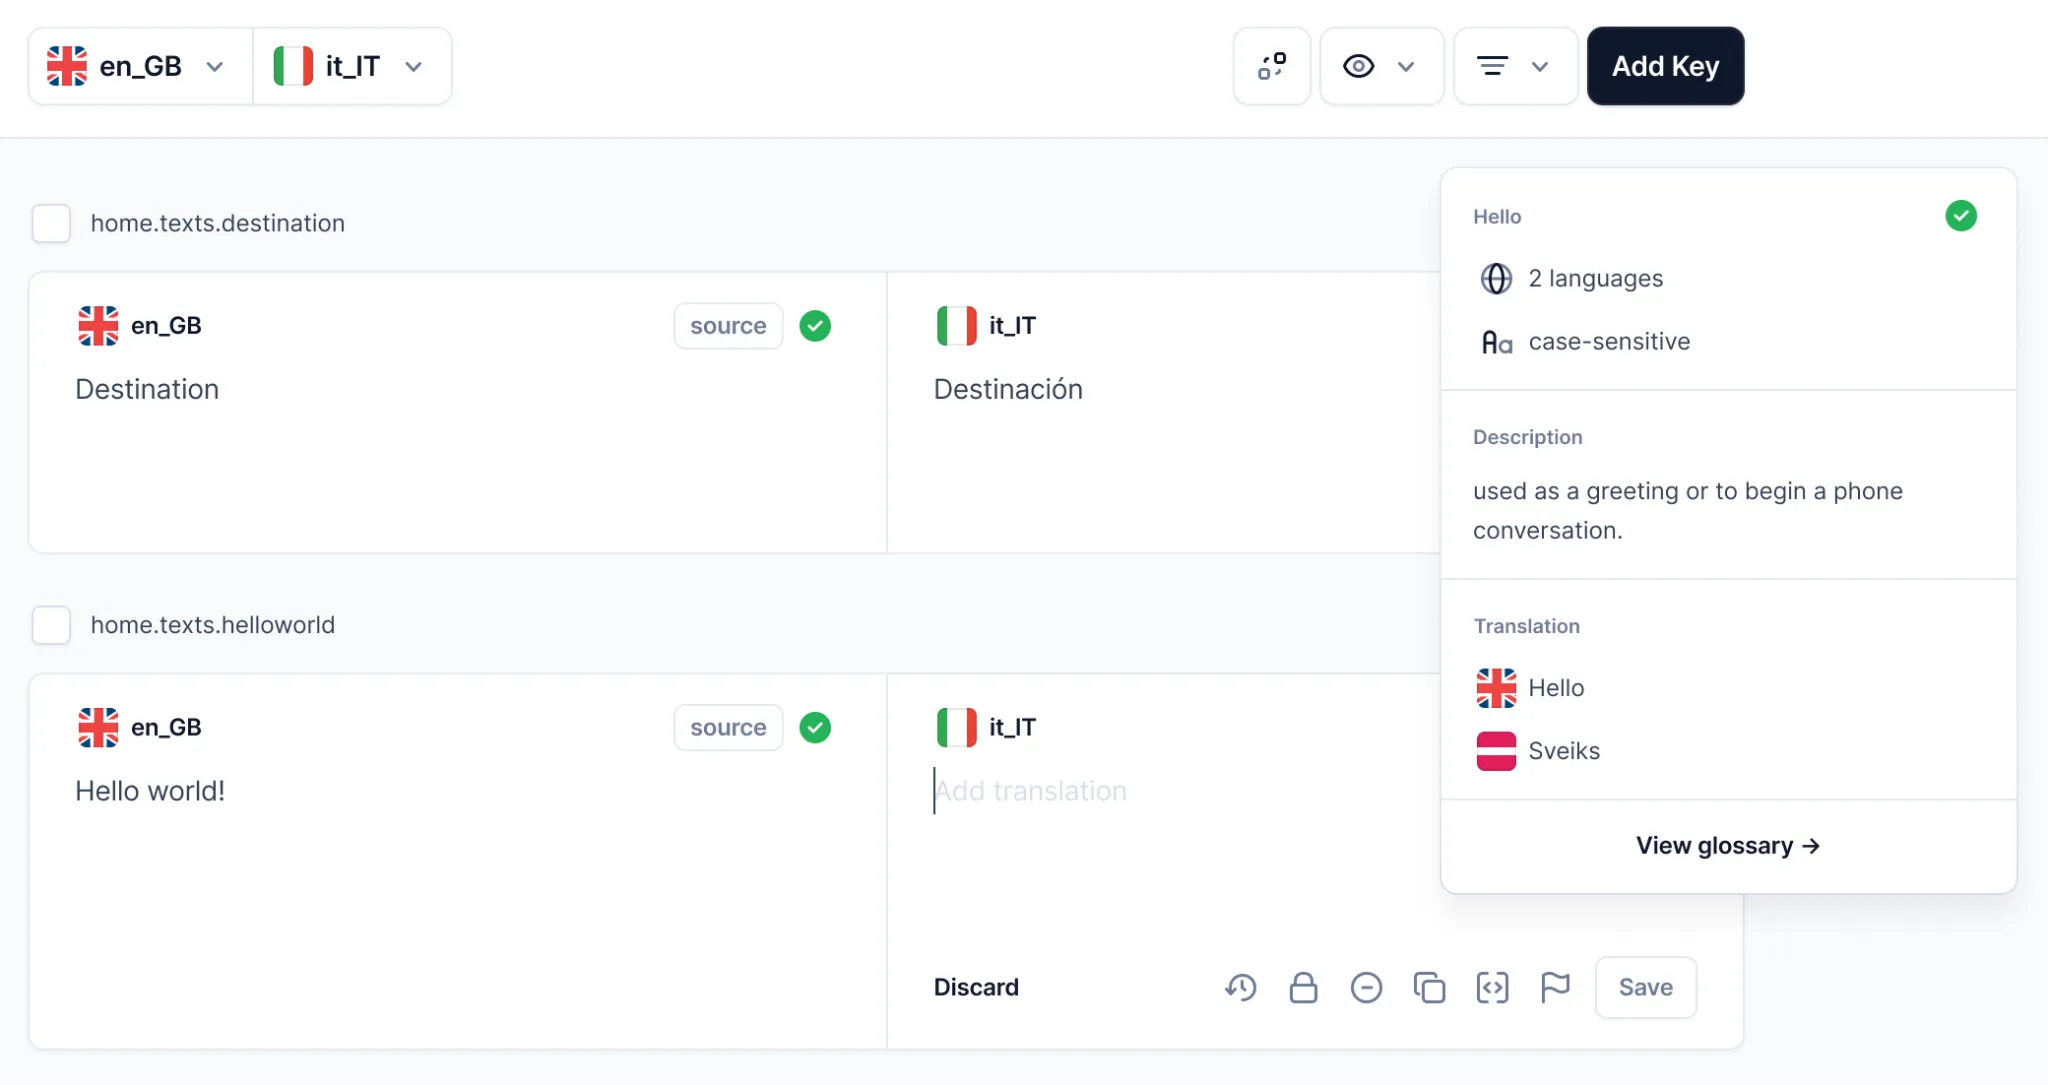
Later the string translations will appear as suggestions in the Editor:
But as discussed above, Svelte localization doesn’t stop at translation. Very often, you need to adjust your design too. Luckily, Centus has got you covered.
Working alongside designers, your editors can also ensure that translations fit the buttons.
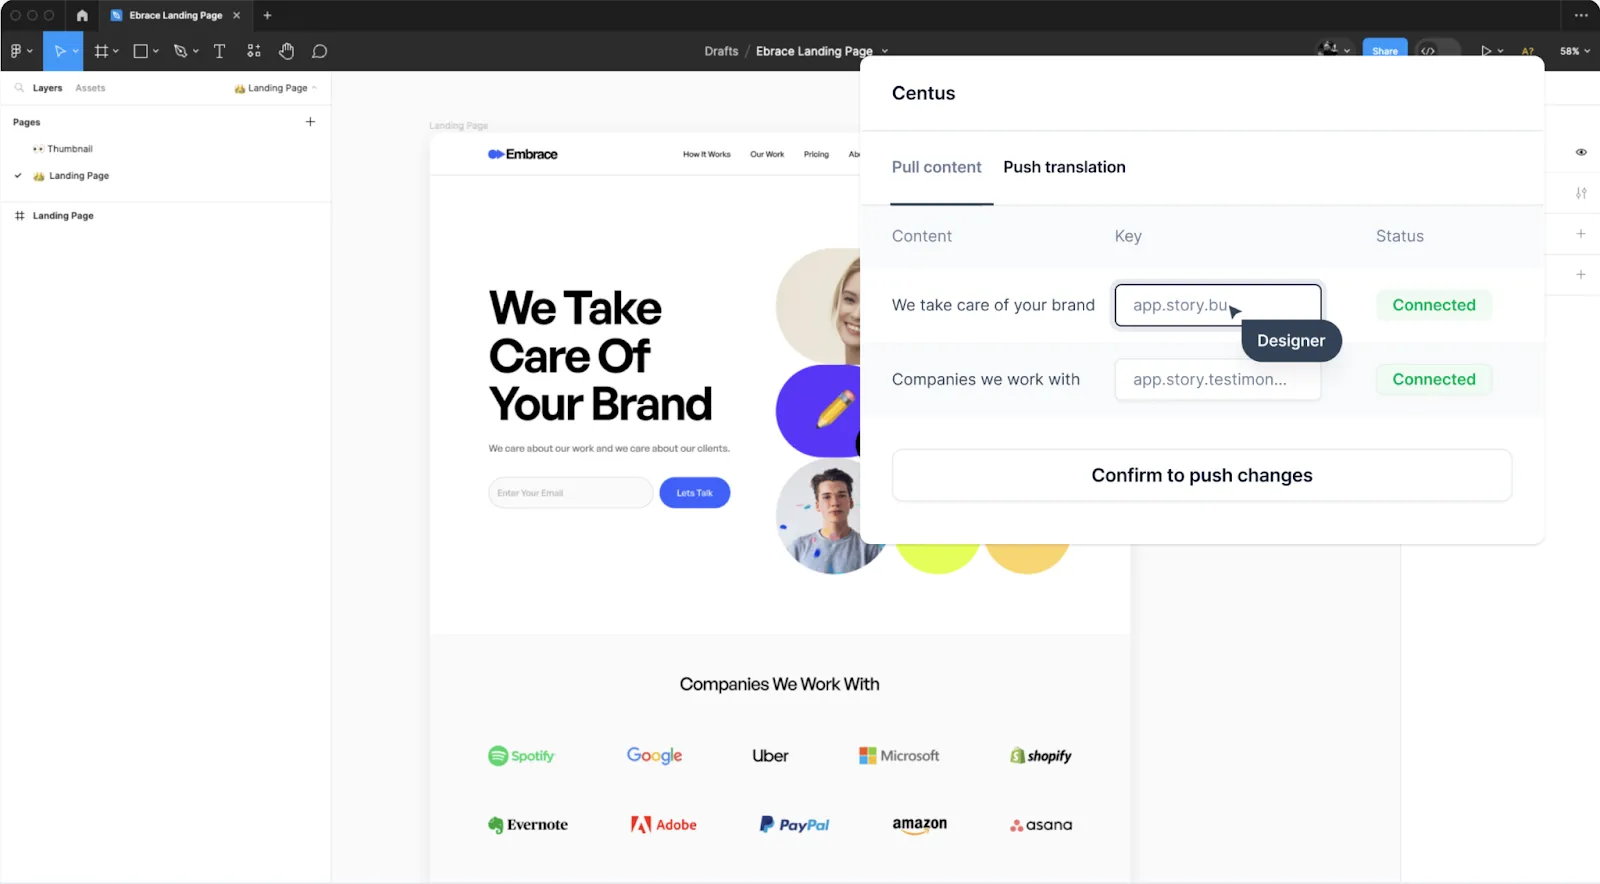
A simple way to do it is by using Centus plugin for Figma. The plugin automatically pulls translations to Figma so that you can avoid truncated or overlapping text.
When translations are ready, go to the Export section, There, choose languages, content, and file format.

Now click Download export.
That’s it! You can now merge the translated files.
Advanced localization techniques in Svelte
Okay, we've talked about the basics of using svelte-i18n to localize Svelte and working with RTL languages. It's not as simple as translating text and switching layouts, though.
Now let’s discuss advanced techniques that will help you become a better app localizer.
Formatting date and time
Localizing dates and time formats can be quite complex. Countries may use opposite formats and styles, and sometimes even completely different calendars. This adds another layer of complexity that you need to handle.
Luckily, Svelte’s localization handles these varying formats. The 'Intl.DateTimeFormat' API helps format dates and times based on the user's locale. Here's how:
const formatDate = (date, locale) => {
  return new Intl.DateTimeFormat(locale, {
    year: 'numeric',
    month: 'long',
    day: 'numeric'
  }).format(date);
};
Here, we wrote a "formatDate" function that accepts a "date" and a "locale" as its inputs in this example. The date is formatted using 'Intl.DateTimeFormat' per the chosen locale and settings.
You can customize the options to include time, weekday, or any other date/time components you need. For example:
const formatDateTime = (date, locale) => {
  return new Intl.DateTimeFormat(locale, {
    year: 'numeric',
    month: 'long',
    day: 'numeric',
    hour: 'numeric',
    minute: 'numeric',
    second: 'numeric',
    timeZoneName: 'short'
  }).format(date);
};
The formatted output from this 'formatDateTime' method gives us both the time components and the name of the time zone.
To use these functions in your Svelte components, all you have to do is import them and pass the right parameters:
<script>
  import { formatDate, formatDateTime } from './dateUtils';
  import { locale } from 'svelte-i18n';

  const currentDate = new Date();
</script>

<p>Date: {formatDate(currentDate, $locale)}</p>
<p>Date and Time: {formatDateTime(currentDate, $locale)}</p>
Pluralization
Languages have very different rules about how to use plural forms. One, two, few, many, and other plurals are written differently in some languages. It can be a pain to deal with these rules by hand.
The svelte-i18n package has built-in support for ICU message syntax pluralization. Let’s take a look at an example:
{
  "cart": {
    "itemCount": "{count, plural, =0 {No items} one {1 item} other {{count} items}}"
  }
}
In this translation file, we define a message for the cart.itemCount key. The message uses the plural keyword to specify different forms based on the count variable.
- If count is 0, the message will be "No items"
- If count is 1, the message will be "1 item"
- For any other value of count, the message will be "{count} items"
To use this in your Svelte component:
<script>
  import { _ } from 'svelte-i18n';
  export let itemCount = 0;
</script>

<p>{$_('cart.itemCount', { count: itemCount })}</p>
svelte-i18n will automatically choose the correct pluralization form based on the count value and the current locale.
Gender-specific translations
This concept may be difficult to grasp for English-only speakers. But let me try and put it in perspective.
Think of the word “Cupboard”.
Does it have a gender? You’d say “It is a cupboard” not “He is a cupboard”, right?
But if you have to use the same word in French, placard, it is a masculine noun and will be written as le placard. The “le” is the equivalent of “he” for objects.
Similarly, the word bottle doesn’t have a gender in English but in French, bouteille is a feminine noun that will be written as la bouteille where “la” is “she” or “her” for objects.
But it doesn’t stop there. In French, for example, adjectives and pronouns change based on the gender of the noun they refer to.
Imagine handling gender-specific translations manually. Luckily, you don’t have to.
Here's how you can handle this in your translations using the select keyword in svelte-i18n:
{
  "item": {
    "description": "{gender, select, masculine {Le {item} {color}} feminine {La {item} {color}} other {L'{item} {color}}}"
  }
}
In this example, the message for item.description has different forms based on the gender variable.
The select keyword selects the appropriate form and provides various options for "masculine", "feminine", and "other" values.
- If gender is "masculine", the message will be "Le {item} {color}"
- If gender is "feminine", the message will be "La {item} {color}"
- If gender is any other value, the message will be "L'{item} {color}"
To use this in your Svelte component:
<script>
  import { _ } from 'svelte-i18n';
  export let item = 'livre';
  export let color = 'rouge';
  export let gender = 'masculine';
</script>

<p>{$_('item.description', { item, color, gender })}</p>
Here, svelte-i18n will choose the correct gender based on the gender value and the selected locale.
But you must also have a similar setup for all the languages you support. It can get messy, and that’s why I sometimes think it’s better to move translations over to a dedicated translation management platform instead of handling them within your code.
Of course, you still have to implement the languages in the code. But it becomes much easier to add the language files rather than setting up the nuances of each language inside your code blocks.
Handling missing translations
Imagine what would happen if your users accidentally see a button that has the text “button.submit” instead of the appropriate word for submit in the selected language.
You may have all the checks in place, but you can’t always be sure that every single word has been translated. The codebase could be extremely large and disparate making it hard to verify every piece of the tool. Maybe you’re adding a piece of text dynamically and your translation team never saw the text leaving it with no translation files.
These cases can happen. But how you handle it can make the difference between a trustworthy app and a half-baked one.
With svelte-i18n, you can provide fallback values by using the fallbackLocale option in svelte-i18n. To provide fallback values, you can use the | | syntax in your translations:
{
  "greeting": "Hello, {name}! | | Hi there!"
}
In the above example, if someone’s name isn’t available, instead of printing {name} as we saw in the screenshot of Alibaba’s translated homepage your users will see the word “there”.
If you think adding fallback to each string is cumbersome, you can even set a fallback locale.
import { init } from 'svelte-i18n';

init({
  fallbackLocale: 'en',
  // ...
});
With this config, if the translation fails for any particular string, the code will show the English version.
Lazy loading translations
With new functionality, you’ll notice that your translation file sizes grow as well. Over time, this leads to a slow-loading app.
This is when you need to take advantage of Svelte’s lazy loading feature.
Instead of loading all translations in one go, Svelte’s svelte-i18n package helps you create dynamic imports. These files are conditionally imported based on the selected locale.
Lazy loading does a few things to improve your app’s user experience:
- You can support as many languages as you need without slowing your app
- Your user’s device will only download the language file that they need
- Your app continues to be snappy while also being accessible
To implement dynamic imports, you’ll need to update your svelte-i18n configuration like below:
import { register, init } from 'svelte-i18n';

register('en', () => import('./locales/en.json'));
register('es', () => import('./locales/es.json'));
register('fr', () => import('./locales/fr.json'));

init({
  fallbackLocale: 'en',
  // ...
});
Notice how instead of directly importing the JSON files, we’re using dynamic import functions**:**
() => import(...).
This tells svelte-i18n to load the translations “lazily” only when the specific locale is selected.
Now, in your Svelte components file, you need to use the waitLocale function and ensure the translations are loaded before rendering:
<script>
  import { _, waitLocale } from 'svelte-i18n';

  let loaded = false;

  waitLocale().then(() => {
    loaded = true;
  });
</script>

{#if loaded}
  <h1>{$_('title')}</h1>
  <p>{$_('description')}</p>
{:else}
  <p>Loading...</p>
{/if}
The waitLocale function returns a “promise” that resolves when the translations for the current locale are loaded. We then use this to conditionally render the component once the translations are ready to be displayed.
Automatic locale detection
While Svelte doesn’t have built-in locale detection, you can either use the svelte-i18n package with its getLocaleFromNavigator module or use Svelte navigator.language.
Let’s look at the implementation for both methods:
let detectedLocale = navigator.language || navigator.userLanguage;
As you can see, I first fetched the navigator.language property from the user’s web browser and have kept the userLanguage method as a fallback.
You can also use svelte-i18n that has a built-in locale detection method. Here’s what the implementation would look like:
import { init, getLocaleFromNavigator } from 'svelte-i18n';

init({
  fallbackLocale: 'en',
  initialLocale: getLocaleFromNavigator(),
});
Thing is, you can achieve the same functionality in both cases. If I’m already using the svelte-i18n package in my code, it makes sense to continue using the functionality provided.
However, if the app only needed the simple locale detection functionality and no other features of a full-fledged localization library, you can go with the first method.
Parting thoughts
I know, this can seem extremely tiring! Localization and internationalization add multiple layers of abstraction and can make things difficult for everyone involved.
But trust me, it is all worth it in the long run.
Your app is now accessible to people across different regions you’d otherwise not reach.
People engage better with the app and you also end up with more paying customers—thus helping you scale your app further.
So, don’t skimp on the localization efforts and just dive head-first into it.
As an experiment, I’d consider this a successful one and I’ll be playing with Svelte more in the future.
Hopefully, you now have a good grasp on creating translations and can also handle the various issues with RTL languages along with the different currency and number formats.
If you’re ready to start localizing your app, try Centus now and see how easy it can be!
Get the week's best content!
By subscribing, you are agreeing to have your personal information managed in accordance with the terms of Centus Privacy Policy ->
Keep learning

21 min. read
React App Localization and i18n: Advanced Guide

25 min. read
Vue i18n and Localization: How to Localize a Vue App

19 min. read
NextJS Internationalization: A Complete Walkthrough

23 min. read
Angular Localization and Internationalization (i18n) Guide

18 min. read
JavaScript Localization Guide for Web Apps
30 min. read