NextJS Internationalization: A Complete Walkthrough
As a developer, it’s easy to focus on the language dearest to your heart and nearest to your home.
Having developed apps for years, I’ve learned that many companies focused solely on a single locale, failing to internationalize their apps.
Big mistake.
Let me show you how to internationalize your NextJS app to open it to billions of potential users who don’t speak your language. I’ll provide concrete NextJS examples of localization to get you started in no time.
I’ve written similar localization guides for React, Vue, and Svelte apps, so you might want to check those out too.
Back already? Great—let’s dive in!
Why internationalization matters more than you think
While only 20% of people speak English worldwide, over 50% of web pages are in English.
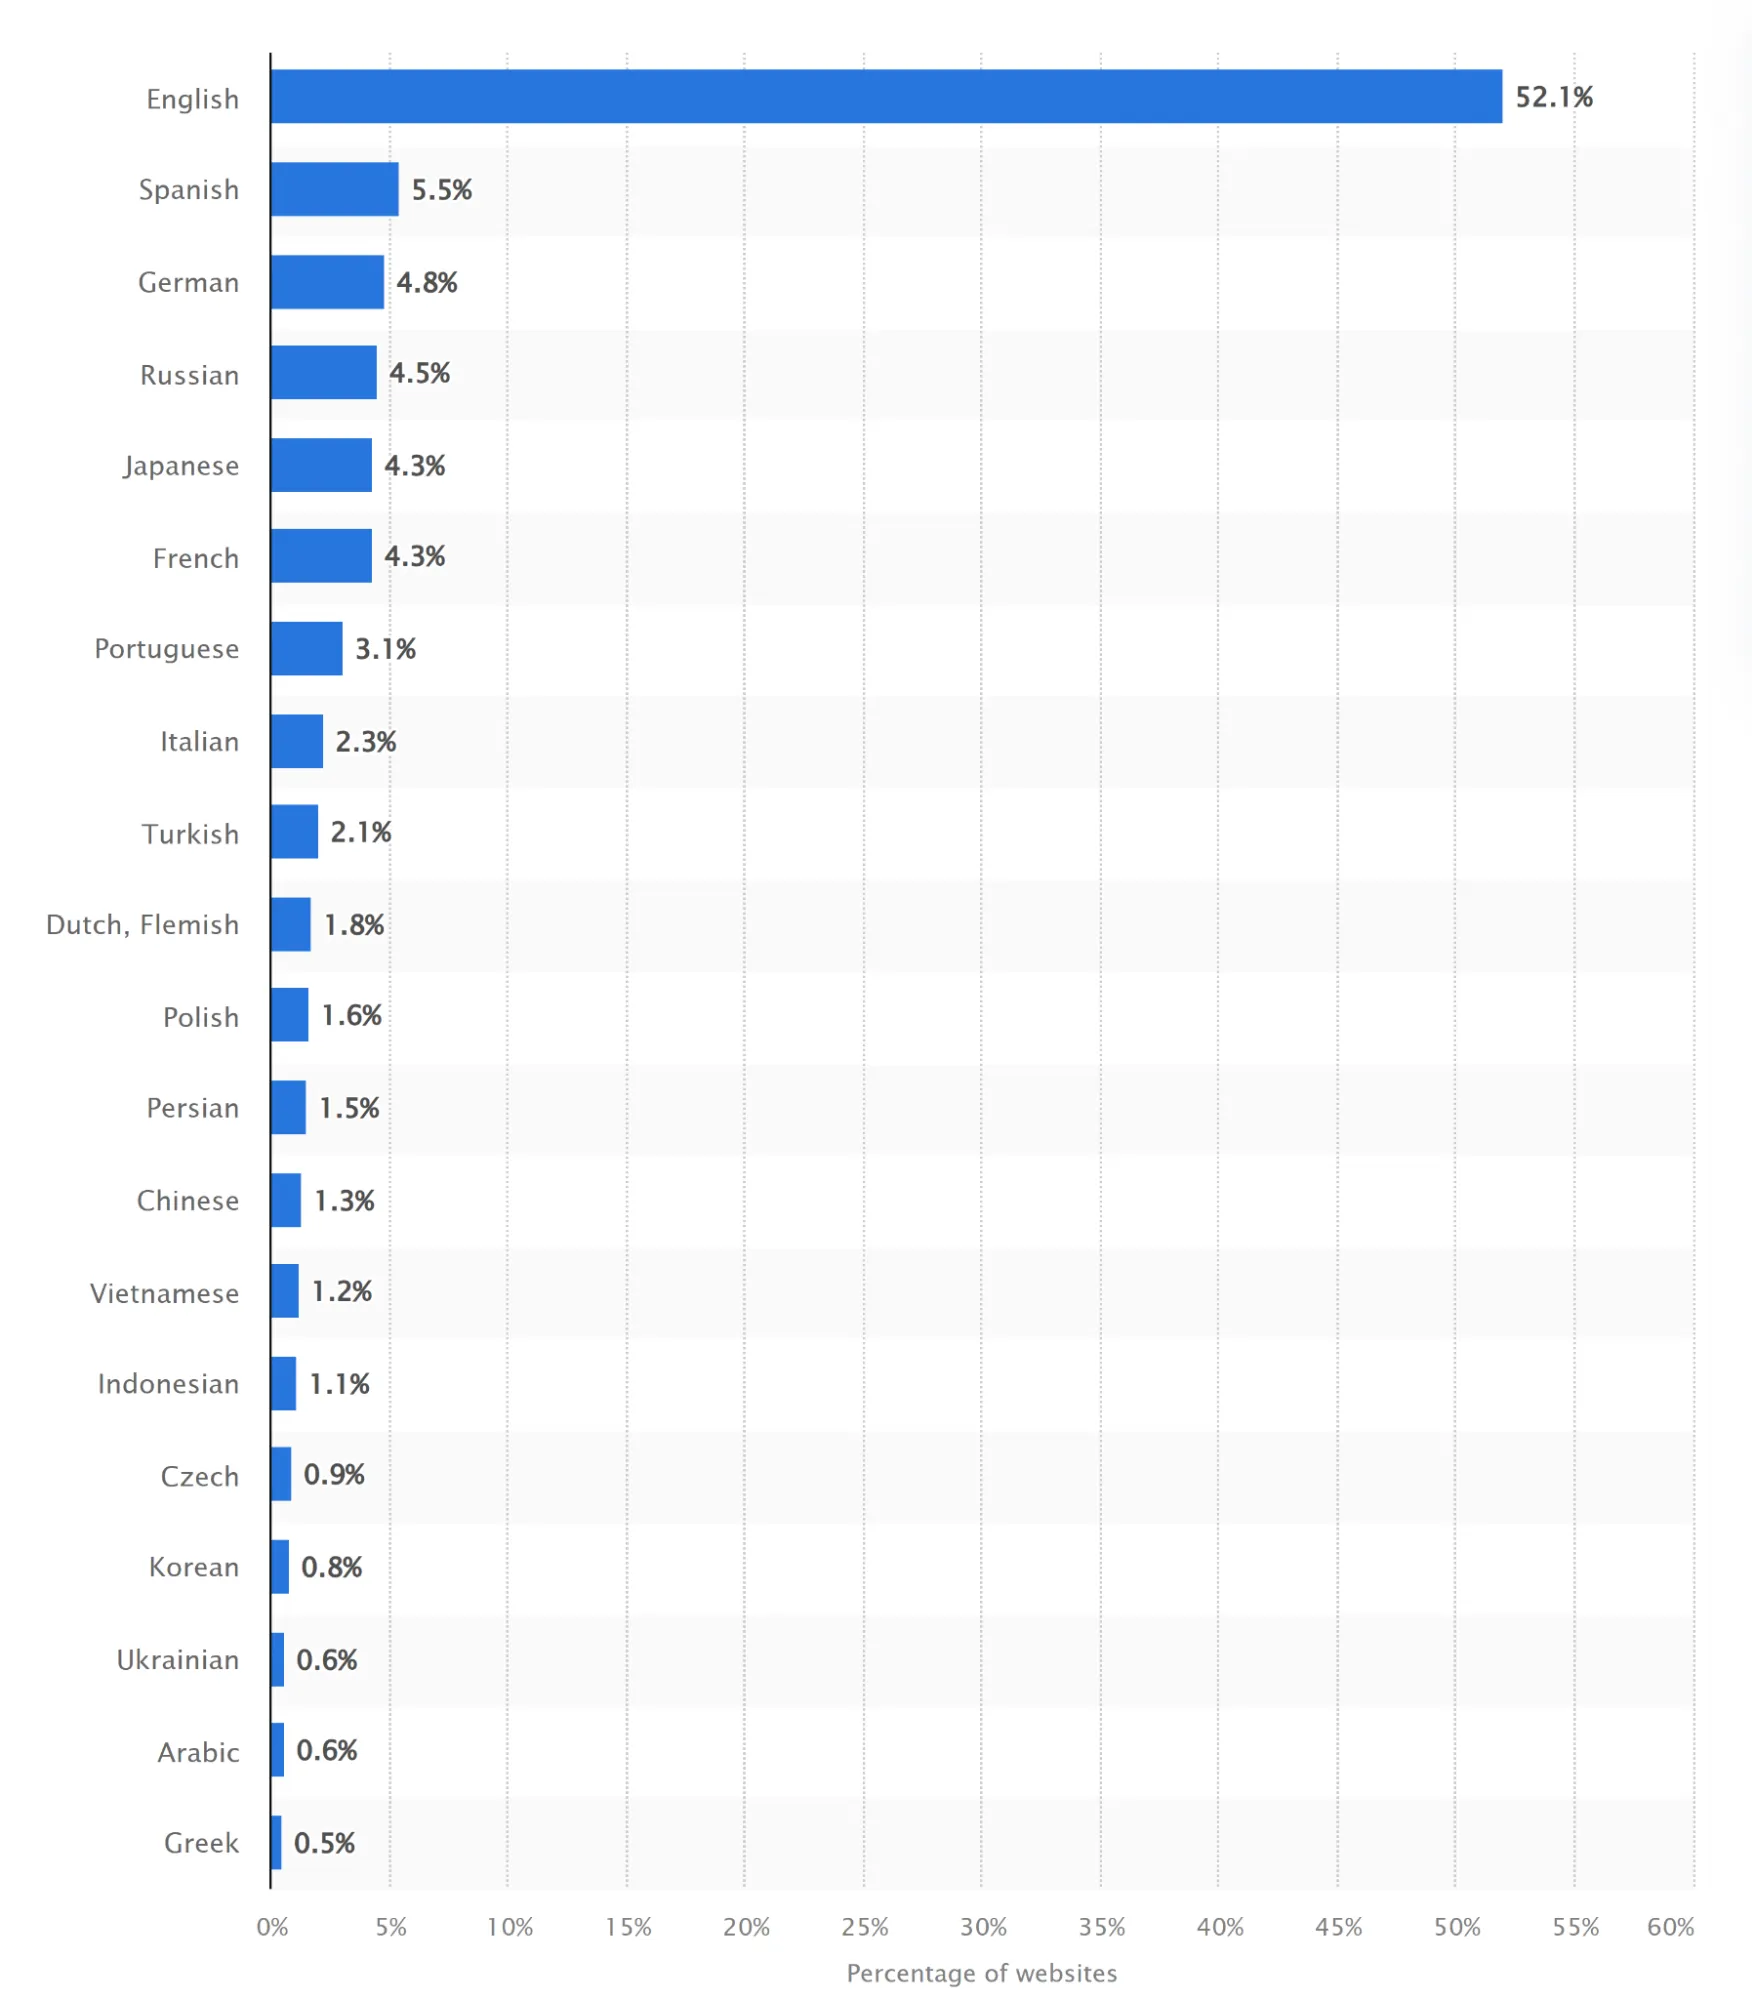
Source: Statista
That’s almost 4 in 5 people who cannot access more than 50% of the content available online.
This statistic was enough for me to start internationalizing my applications.
To be honest, localization seemed like a chore to me. However, the more I looked into it, the more I noticed how it brought in new users and kept them engaged.
And it’s not just about translating the words, but about ensuring that people feel at ease using your app.
If you also want your users to enjoy, and hopefully, love your app, let’s dive into the intricacies of NextJS internationalization.
A step-by-step guide to NextJS internationalization (i18n)
Now that you’ve decided to make your app available in multiple languages, let’s go over the NextJS i18n process.
After you’re done, you’ll have a multilingual and multicultural NextJS app ready to go live.
Step 1: Create a new NextJS app
First, I’ll use the create-next-app to create a new NextJS app. Open up a terminal and enter:
npx create-next-app@latest nextjs-i18n-demo
Here's the terminal output:
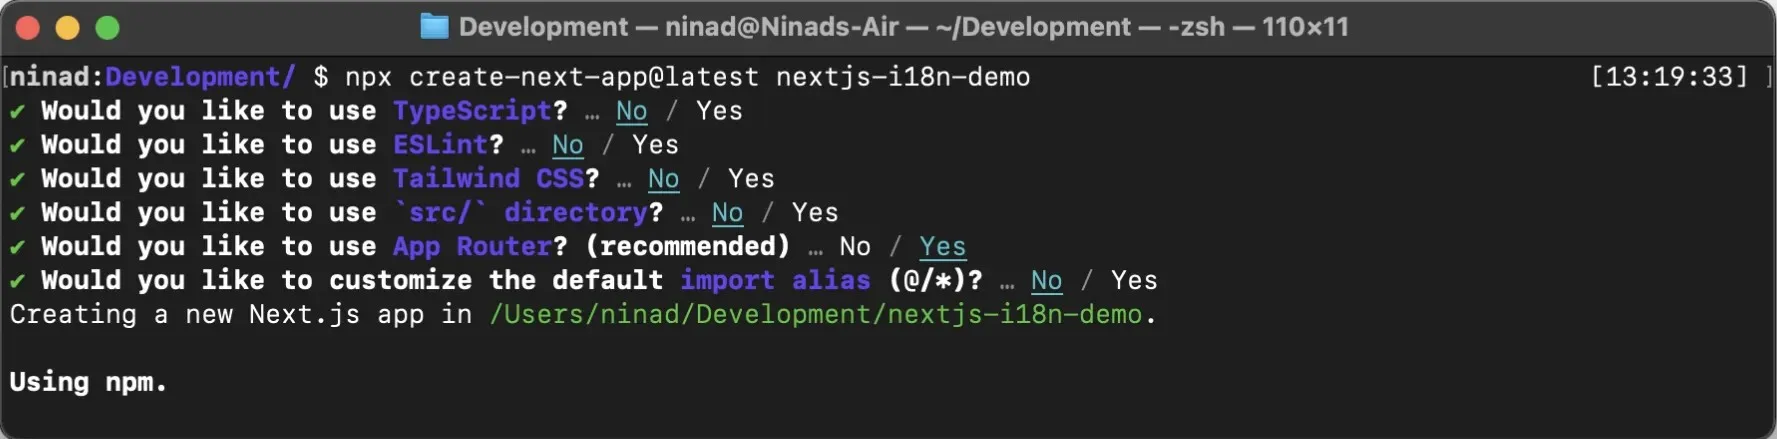
I’ve selected No for pretty much all the options except for using the App Router. We’ll talk a bit more about routing types later. But once this command is done, it will add all the required files in the nextjs-i18n-demo directory to give you a basic NextJS app.
Once it’s ready, cd into the directory:
cd nextjs-i18n-demo
And the app is ready to be run as a test. So let’s do just that.
Step 2: Run the app locally and clean up the directory
The app won’t do much right now, but let’s run it to ensure we’ve set everything up correctly.
Run the below command while you’re inside the project directory.
npm run dev
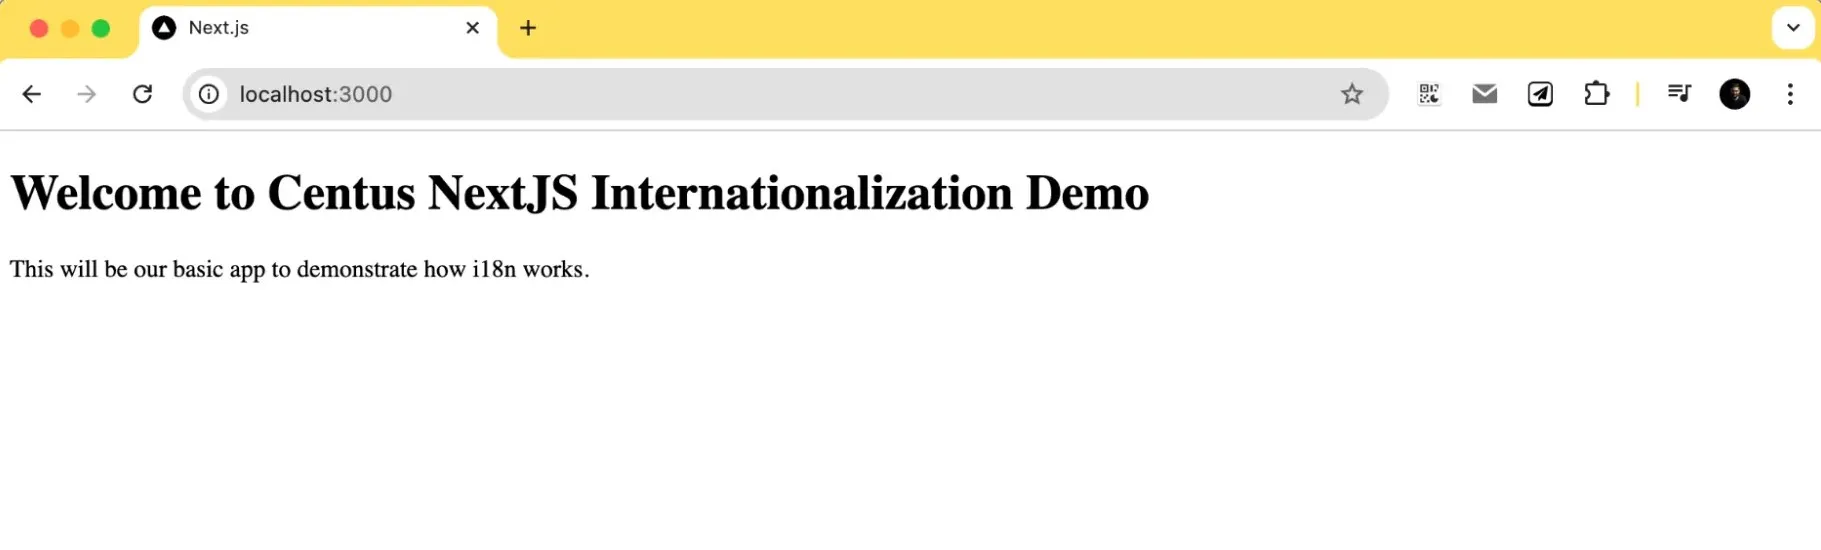
You should see a Welcome page on localhost:3000 if the app runs successfully.
If that worked, great! Let’s clean up the directory and make it ready for some actual code.
Delete everything in the app folder and create a simple page.js file with the following code:
// app/page.js

export default function Home() {
  return (
    <div>
      <h1>Welcome to Centus NextJS Internationalization Demo</h1>
      <p>This will be our basic app to demonstrate how i18n works.</p>
    </div>
  );
}
With this done, the index.js will be a simple page with a header and paragraph. If you now rerun the npm run dev command, your page should be updated with the new content.
I’m using the page.js file as the base for all our NextJS translations.
However, if you’re working with an existing app, you can follow the steps below while adjusting for file names and structure as per your app.
Step 3: Install internationalization libraries
Alright, let’s move on to other critical steps of Next.JS internationalization. The library you pick will need to support the routing system. Let me give you a quick brief.
What are Next.js routers and why we’re choosing next-intl
There are a few libraries like, next-intl, i18next, react-i18next that you could use. It depends on what routing system you use–App routing or Page routing.
Pages Router
-
Located in the pages/ directory.
-
Uses file-based routing where each file corresponds to a route.
-
Well-supported by libraries like i18next and next-i18next (ho
App Router
-
Introduced in Next.js 13, located in the app/ directory and recommended by NexJS devs
-
Supports advanced features like React Server Components and nested layouts.
-
Offers improved performance and scalability.
-
Perfect for the library we’re using — next-intl
Note: I’m using next-intl for two reasons: first, it’s extremely popular, and second, it’s easier to implement compared to many other libraries.
So let’s install the library and move to the next steps:
npm install next-intl
We’re now ready to move to the next steps now.
Step 4: Configuring next-intl for translations and internationalization
This library works with the help of a middleware that handles the text translations during runtime. So, I’ll create a middleware.js file in the root of our project.
// middleware.js

import createMiddleware from 'next-intl/middleware';

export default createMiddleware({
  // A list of all locales that your application supports
  locales: ['en', 'es', 'fr'],
  // The default locale
  defaultLocale: 'en'
});

export const config = {
  // Skip all paths that should not be internationalized
  matcher: ['/((?!api|_next|.*\\..*).*)']
};
This file intercepts requests and determines the user's locale based on the URL or browser settings.
We also need a next.config.js file to set up the next-intl library. If you don’t have this file, create it in the root of your project and add the following code:
// next.config.js

const withNextIntl = require('next-intl/plugin')();

/** @type {import('next').NextConfig} */
const nextConfig = {};

module.exports = withNextIntl(nextConfig);
If you rerun your server now, you should see a 404 error but you’ll also notice that the default URL auto-redirects to localhost:3000/en instead of just localhost:3000/.
That means you’re good to proceed!
Step 5: Create the translation files
I’ll now move to creating the NextJS translation files to work with our app. Let’s create a messages directory in the project root with JSON files for each locale.
mkdir messages
touch messages/en.json messages/es.json messages/fr.json
Now let’s add translations to each of these JSON files.
To improve organization for for long-term maintainability, I’m nesting the translations under the “homepage” key. This will make it simpler to add new pages and translations without mixing them up later down the line.
messages/en.json
{
    "homepage": {
        "welcomeMessage": "Welcome to Centus NextJS Internationalization Demo",
        "description": "This will be our basic app to demonstrate how i18n works.",
        "changeLanguage": "Change Language"
    }
}
messages/es.json
{
    "homepage": {
        "welcomeMessage": "Bienvenido al Demo de Internacionalización de NextJS de Centus",
        "description": "Esta será nuestra aplicación básica para demostrar cómo funciona i18n.",
        "changeLanguage": "Cambiar idioma"
    }
}
messages/fr.json
{
    "homepage": {
        "welcomeMessage": "Bienvenue dans la démo d'internationalisation NextJS de Centus",
        "description": "Ceci sera notre application de base pour démontrer comment fonctionne i18n.",
        "changeLanguage": "Changer de langue"
    }
}
Each of these messages directly corresponds to the individual text elements in our app.
I know it seems cumbersome, and that’s also why people tend to use a translation management system (TMS). But more on that later.
For now, let’s move on to the next step, that is, implementing these translations in our app.
Step 6: Using these translations in our app
Okay, you followed through and have all these app files floating around. But the app still shows a 404.
That’s because while we implemented a dynamic route, we haven’t actually implemented that in our app. So let’s do just that. Before you proceed, just ensure that your directory structure looks something like this:
Now, create a directory named [locale] inside your app directory and move all the files into it. The new directory structure should look something like this:
Note: Do not substitute the directory name [locale] with the actual locales. I'm using this name so that NextJS recognizes the individual locales as dynamic route parameters.
After this is done, your app will no longer show a 404. Instead, it’ll be back to displaying content from the page.js file.
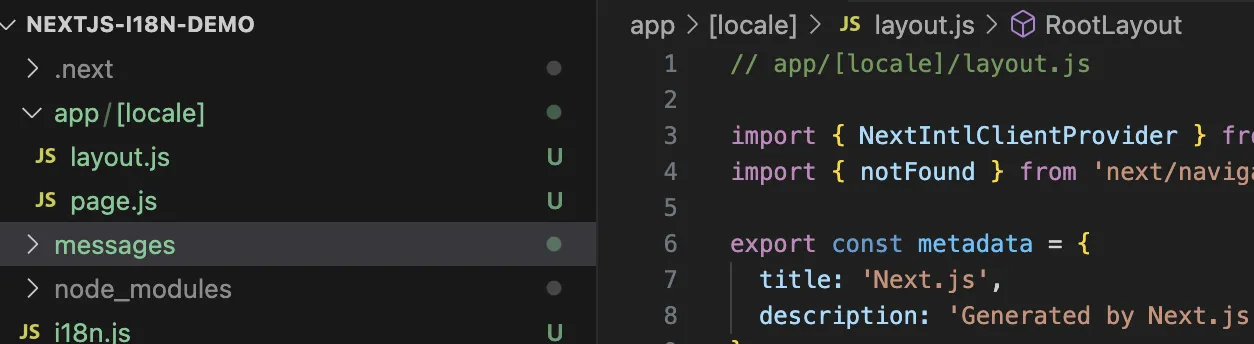
Step 7: Update the layout.js and page.js files to use translations
We’ll now update the layout.js file to wrap our app with the NextIntlProvider. Replace the code in the existing layout.js file (or create a new file if it doesn’t exist):
// app/[locale]/layout.js

import { NextIntlClientProvider } from 'next-intl';
import { notFound } from 'next/navigation';

export const metadata = {
 title: 'Next.js',
 description: 'Generated by Next.js',
};

export default async function RootLayout({ children, params: { locale } }) {
 let messages;
 try {
   messages = (await import(`../../messages/${locale}.json`)).default;
 } catch (error) {
   notFound();
 }

 return (
   <html lang={locale}>
     <body>
       <NextIntlClientProvider locale={locale} messages={messages}>
         {children}
       </NextIntlClientProvider>
     </body>
   </html>
 );
}
And then, we also need to replace the hardcoded text in our code with the variables that next-intl can use for translating text.
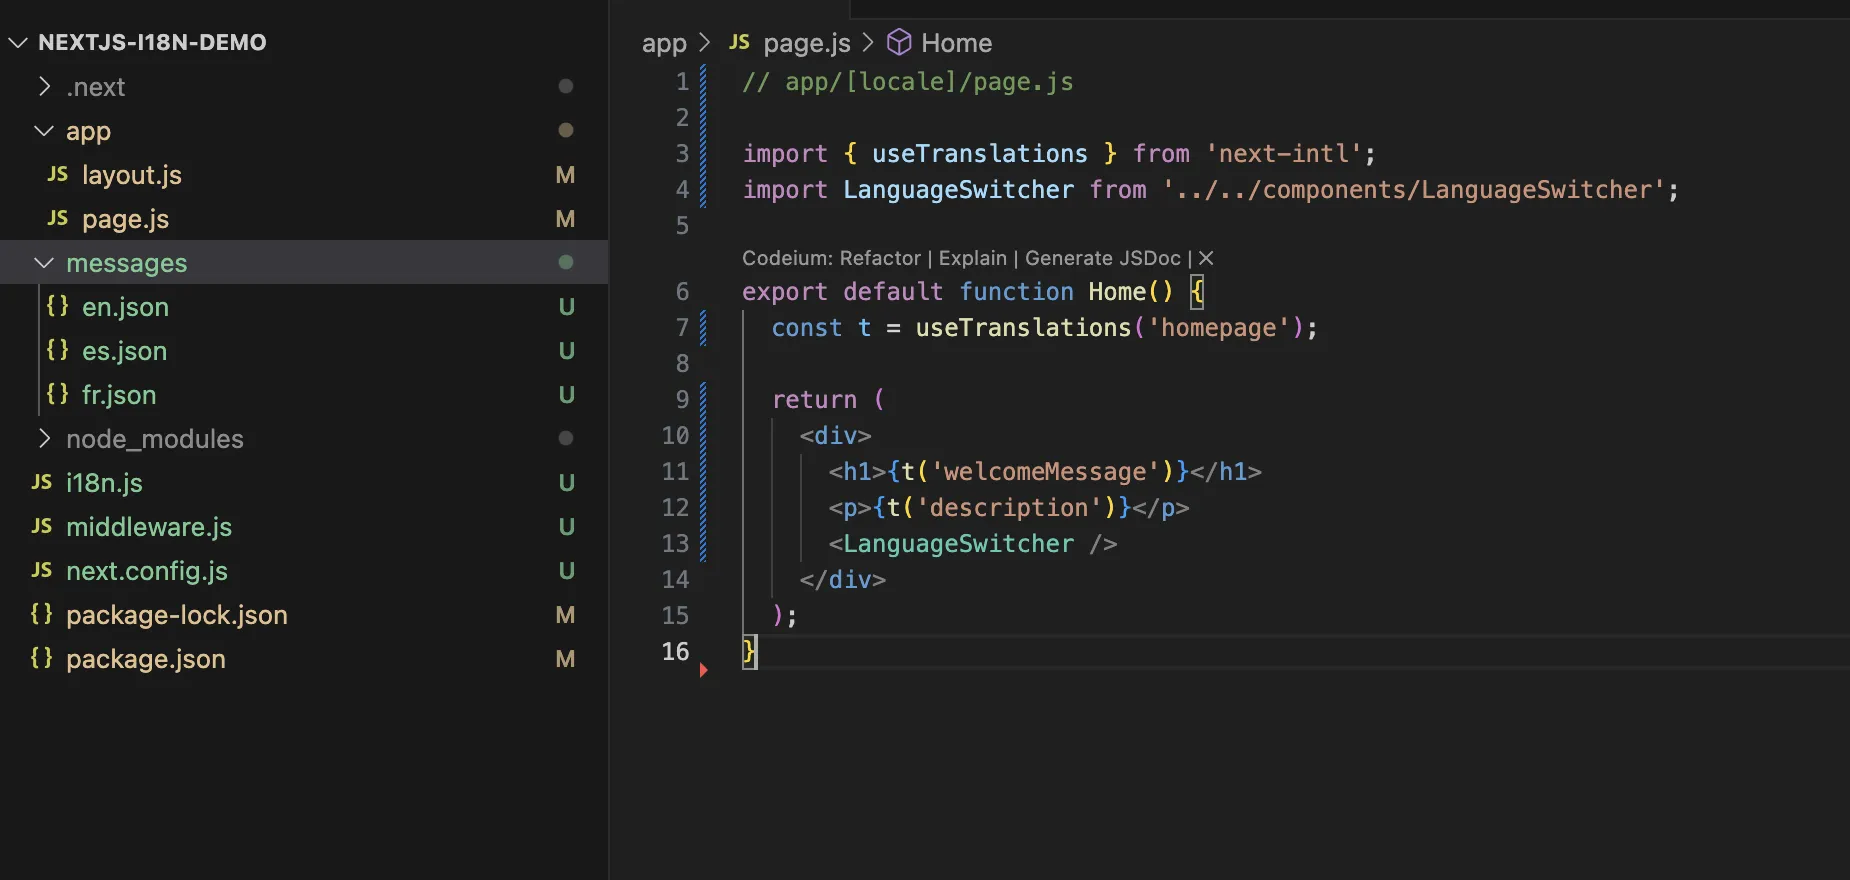
// app/[locale]/page.js

import { useTranslations } from 'next-intl';
import LanguageSwitcher from '../../components/LanguageSwitcher';

export default function Home() {
  const t = useTranslations('homepage');

  return (
    <div>
      <h1>{t('welcomeMessage')}</h1>
      <p>{t('description')}</p>
      <LanguageSwitcher />
    </div>
  );
}
Replace the code in our existing page.js file with the code above. You’ll also notice I’ve added the LanguageSwitcher tag. If we run the npm server now, the page will show an error because I haven’t implemented the language switcher yet.
So let’s do that!
Step 7: Implement the language switcher to use the selected locale
I’m going to add a simple dropdown with the list of locales that a user can pick from and our app will automatically switch the language.
Create a components folder in the root directory. Then, add a LanguageSwitcher.js file with the below code:
// components/LanguageSwitcher.js

'use client';

import { useRouter } from 'next/navigation';
import { useLocale } from 'next-intl';

export default function LanguageSwitcher() {
  const router = useRouter();
  const locale = useLocale();

  const handleChange = (e) => {
    const newLocale = e.target.value;
    router.push(`/${newLocale}`);
  };

  return (
    <select onChange={handleChange} value={locale}>
      <option value="en">English</option>
      <option value="es">Español</option>
      <option value="fr">Français</option>
    </select>
  );
}
We're just creating a few drop-down options with the locales hardcoded in. Each locale has a value assigned that corresponds to the locale JSON file so when the URL is updated using router.push(`/${newLocale}, it will fetch the required text.
You can also dynamically generate them by pulling the locale names from the directory if you plan to add many languages in the future. However, for our purpose, this should suffice.
Now, if you’ve followed through all of this correctly, you should have a dropdown with the three languages listed.
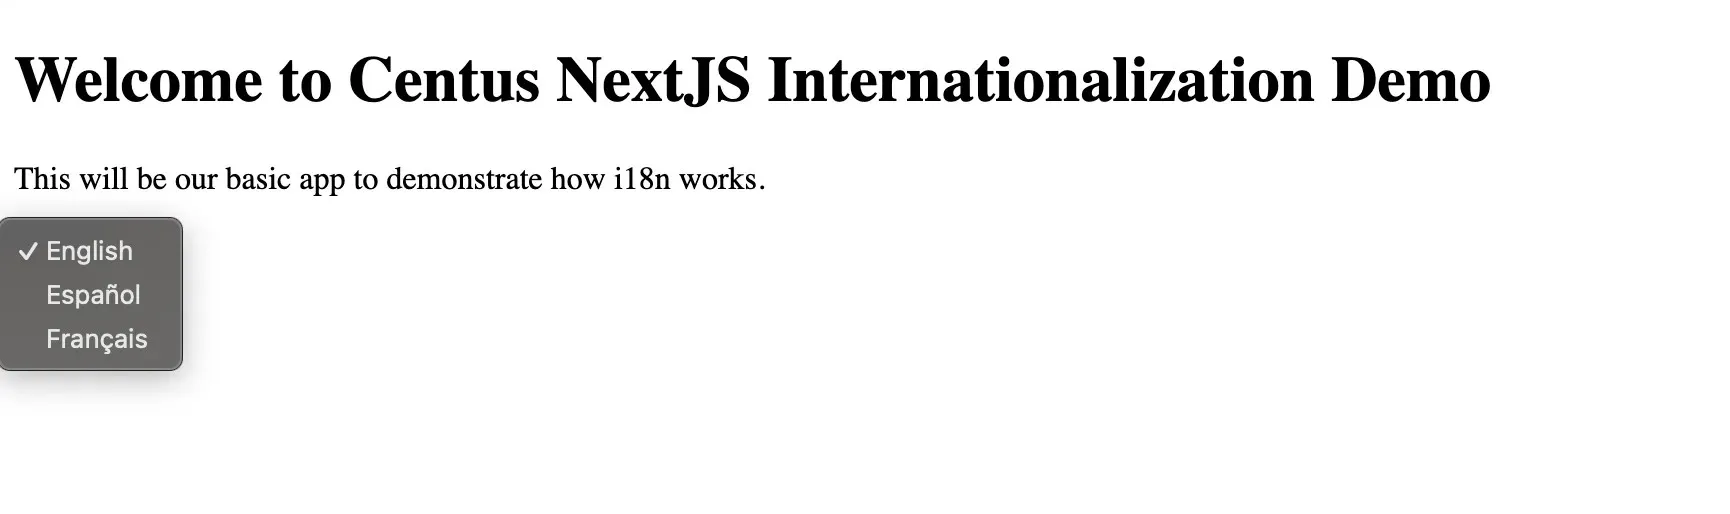
Selecting any of these languages will add the locale to the URL, pull the required text, and update the page with the new text.
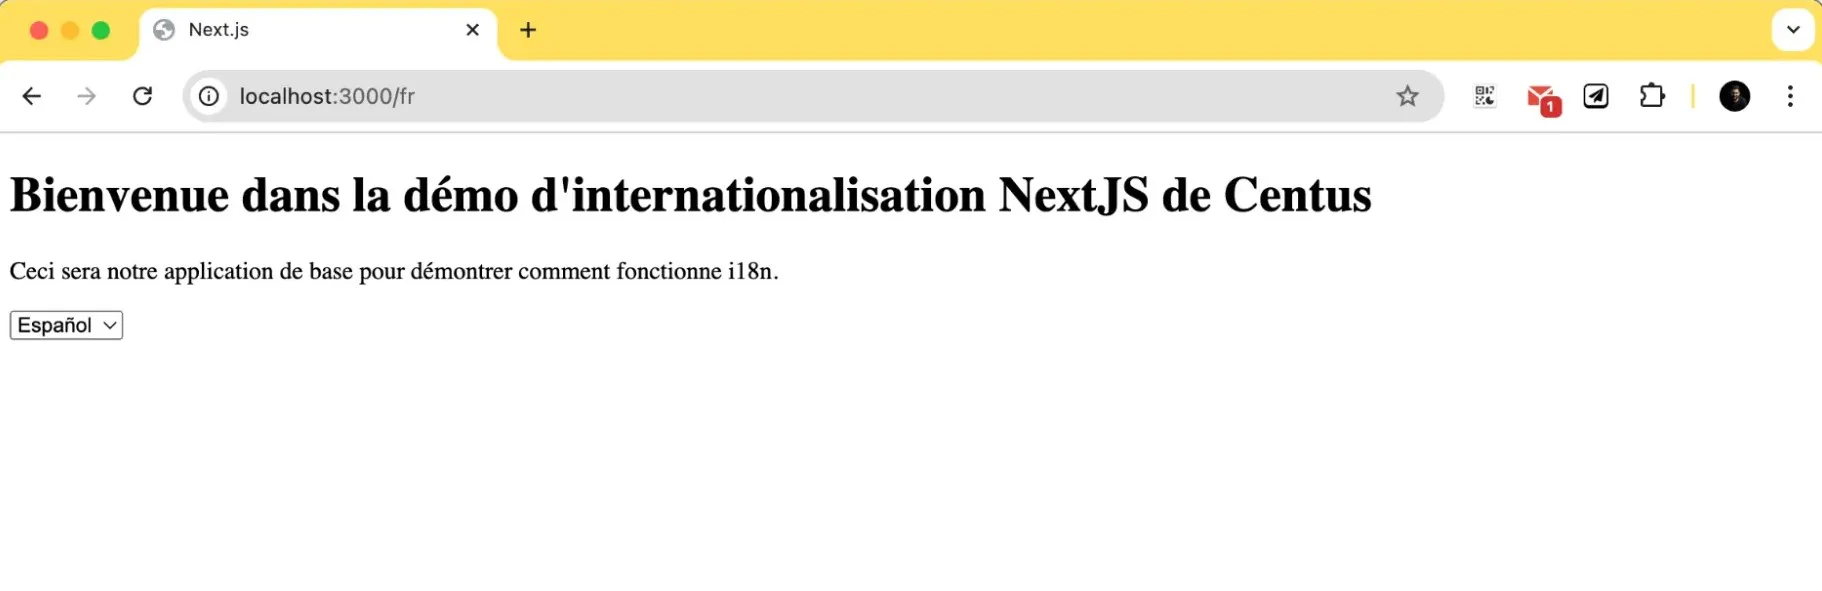
You could also visit the locale-specific routes as below:
- For English: localhost:3000/en
- For Spanish: localhost:3000/es
- For French: localhost:3000/fr
That’s it! You have a fully functional, internationalized NextJS app.
Advanced NextJS internationalization techniques
Now, are we all done? Absolutely not. What we've covered so far has been basic text translation.
It gets you up to speed.
But you must also handle some language nuances like plurals (some languages have six plural forms! ), date and currency formats, and more.
So let’s look at these advanced techniques one by one.
Handling numbers and currency formats
Not all countries follow the same number and currency formatting methods. For instance, if you had to write the number eight decimal three, here’s what it’d look like in the USA and France:
- USA: 8.3
- France: 8,3
Similarly, for currencies, in the US, we use the $ sign before the numbers, while France and Europe use the € sign after the numbers.
These differences may seem minor, but imagine selling a product on your app with a 5.600€ price tag in the US. People are bound to assume that the price is €5.6 instead of €5,600.
Luckily, we don’t have to handle this manually. Almost every Next JS localization library does this automatically.
Create a new file called components/FormattedNumber.js and add the following code:
// components/FormattedNumber.js
'use client';
import { useLocale } from 'next-intl';

export default function FormattedNumber({ value, style = 'decimal', currency }) {
  const locale = useLocale();

  const options = {
    style: style,
    ...(style === 'currency' && { currency }),
  };

  return new Intl.NumberFormat(locale, options).format(value);
}
This single component can handle both regular numbers and currency formatting on the style property.
Now, I’ll import the above file and add a few lines with some numbers and currency values to format.
// app/[locale]/page.js
import { useTranslations } from 'next-intl';
import LanguageSwitcher from '../../components/LanguageSwitcher';
import FormattedNumber from '../../components/FormattedNumber';
export default function Home() {
const t = useTranslations('homepage');
return (
<div>
<h1>{t('welcomeMessage')}</h1>
<p>{t('description')}</p>
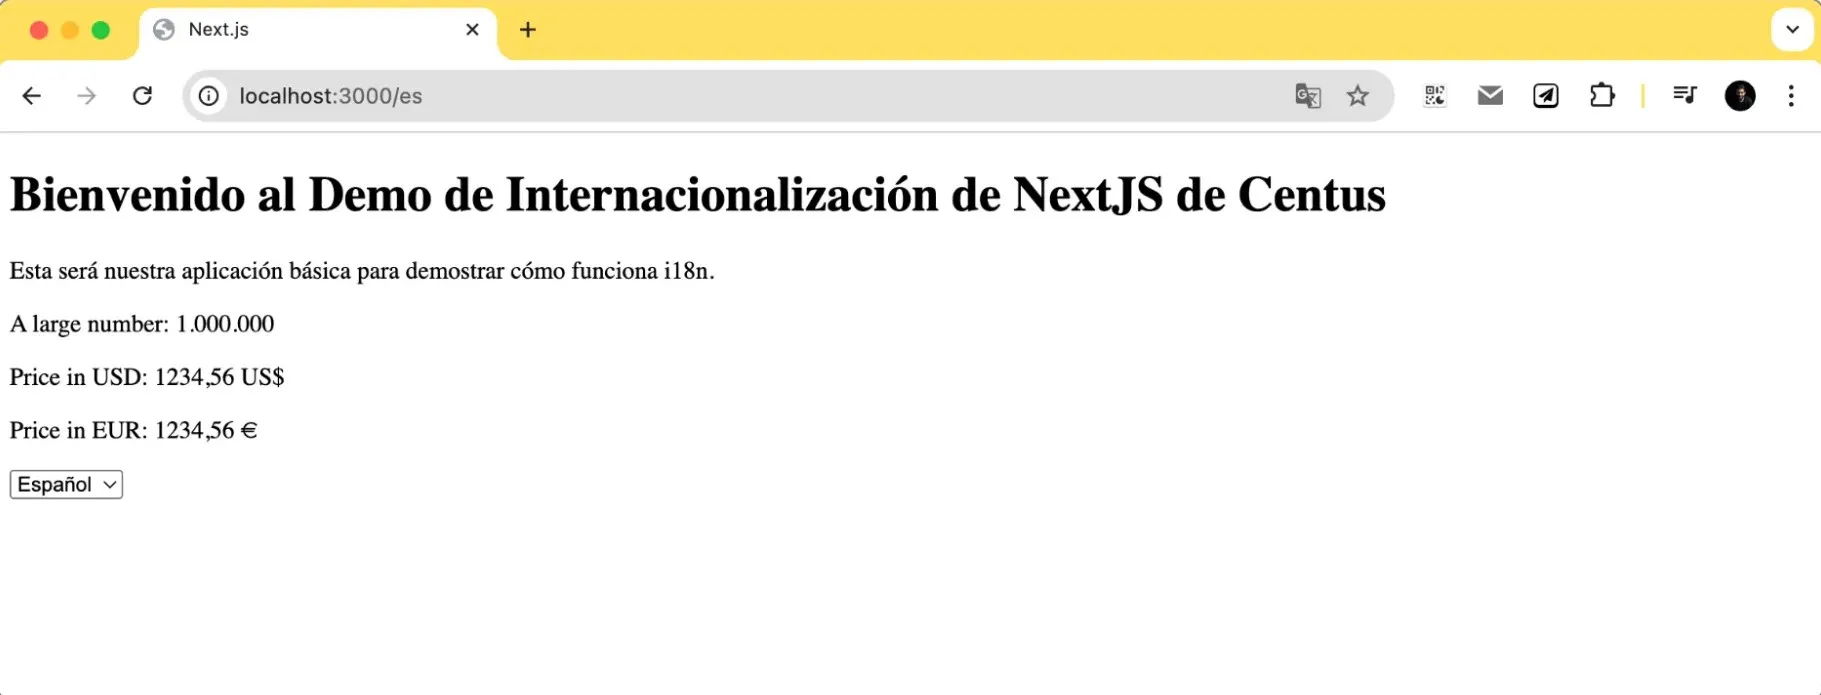
<p>A large number: <FormattedNumber value={1000000} /></p>
<p>Price in USD: <FormattedNumber value={1234.56} style="currency" currency="USD" /></p>
<p>Price in EUR: <FormattedNumber value={1234.56} style="currency" currency="EUR" /></p>
<LanguageSwitcher />
</div>
);
}
If you refresh the page now, you’ll see the large number and the currencies. Switching the locale will automatically format them.
Alright, now let’s move to date formatting.
Date and time formatting
Countries also use different date formats, similar to numbers and currencies. Some have a DD/MM/YYYY format; others use an MM/DD/YYYY. Yet others use YY/MM/DD.
Showing the DD/MM/YYYY format to a person who’s used to seeing the month first will confuse them, and vice versa. So we need to pay special attention to date and time formatting.
Luckily, next-intl also handles local date and time formats.
Let’s create a file components/FormattedDateTime.js and add the following code:
// components/FormattedDateTime.js
'use client';
import { useLocale } from 'next-intl';

export default function FormattedDateTime({ value, format = 'date' }) {
  const locale = useLocale();

  const options = {
    date: { dateStyle: 'long' },
    time: { timeStyle: 'short' },
    dateTime: { dateStyle: 'long', timeStyle: 'short' },
  }[format];

  return new Intl.DateTimeFormat(locale, options).format(value);
}
This will handle both the date and time formats automatically.
Let’s update our page.js file to display some dates and see how this affects what is displayed:
// app/[locale]/page.js
import { useTranslations } from 'next-intl';
import LanguageSwitcher from '../../components/LanguageSwitcher';
import FormattedDateTime from '../../components/FormattedDateTime';

export default function Home() {
  const t = useTranslations('homepage');
  const now = new Date();

  return (
    <div>
      <h1>{t('welcomeMessage')}</h1>
      <p>{t('description')}</p>
      <p>Today's date: <FormattedDateTime value={now} format="date" /></p>
      <p>Current time: <FormattedDateTime value={now} format="time" /></p>
      <p>Date and time: <FormattedDateTime value={now} format="dateTime" /></p>
      <LanguageSwitcher />
    </div>
  );
}
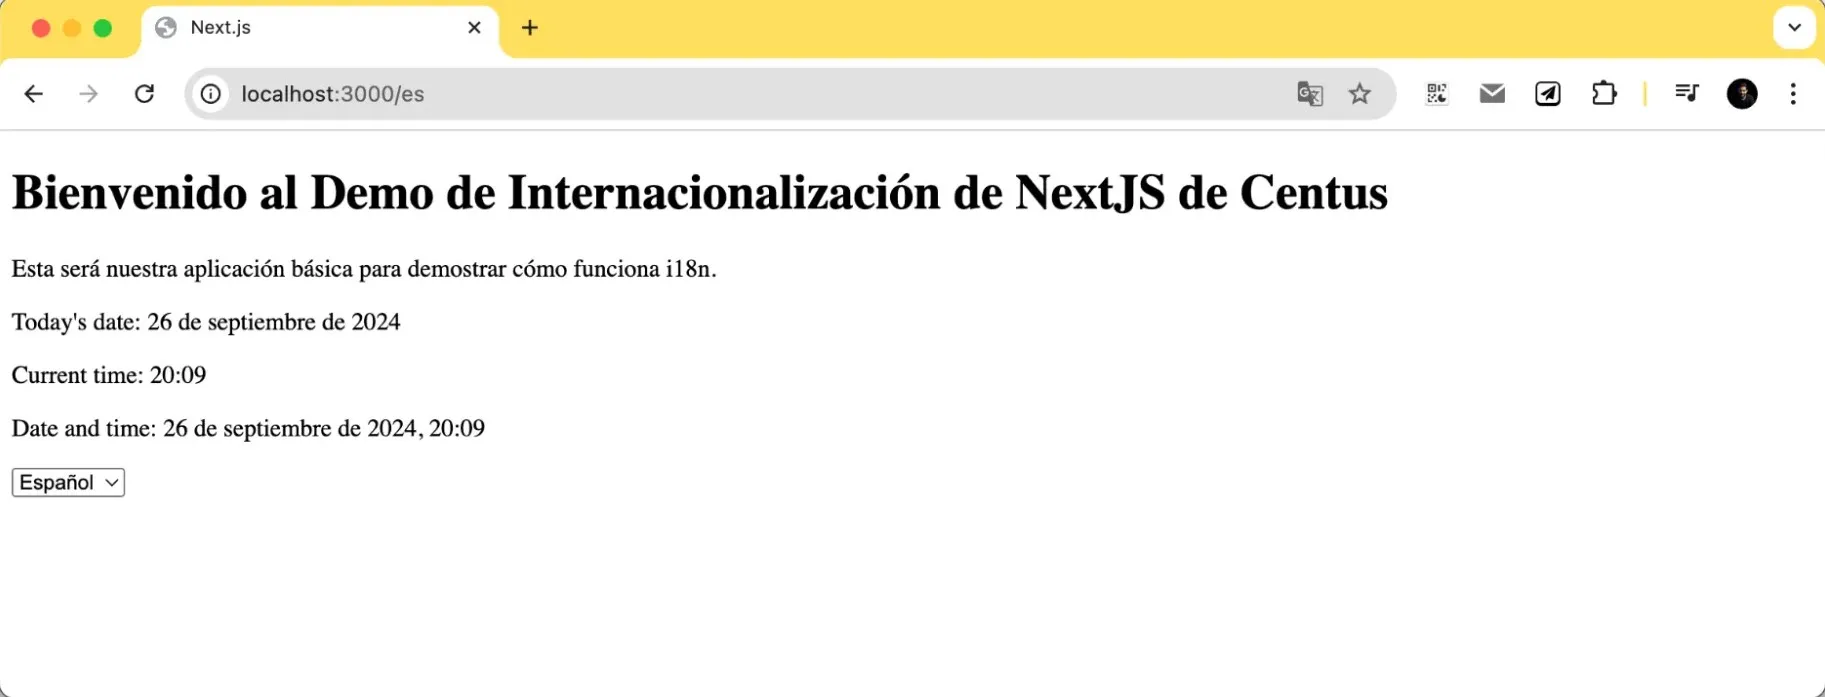
Now, refresh your app page, and you should see the date and time formatted per the selected locale.
For example, "September 26, 2024" can be displayed as "26 septembre 2024" in French, and "3:30 PM" might be displayed as "15:30".
Great! Now let’s proceed to plurals—a tricky aspect of internationalizing NextJS applications.
Handling pluralization
Pluralization often gets overlooked—either because people are unaware of the rules or it seems like a lot of additional effort.
But if there’s one thing to note, it’s that adding an 's' at the end of a word doesn’t solve the problem. For example, some languages have different forms for zero, one, two, few, many, and other quantities.
Let’s handle plurals for the three languages that we cover.
First, add a messageCount variable for each of the JSON files:
// messages/en.js

{
  "homepage": {
    "welcomeMessage": "Welcome to Centus NextJS Internationalization Demo",
    "description": "This will be our basic app to demonstrate how i18n-js works.",
    "changeLanguage": "Change Language",
    "messageCount": "{count, plural, =0{You have no messages} one{You have # message} other{You have # messages}}"
  }
}

// messages/es.js
{
  "homepage": {
    "welcomeMessage": "Bienvenido al Demo de Internacionalización de NextJS de Centus",
    "description": "Esta será nuestra aplicación básica para demostrar cómo funciona i18n.",
    "changeLanguage": "Cambiar idioma",
    "messageCount": "{count, plural, =0{No tienes mensajes} one{Tienes # mensaje} other{Tienes # mensajes}}"
  }
}


// messages/fr.js
{
    "homepage": {
      "welcomeMessage": "Bienvenue dans la démo d'internationalisation NextJS de Centus",
      "description": "Ceci sera notre application de base pour démontrer comment fonctionne i18n.",
      "changeLanguage": "Changer de langue",
      "messageCount": "{count, plural, =0{Vous n'avez aucun message} one{Vous avez # message} other{Vous avez # messages}}"
    }
  }
Now create a component file components/PluralizedMessage.js that will handle pulling the required pluralized text from the translations JSON.
// components/PluralizedMessage.js
'use client';
import { useTranslations } from 'next-intl';

export default function PluralizedMessage({ count }) {
  const t = useTranslations('homepage');

  return <p>{t('messageCount', { count })}</p>;
}
Finally, import this file to our page.js and display the different pieces of text:
// app/[locale]/page.js
import { useTranslations } from 'next-intl';
import LanguageSwitcher from '../../components/LanguageSwitcher';
import PluralizedMessage from '../../components/PluralizedMessage';


export default function Home() {
  const t = useTranslations('homepage');
  const now = new Date();

  return (
    <div>
      <h1>{t('welcomeMessage')}</h1>
      <p>{t('description')}</p>
      <PluralizedMessage count={0} />
      <PluralizedMessage count={1} />
      <PluralizedMessage count={5} />
      <LanguageSwitcher />
    </div>
  );
}
If you did everything correctly, you'll see this:
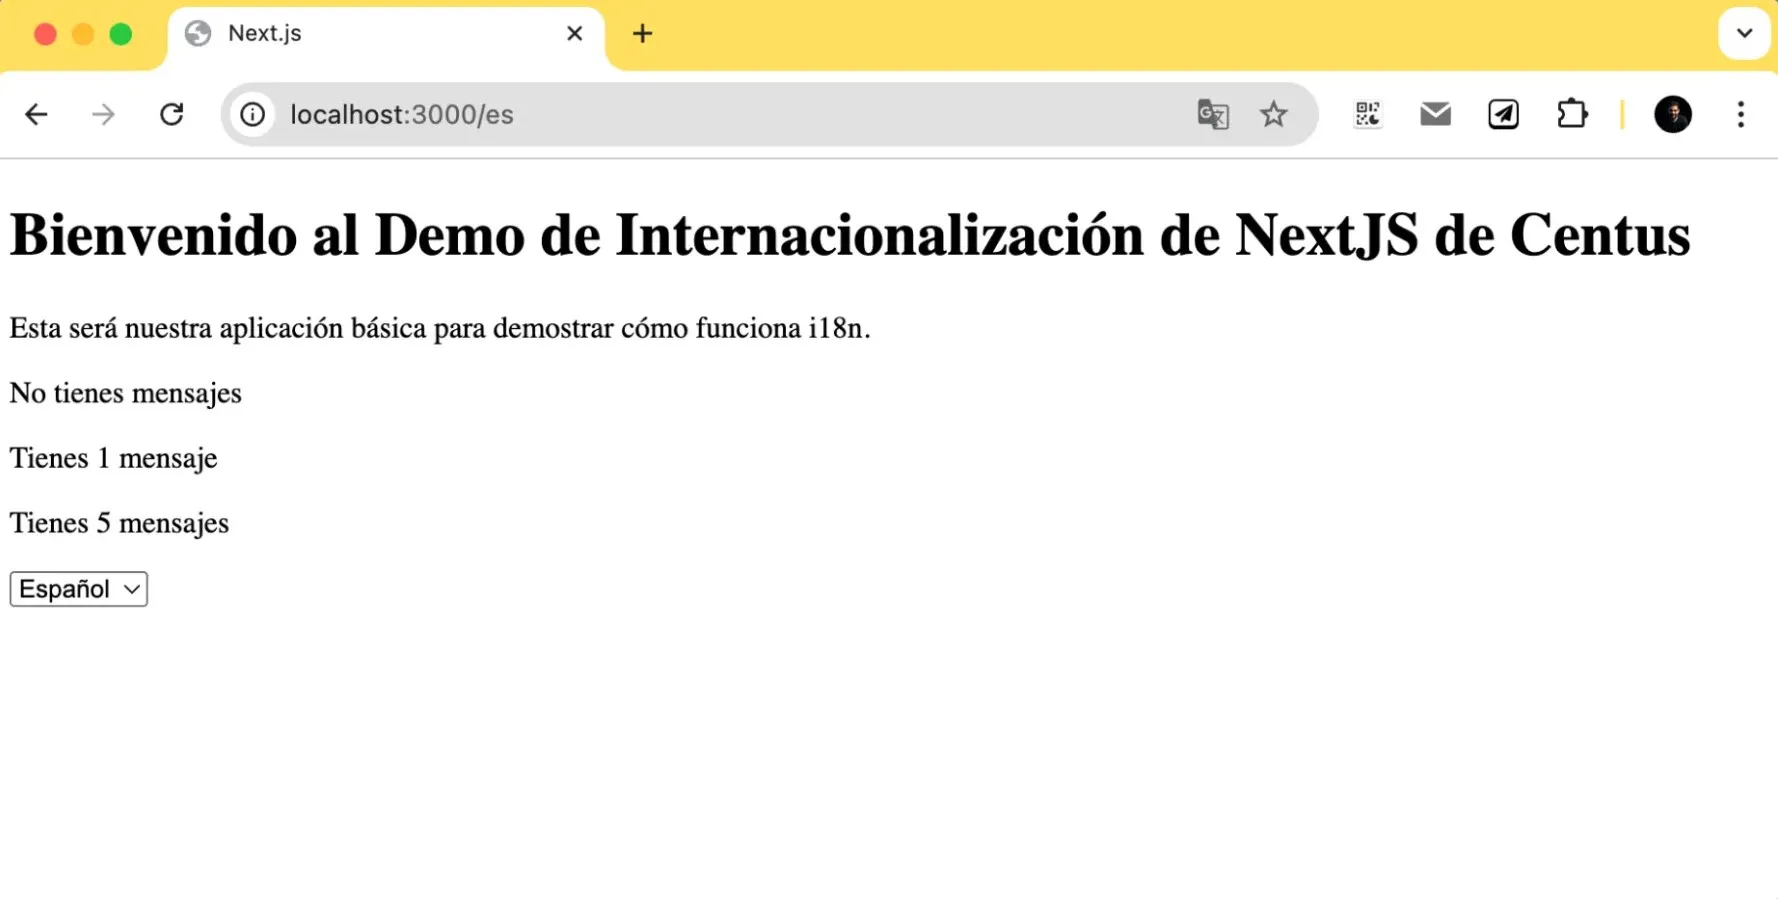
You can change the count variable that we’ve used in our page.js code to see how it affects the plurals. Some languages, like Ukrainian, have more forms of plurals. However, you can handle them just like we have handled English, Spanish, and French.
Here’s a snippet of how I’d handle Ukrainian plurals:
{
  "messageCount": "{count, plural, one{# яблуко} few{# яблук} many{# яблук} other{# яблука}}"
}
Okay great! We’re close to completion. Now, we have to figure out how to work with right-to-left (RTL) languages.
Working with RTL languages
RTL languages are a different beast. Apart from just changing the text direction, you also have to change:
- Text alignment (right-aligned instead of left-aligned)
- Flow of UI elements (e.g., navigation bars typically on the right instead of left)
- Directional icons (e.g., arrows pointing left for "next" instead of right)
I’ll be modifying a couple of things to make this all work together:
- I need to identify if a language is RTL or LTR, and based on that, change the layout of the page
- Change the layout.js file to pass the dir attribute based on the language direction
- Update the CSS to flip the layout and icons
Let’s start with creating a utils file to determine the language direction.
// utils/rtl.js
const rtlLanguages = ['ar', 'he', 'fa', 'ur']; // Add more as needed

export function isRTL(locale) {
  return rtlLanguages.includes(locale);
}
Now, update the layout.js file to import the above file and use it to determine the dir attribute:
// app/[locale]/layout.js

import { NextIntlClientProvider } from 'next-intl';
import { notFound } from 'next/navigation';
import { isRTL } from '../../utils/rtl';

export const metadata = {
 title: 'Next.js',
 description: 'Generated by Next.js',
};

export default async function RootLayout({ children, params: { locale } }) {
 let messages;
 try {
   messages = (await import(`../../messages/${locale}.json`)).default;
 } catch (error) {
   notFound();
 }

 return (
  <html lang={locale} dir={isRTL(locale) ? 'rtl' : 'ltr'}>
     <body>
       <NextIntlClientProvider locale={locale} messages={messages}>
         {children}
       </NextIntlClientProvider>
     </body>
   </html>
 );
}
And finally, we’ll change our CSS elements to use logical properties instead of left and right:
/* Before */
.someElement {
  margin-left: 10px;
  padding-right: 20px;
}

/* After */
.someElement {
  margin-inline-start: 10px;
  padding-inline-end: 20px;
}
With this change, you ensure that the “start” and “end” are dynamically determined based on the language direction instead of setting margins and paddings on the “left” or “right” of the page.
How to translate JSON files for your NextJS app
Translating JSON files manually works fine for small projects. But if you’re translating larger apps into multiple languages, you need specialized tools to organize the process.
Here’s how to translate JSON files with the localization management platform Centus:
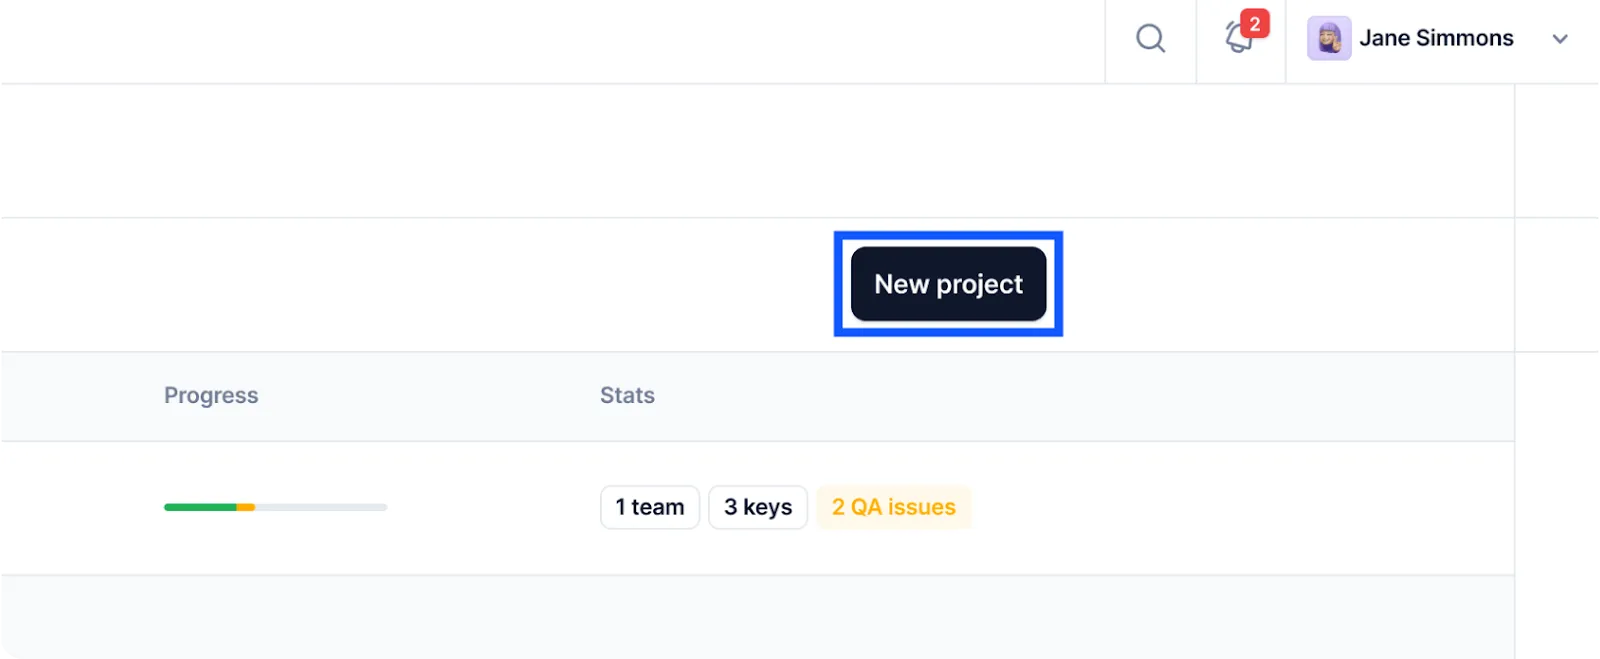
Start by signing up to Centus and creating a new project.
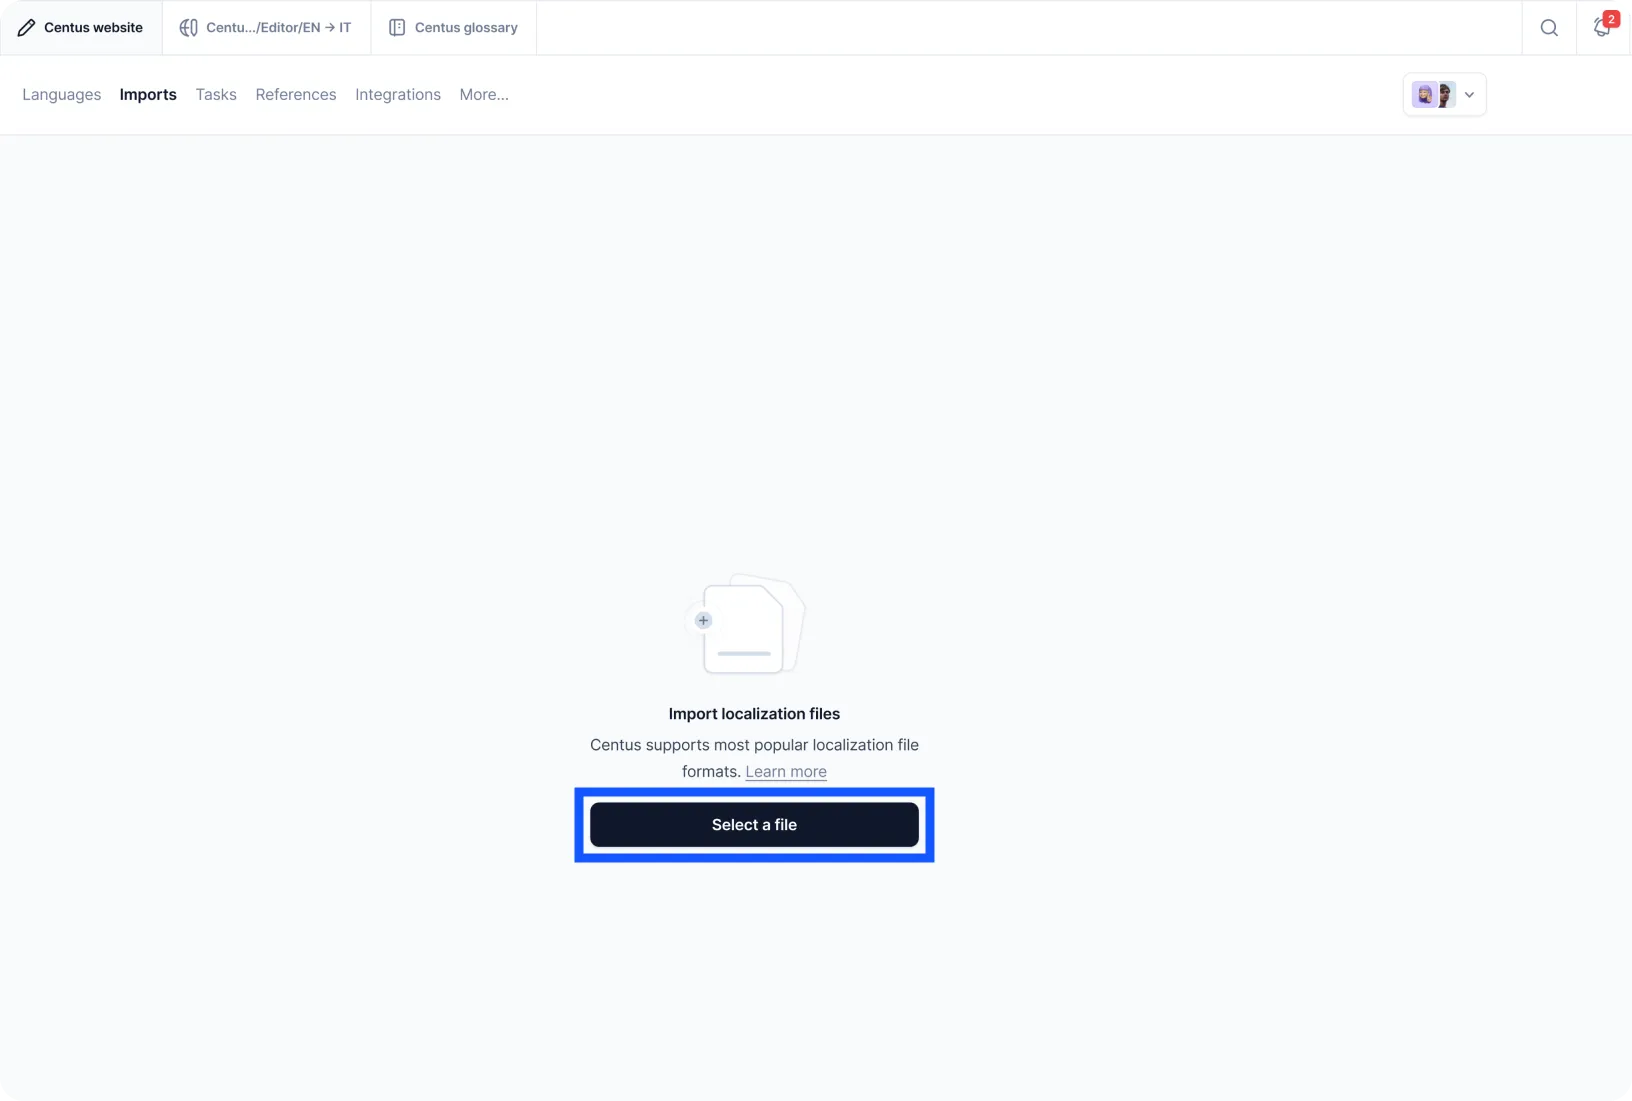
Then, go to the Imports section and upload content files.
Centus supports not only JSON files, but also YAML, PHP, XLIFF, and many other file types, making it useful for all of your app localization projects.
The next step is to bring translators and editors to your project.
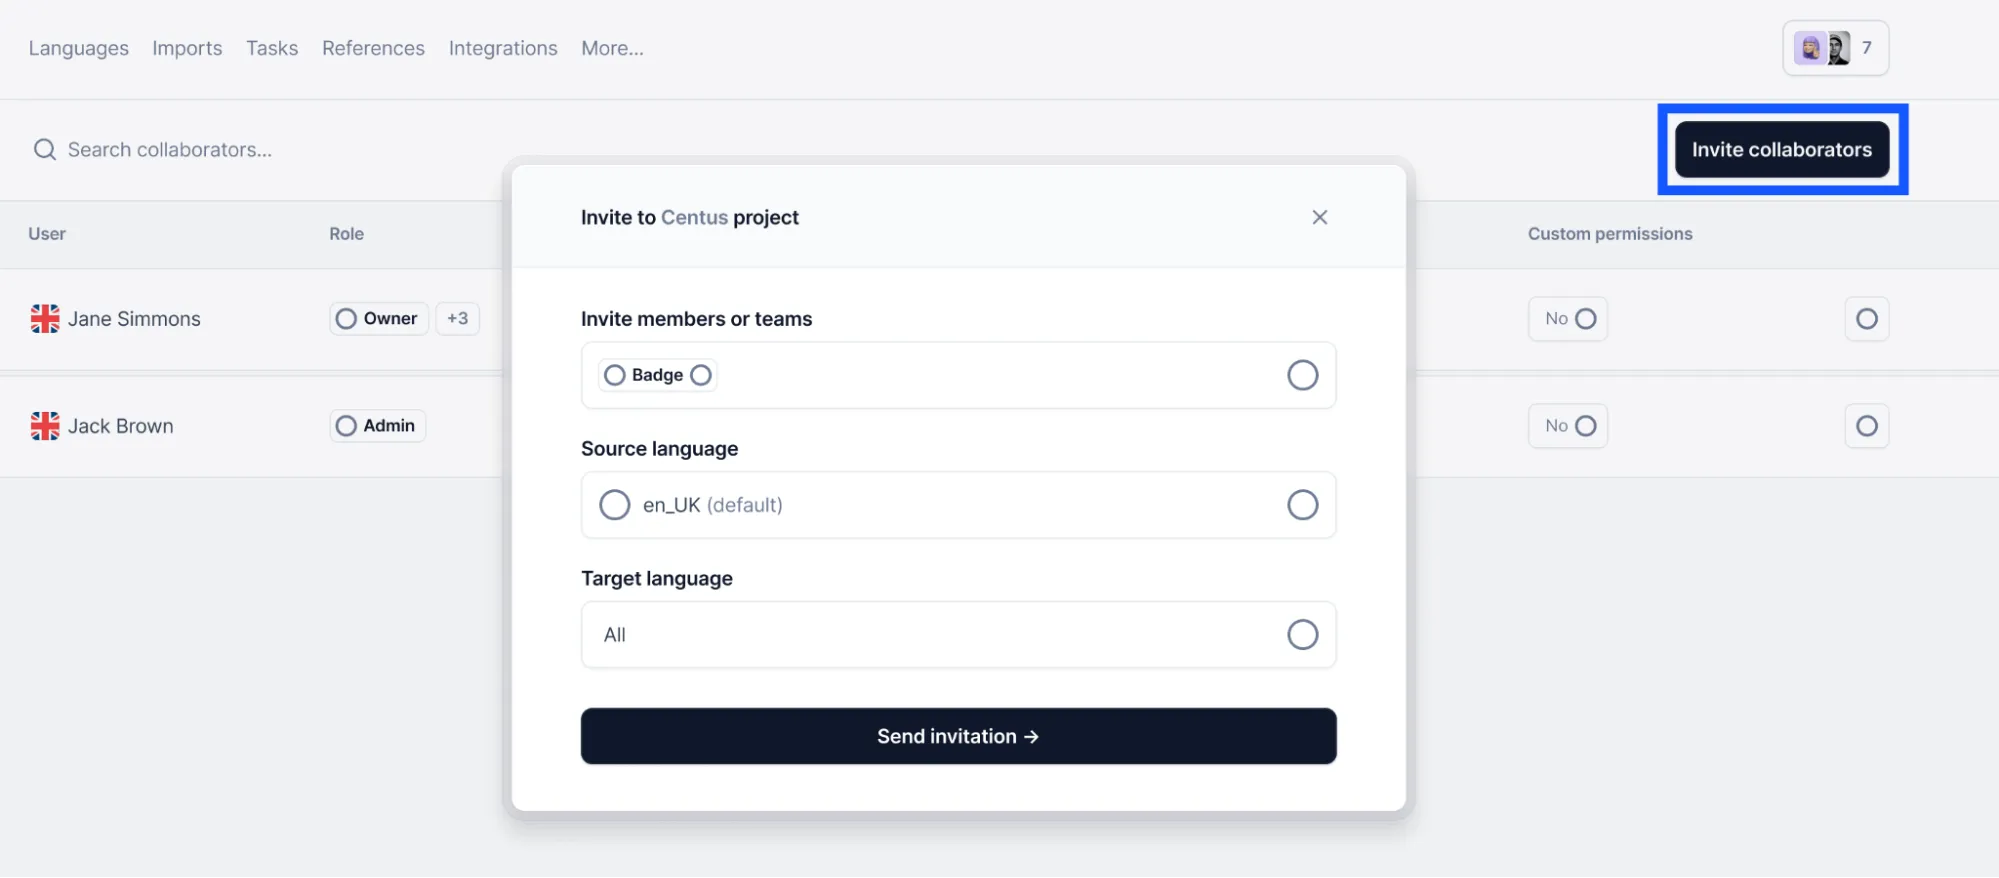
You can manage user roles and permissions to ensure that everyone has access to the information they need.
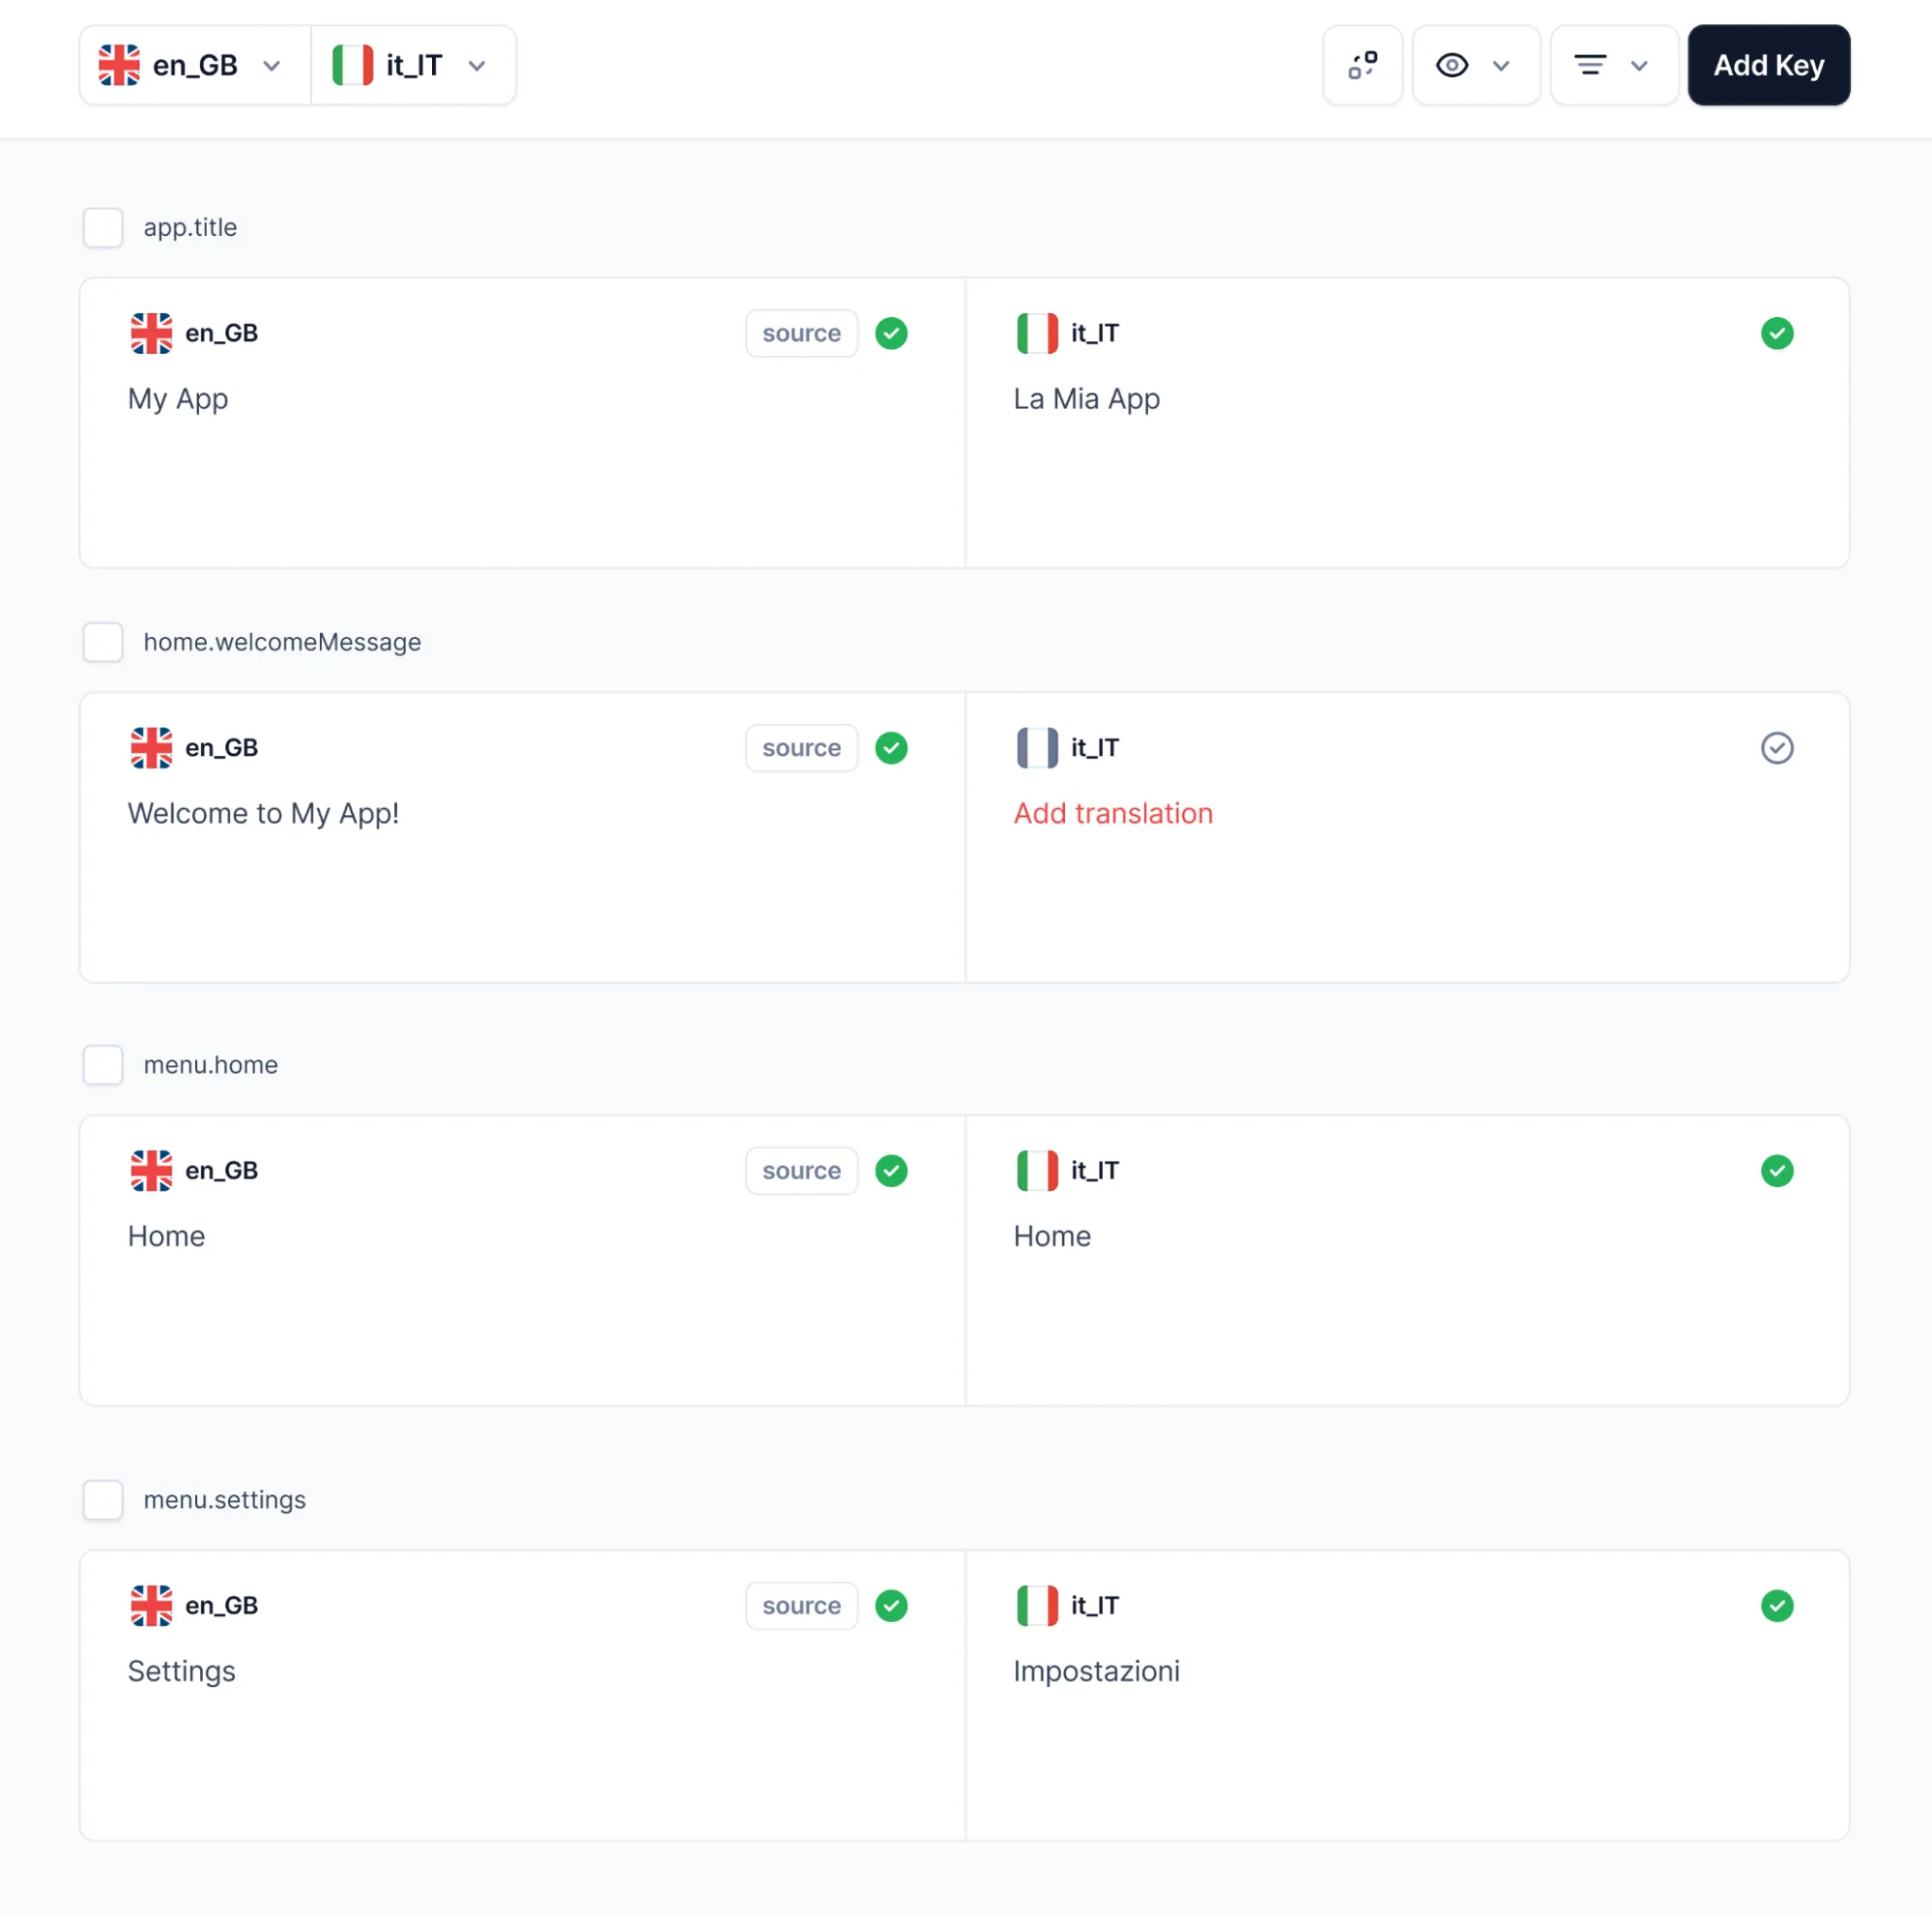
After assembling your team of language experts, let them translate automatically segmented strings.
They can start by generating automatic translations and editing them in Centus Editor. This approach can reduce translation costs and time by up to 90%, which is critical for sim-ship releases.
Encourage your team to communicate and share feedback, especially at the review stage. This way, you can avoid critical errors in the future.

To monitor the progress of your NextJS translation project, navigate to the Home panel and review key statistics.
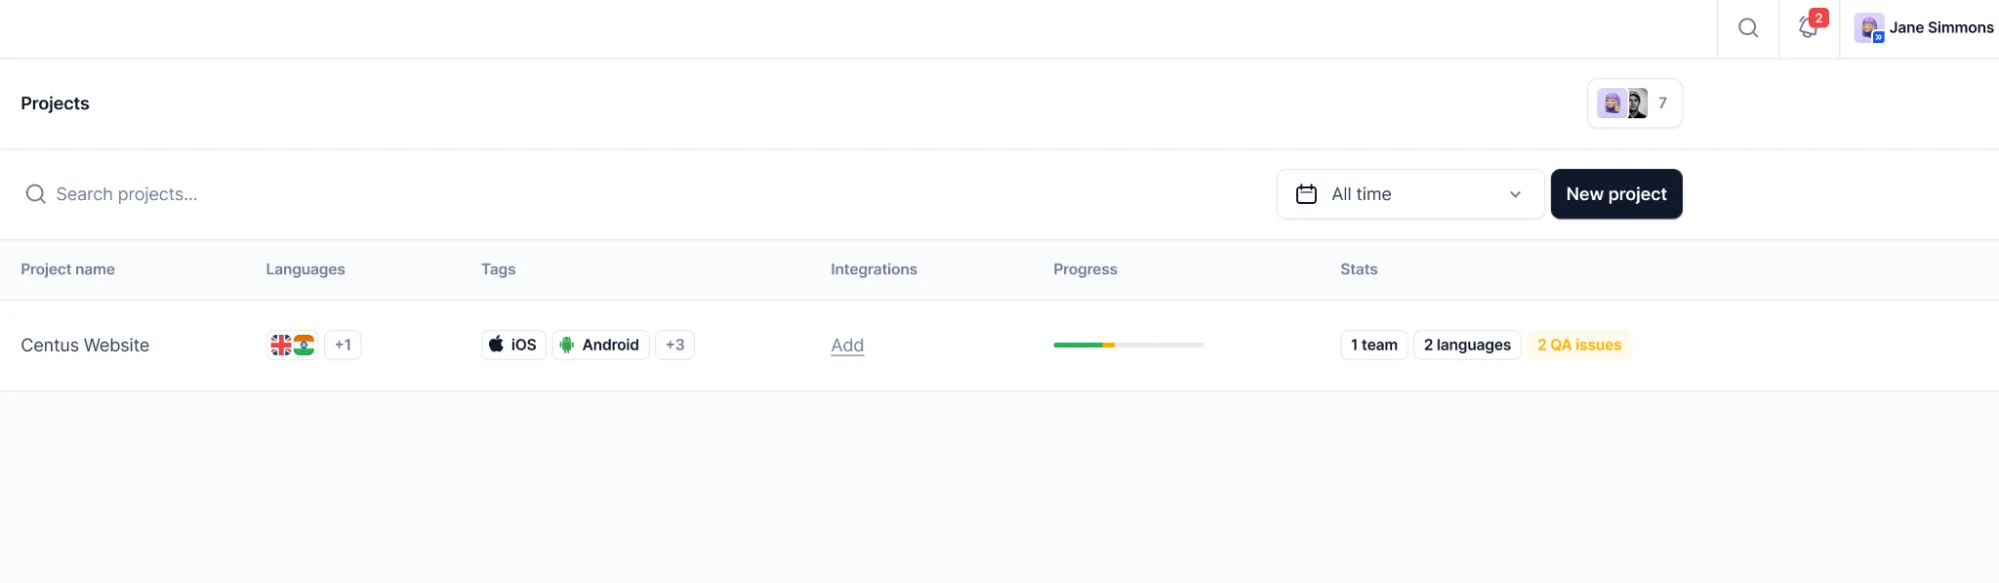
You can also use the notification panel to stay on top of the key steps and changes in the project.

When the translations are ready, incorporate them into your app following my advice above.
As you can see, Centus allows you to delegate the translation process to professionals and efficiently organize their cooperation.
While they are busy creating accurate translations, you can focus on other aspects of Next JS internationalization. Convenient? You bet!
Wrapping up
Now you know how to internationalize and localize your NextJS app.
As you grow, however, things do get a bit... complex.
That's where you need the localization management platform Centus.
Centus lets you bring dozens of translators and editors under one digital roof. The platform gives your language experts all the tools they need to create high-quality translations in record time.
Put simply, Centus makes NextJS localization a breeze. Try Centus now!
Get the week's best content!
By subscribing, you are agreeing to have your personal information managed in accordance with the terms of Centus Privacy Policy ->
Keep learning

25 min. read
Vue i18n and Localization: How to Localize a Vue App

19 min. read
Laravel Localization: A Step-by-Step Guide
30 min. read
Your Complete Guide to Django i18n

18 min. read
JavaScript Localization Guide for Web Apps

11 min. read
How to Perform Mobile App Localization: The Right Way
21 min. read