Machine translation has made the localization process a breeze, right?
Wrong.
Localization is still challenging, and a smooth workflow is still critical to the success of your project. Machine translation hasn’t changed that.
So, how to build a localization workflow?
There’s no exact science. It’s largely about discovering the demands of your product and following best practices to meet those needs. And that’s exactly what I’ll cover in my localization workflow guide.
Let’s get started!
What is a localization workflow?
A localization workflow is a series of steps taken to adapt products and services to different languages and cultures. The key steps in the localization workflow are content preparation, translation, editing, localization engineering, testing, deployment, and post-deployment review.
Localization workflow examples
The steps for delivering a localized product can change dramatically depending on the type of your product:
- Software localization is an interactive process that requires tracking changes and using translation memories (TMs) heavily.
- Website localization requires search engine optimization (SEO) in multiple languages. Additionally, there’s a need to adjust visuals for different cultures.
- Video game localization is performed without seeing the final product. It also requires the recording of voiceover and involves multiple last-minute changes.
- Marketing localization involves collaboration with local experts to ensure that marketing materials resonate with local audiences.
To put that into perspective, let’s look at two localization workflow examples.
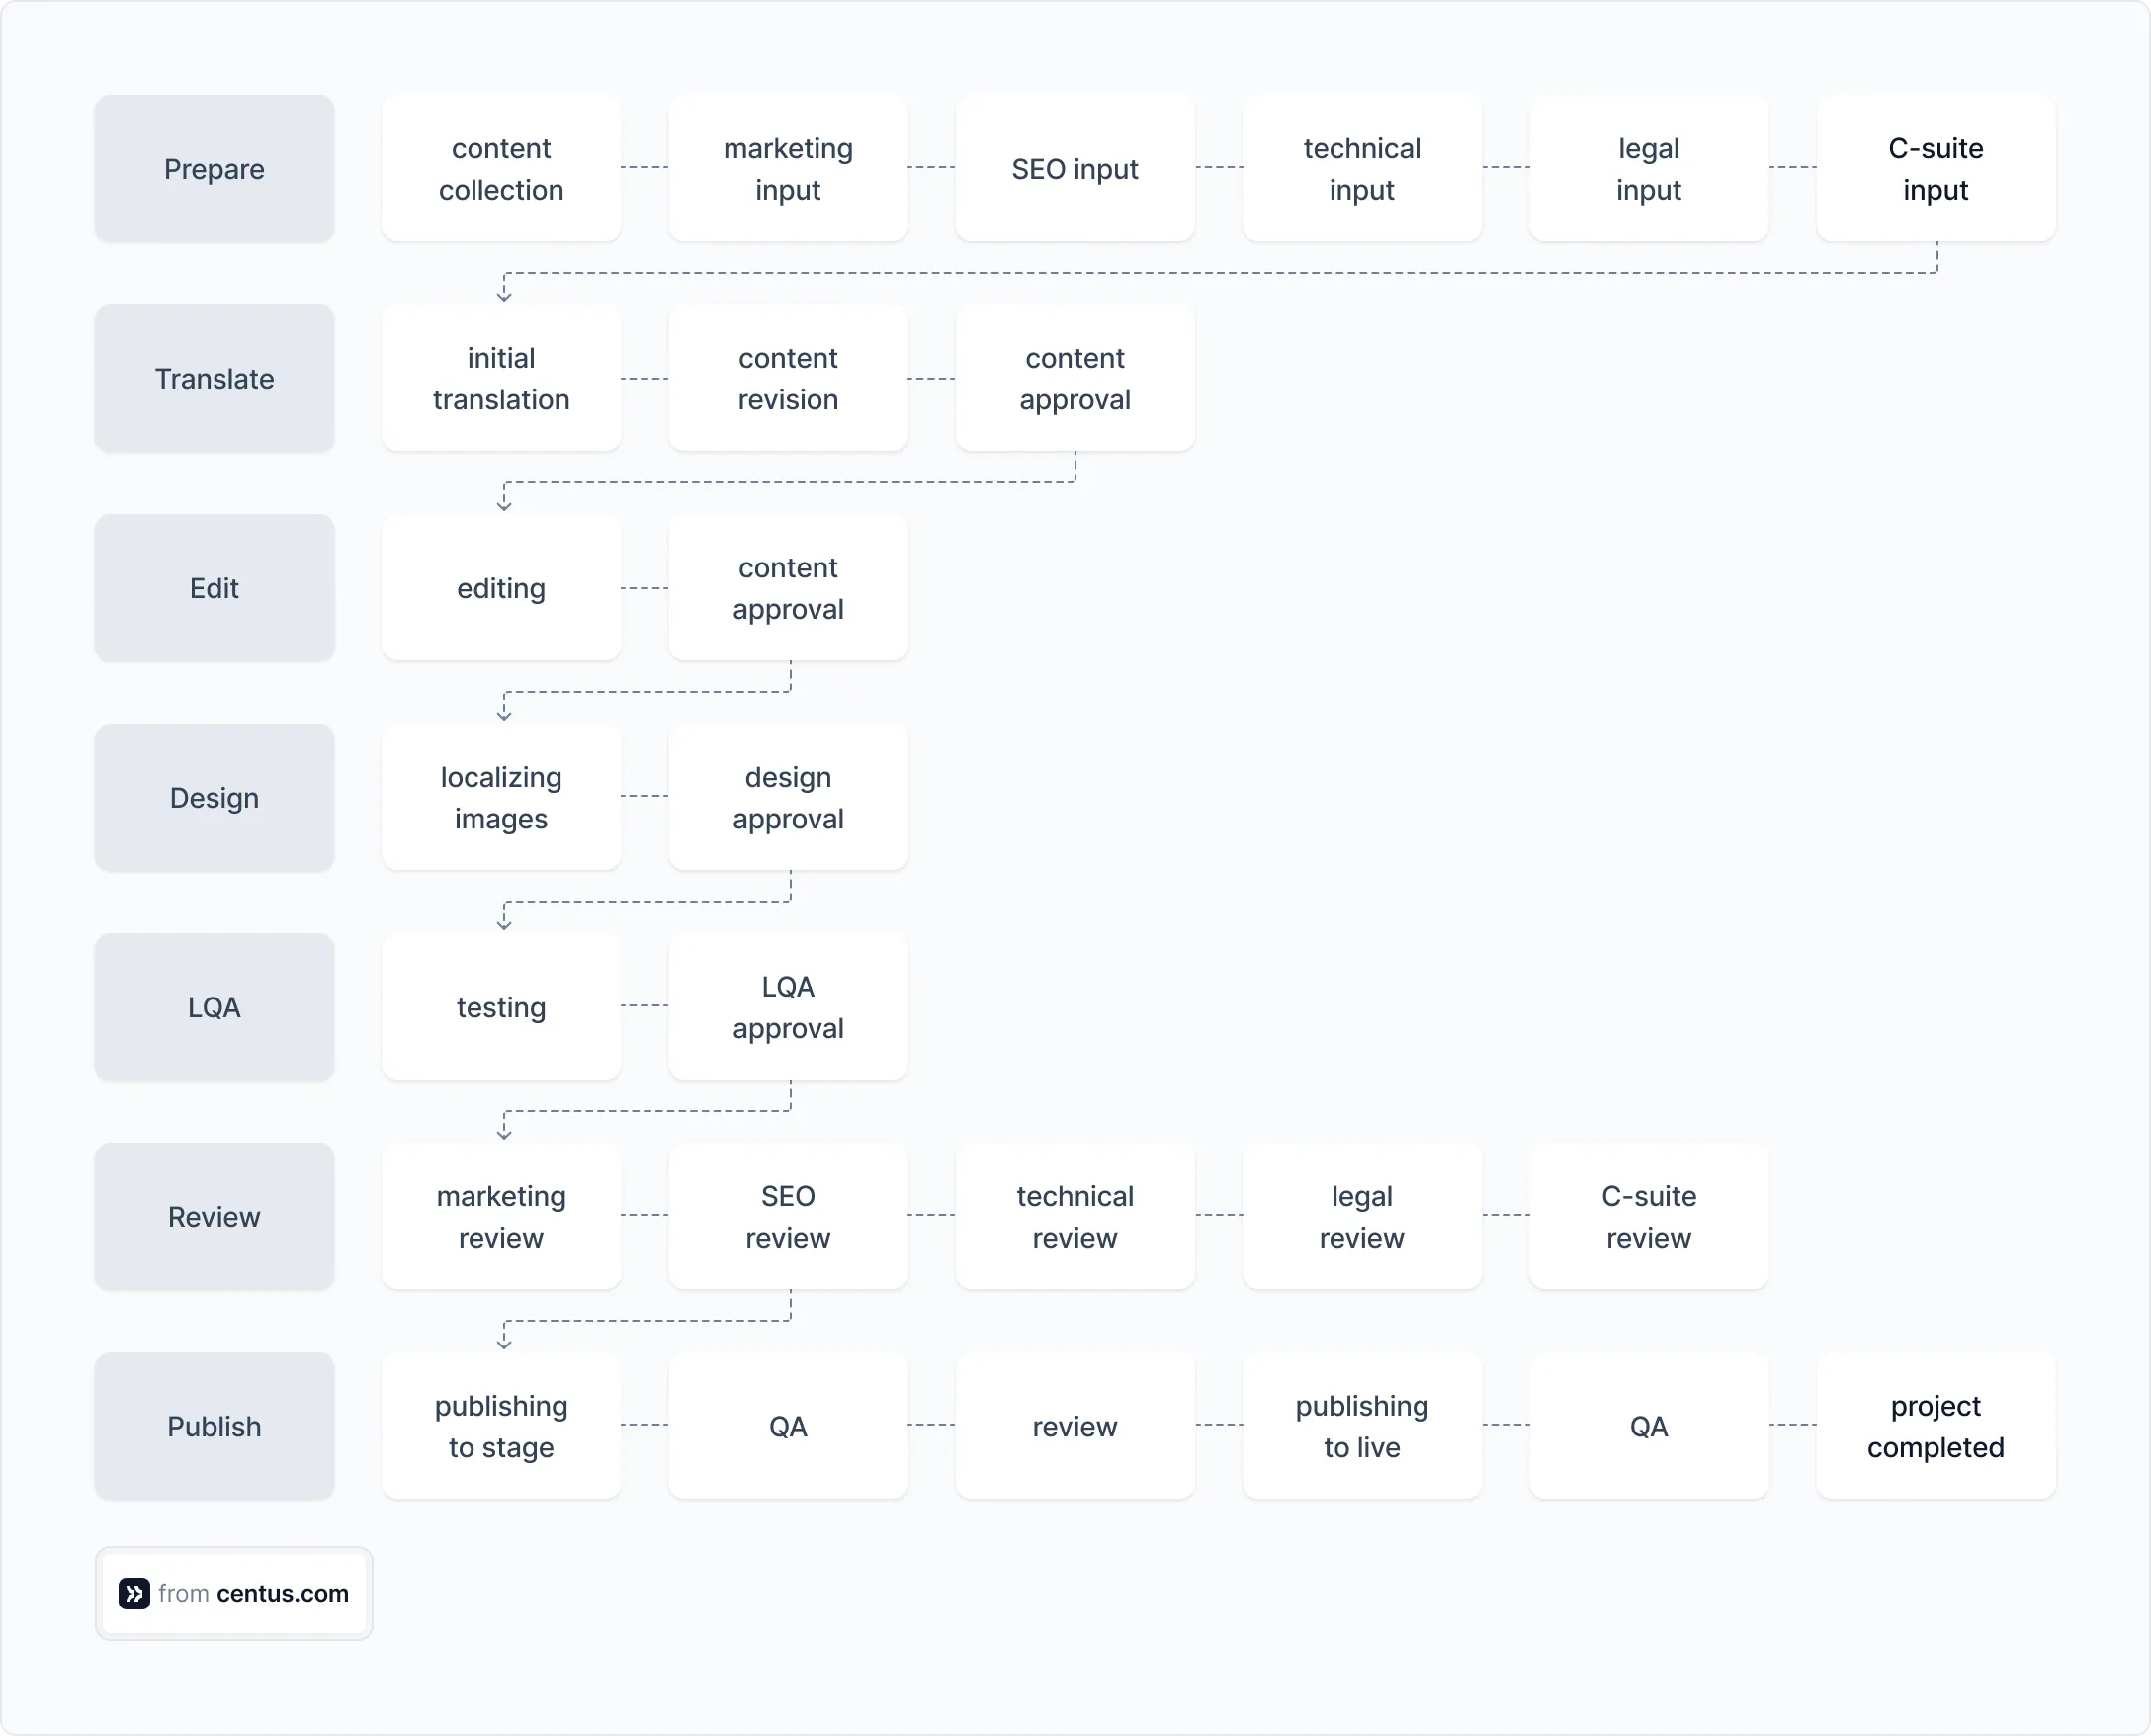
A website localization workflow looks like this 👇
A video game localization workflow is more intricate. One of its critical stages is voiceover recording, where translations are turned into audio assets.
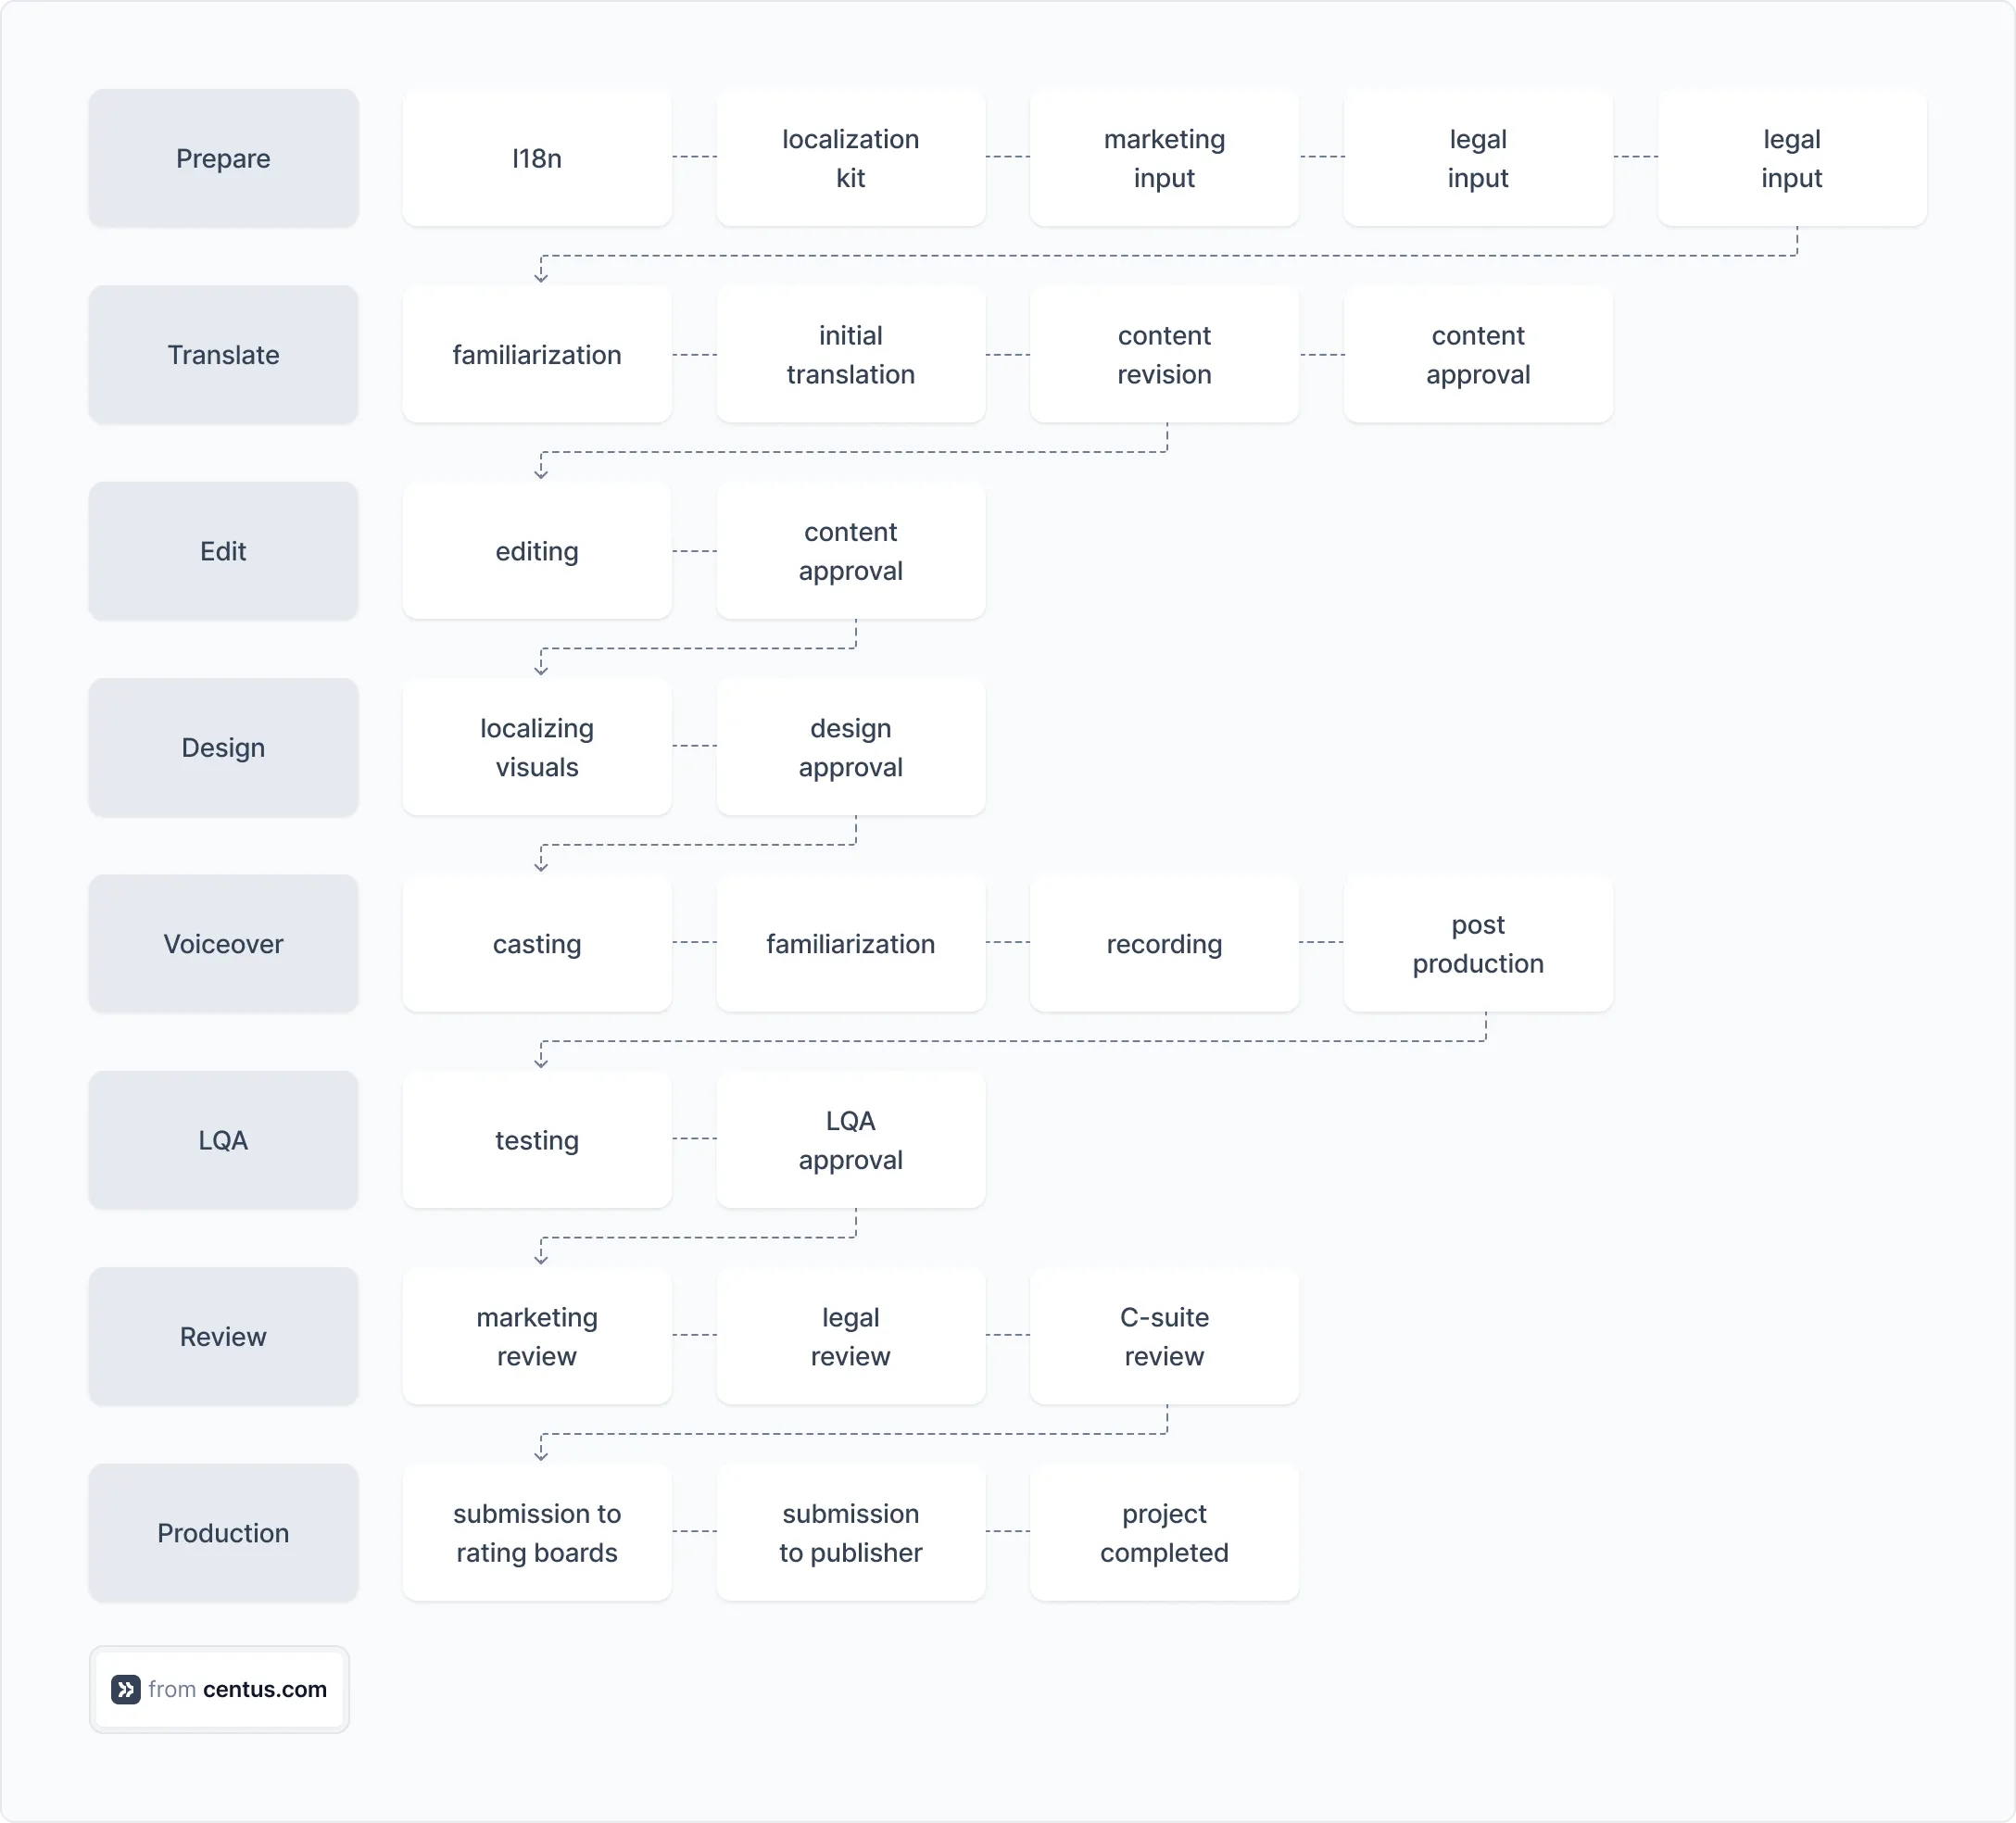
As you can see, localization projects vary widely, so no two workflows are alike. Yet they all share key steps, which I’m about to explain in detail.
6 Key steps in a localization workflow
There are roughly 6 key steps in a localization process workflow:
- Collect localization assets
- Prepare localization assets
- Organize collaboration and control
- Arrange translation and editing
- Arrange design adjustments
- Perform quality control
1. Collect localization assets
Assets. Your localization workflow revolves around handling them.
Make sure to collect all relevant assets to properly understand the project’s scope and create a provisional schedule. It’s better to invest extra time at the pre-launch stage than to discover an untranslated batch of PDF files when your project is in full swing.
Collaborate across departments to collect all customer-facing content:
- Website content
- User interface (UI) elements
- Help documentation
- Video and audio content
- Software/app strings
- Game assets (text, graphics, audio)
- Product packaging and labeling
- Social media content
- Legal documents
- Training materials
- and much, much more
Think about it: your user interacts with 15 to 20 touchpoints throughout their journey with your product. Now imagine that some of them aren’t localized. That’s poor UX, which could translate into poor sales.
On top of customer-facing content, you might need to localize content for internal use such as:
- Training materials
- Internal documentation
- Company policies and guidelines
- Marketing strategy documents
- Performance review forms
- Employee handbooks
Now that you have collected assets, create a content inventory.
Your content inventory entry might look like this:
| Type | User guide |
|---|---|
| Location | /resources/user-guides/a-quick-start-guide |
| File type | |
| File size | 2.4 Mb |
| Images | Yes |
| Meta title: | Centus: A Quick Start Guide |
| Meta description: | Learn how to use the localization platform Centus. This guide will teach you how to perform translations for apps, websites, and documents. |
| Word count | 784 words |
| Content owner | Content Manager, Sofia M. |
| Source language | English |
| Target language | German, French, Spanish, Italian, Ukrainian |
| Update frequency | Quarterly |
| Planned update date | February 15, 2025 |
| Notes | Requires technical review |
The next step in your localization workflow management process is to prepare assets for localization.
2. Prepare localization assets
Not all types of files are equally suitable for localization. But the reality is, you’ll be handed a menagerie of files that must be prepared before sending them for translation.
Brace yourself: it won’t be easy.
Most PDF files are non-editable so they need to be converted to a different format first. To this end, you might want to use optical character recognition (OCR) software or an online service. Both come with risks of inaccuracies.
Make sure to thoroughly review converted PDF files to ensure they aren’t riddled with errors.
DOC and DOCX
Word files (DOC and DOCX) often contain complex formatting complicating the translation process. Most translation platforms can import plain text, headings, and paragraphs while ignoring bullet points and tables.
Experiment with your chosen translation platform to see how well it recognizes formatting in your DOCX files, and then edit them accordingly.
XLS and XLSX
Excel files (XLS and XLSX) are tricky. Even the mundane task of estimating word count in an XLSX file can present a challenge.
💡Pro tip: To check the word count in the XLSX file, use this formula =SUM(LEN(TRIM(A1:A100))-LEN(SUBSTITUTE(TRIM(A1:A100)," ",""))+1), where A1:A100 is the range of cells you want to count.
To prepare Excel files for translation, locate those containing multiple sheets and split them into separate files. The reason? Most translation platforms can import only the first sheet.
Then, organize translation content. Here’s how I do it:
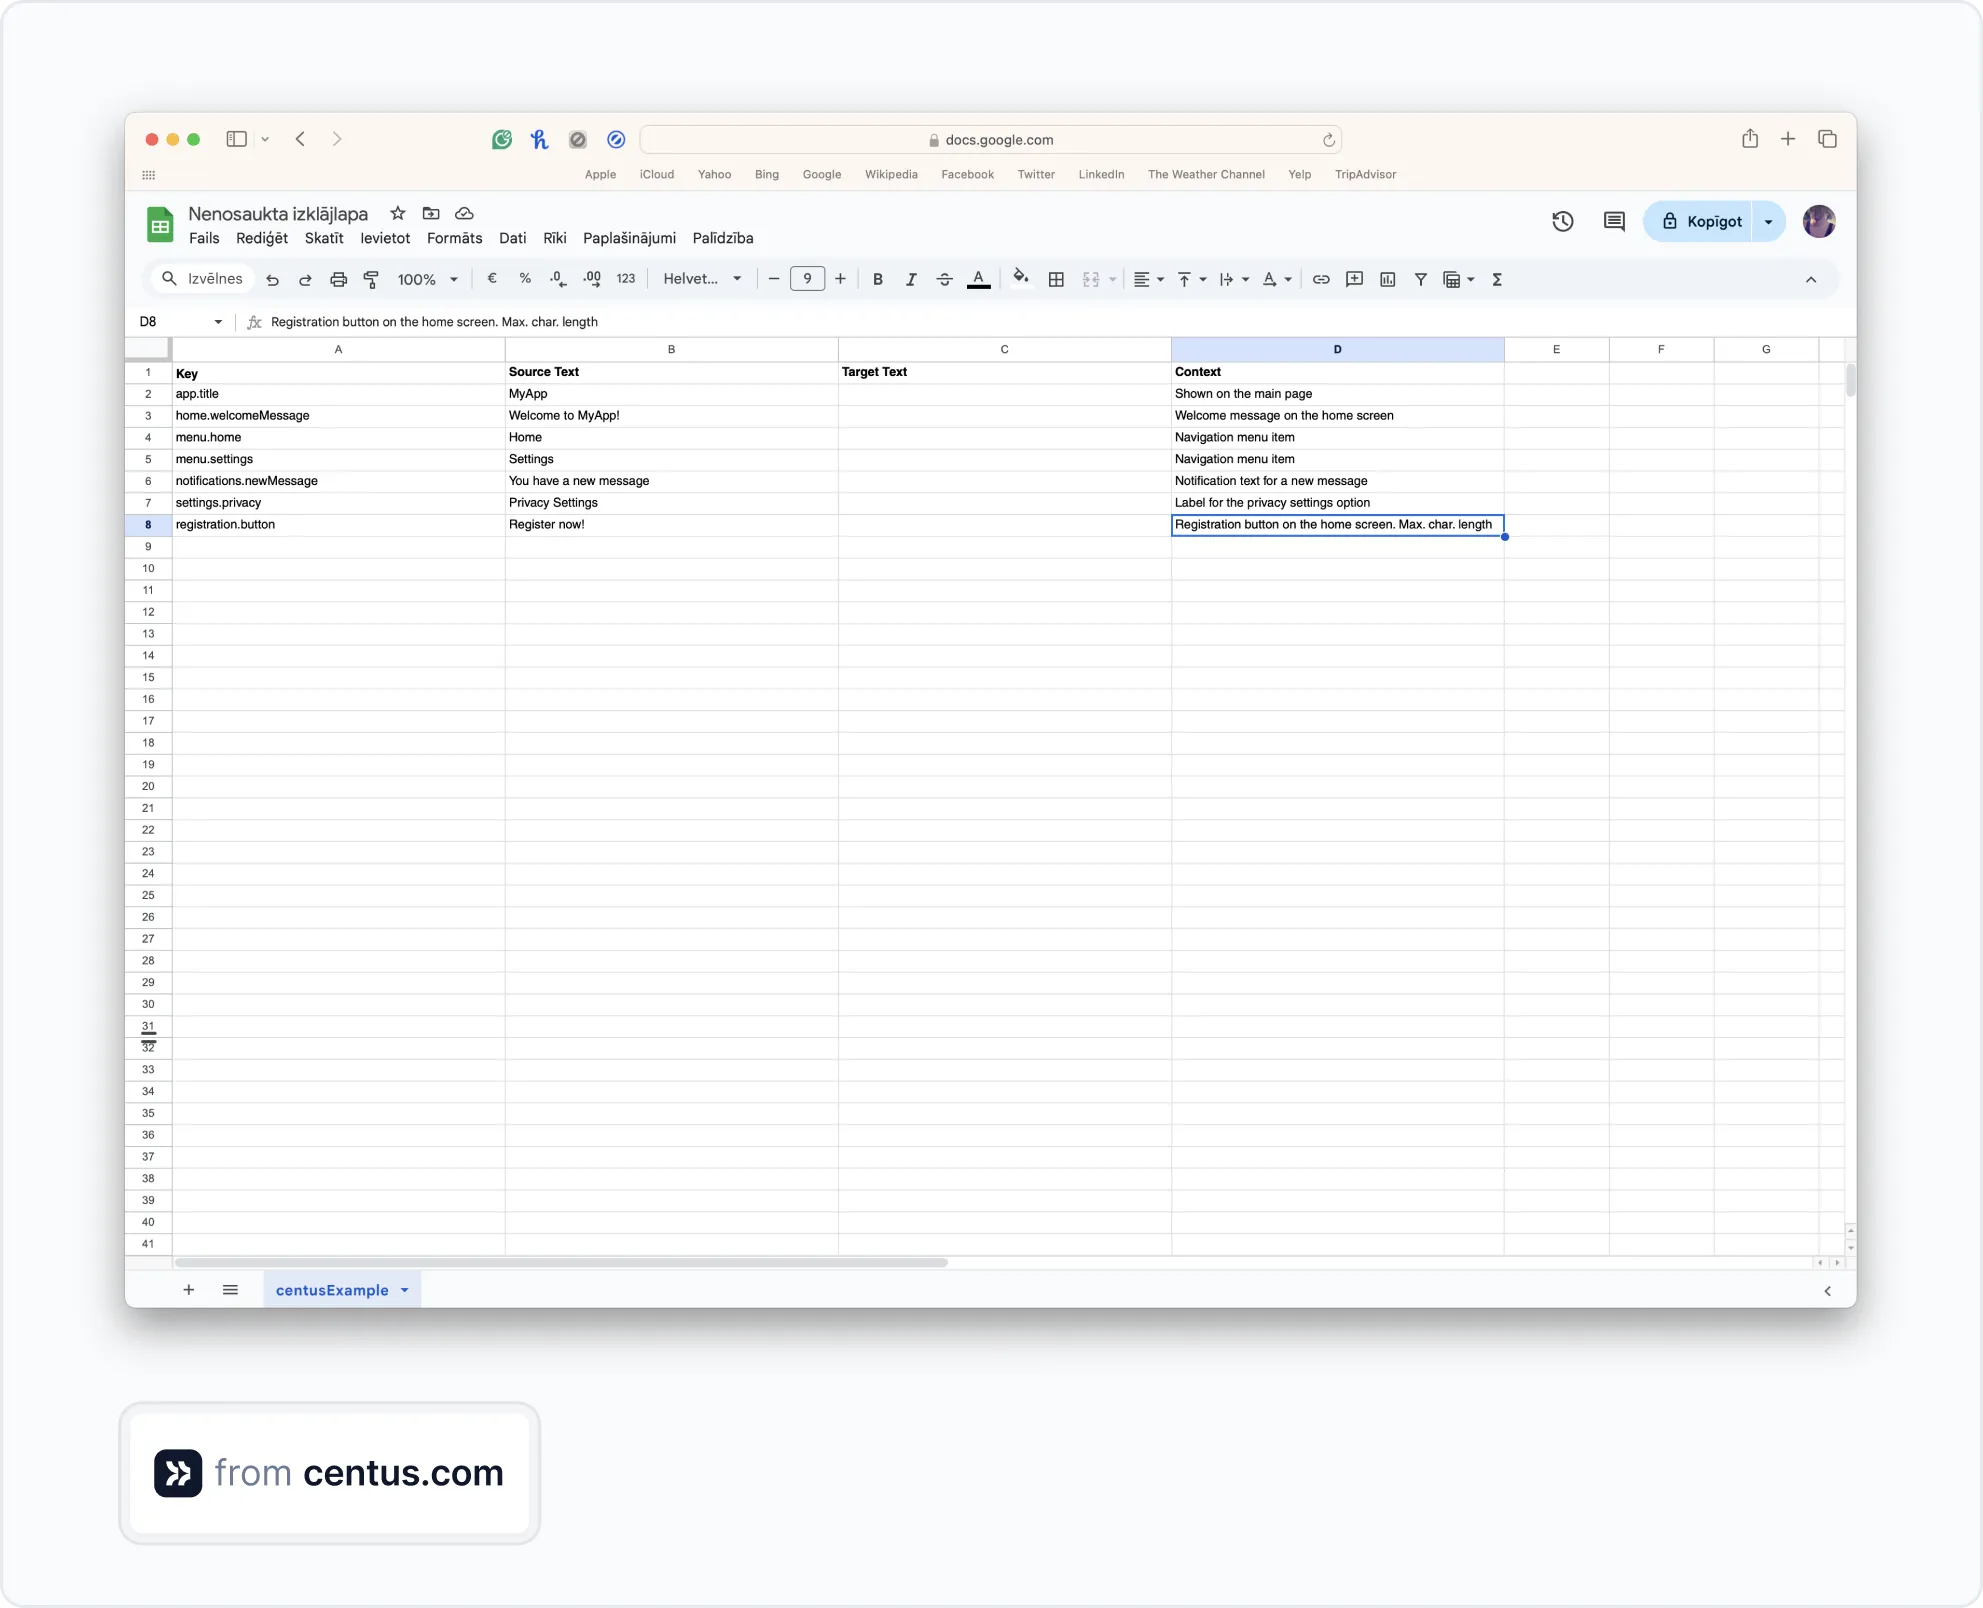
First, I arrange the translation content into four columns: Key, Source Text, Target Text, and Context.

In this example, I’m translating app content.
The A column contains a name (key) for each piece of translatable text in an app. Such text elements are called strings and I listed them in the B column.
To make my translator’s life easier and my translations more accurate, I added translation context to the D column. Here, I described each key.
The context column is entirely optional. You can add just a few entries for ambiguous strings or you can skip it altogether. However, for the best result, I recommend you add it.
When you upload the XLSX file to a localization management platform Centus, it will look like this:
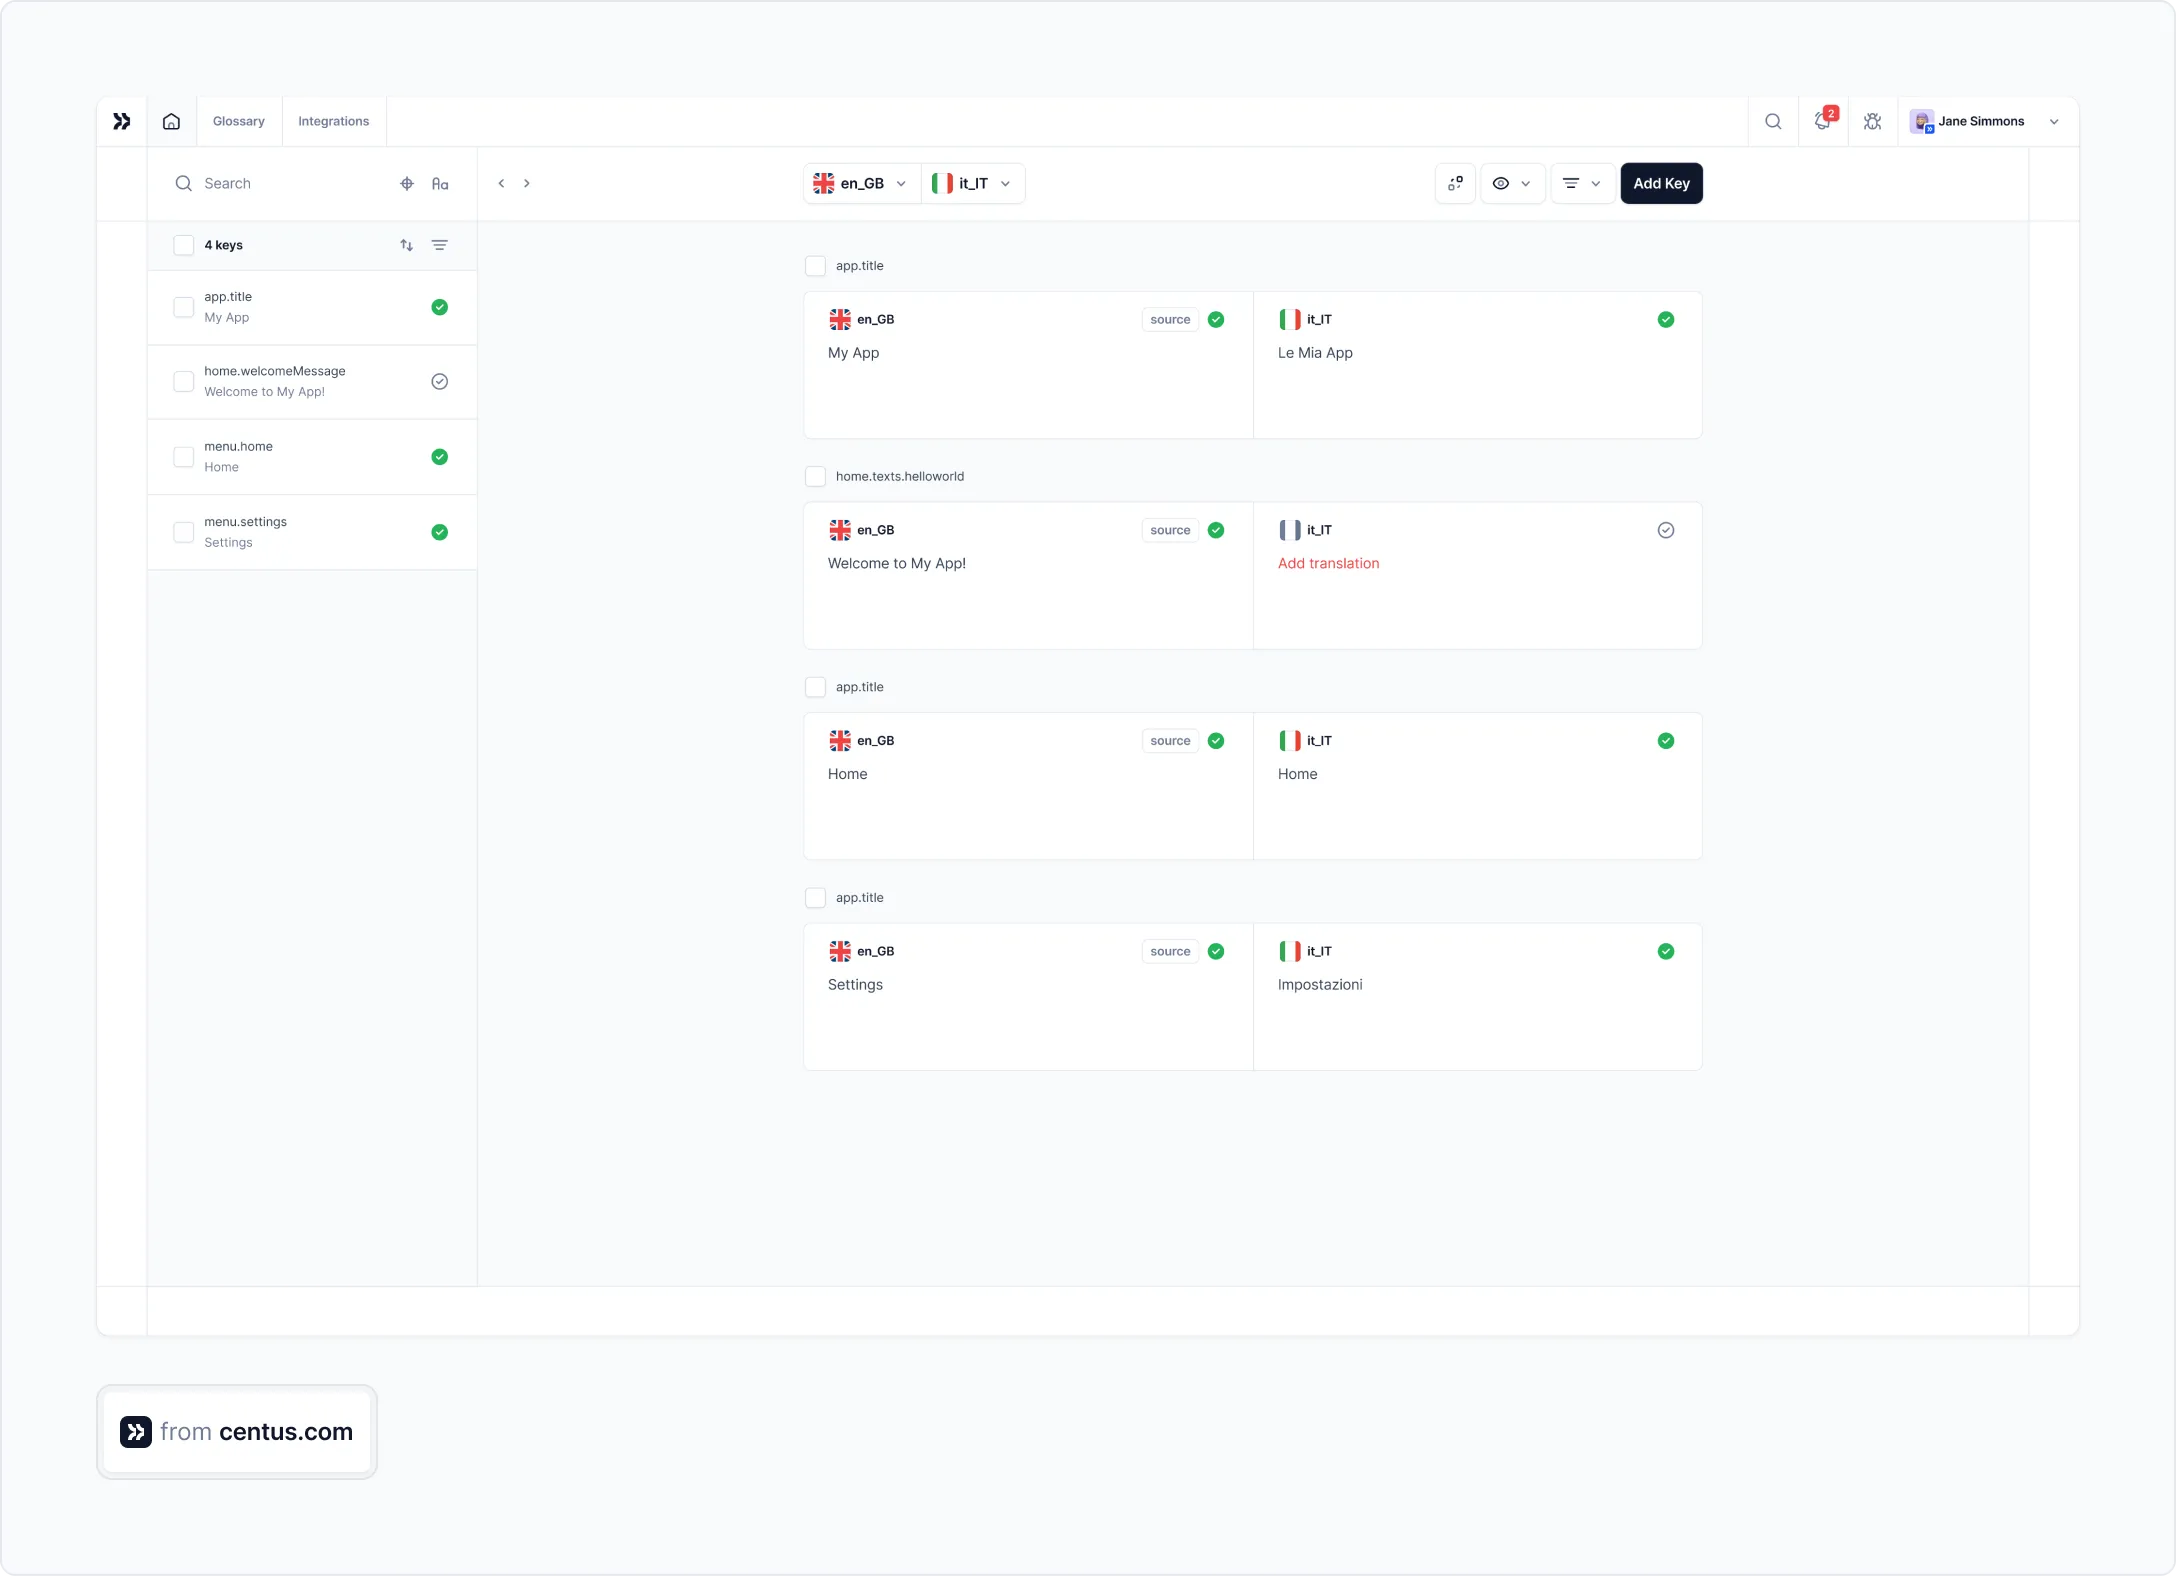
The XLSX file is perfectly organized and ready for translation now.
But before you move on to other files, let me share a tip 💡.
See this counter below?
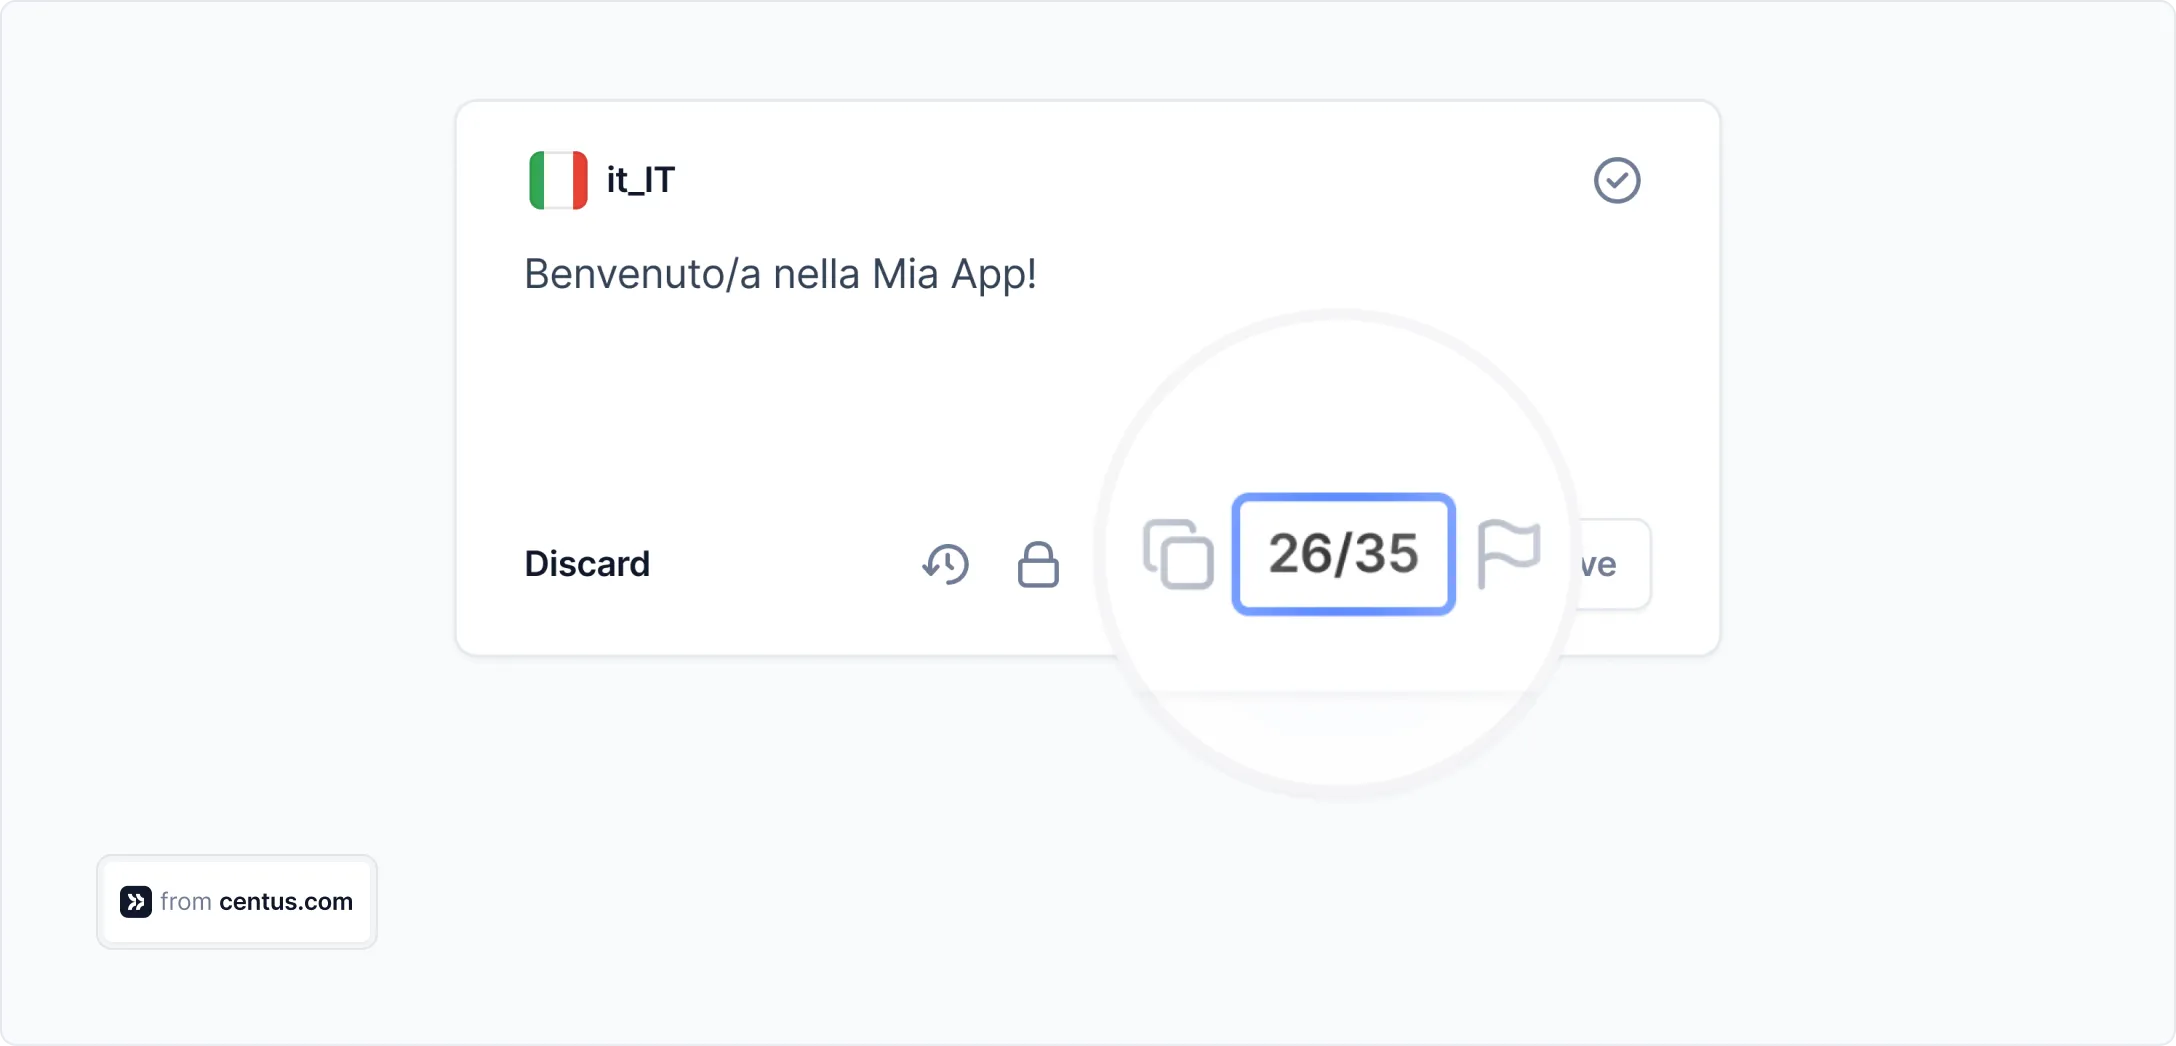
It shows the character count for your translations. It’s particularly valuable for app or software translations where you’ll have to fit translated text on small buttons and other UI elements.
To help your translators, add the maximum character length to the context column in your XLSX file 👇
With the help of the character counter and context suggestions, your translators will be able to adjust translations to fit UI buttons.
PPT and PPTX
First things first, PPT is an outdated PowerPoint file format, which is rarely supported by localization platforms. Convert it to the latest file version to prepare it for translation—PPTX.
Then, make sure your PPTX files don’t contain different formatting within a single line of text, as those might be split into separate parts by your localization tool.
Finally, save slide notes as separate plain text files to ensure that your localization tool recognizes and imports them.
PHP, JSON, YAML, XML, and other string files
9 times out of 10, you have nothing to worry about. Your developer team will hand you the complete string files that are ready for app localization.
But sometimes, you might have to ask them to follow formatting guidelines recommended by your localization management platform.
For example, if your developers use integers as keys in their YAML files, it’s best to put integers in quotes:
en:
 app:
   title: "MyApp"
items:
 "001": "USB-A”
 "002": "USB-B"
 "003": "USB-C"
If the string files don’t adhere to your localization platform’s formatting guidelines, you might have to edit translated files manually. And that’s not something you want to do for even a single file, let alone dozens.
3. Organize collaboration and control
As a localization manager, you might wear multiple hats: manager, editor, QA expert, and even marketing advisor. Yet, your key responsibility is coordinating efforts between multiple teams and individual contributors (ICs).
While the bulk of localization work is out of your hands, it’s nonetheless critical that you remain in control of it. You still need to verify that each process in the localization workflow has been performed to the pre-agreed level of quality.
To sum up, your two critical responsibilities are coordination and control.
Let’s break them down to see what exactly needs to be done:
- assign content to translators and editors
- provide ICs with translation context, style guides, translation memories (TMs), and glossaries
- liaise between ICs and your company’s SEO, marketing, legal, and technical reviewers.
- handle feedback and implement corrections
- oversee changes in the project’s scope and specifications
- monitor adherence to the agreed deadlines
As you can see, there are plenty of responsibilities and parties involved. Without proper workflow management, it’s easy to get pulled in multiple directions.
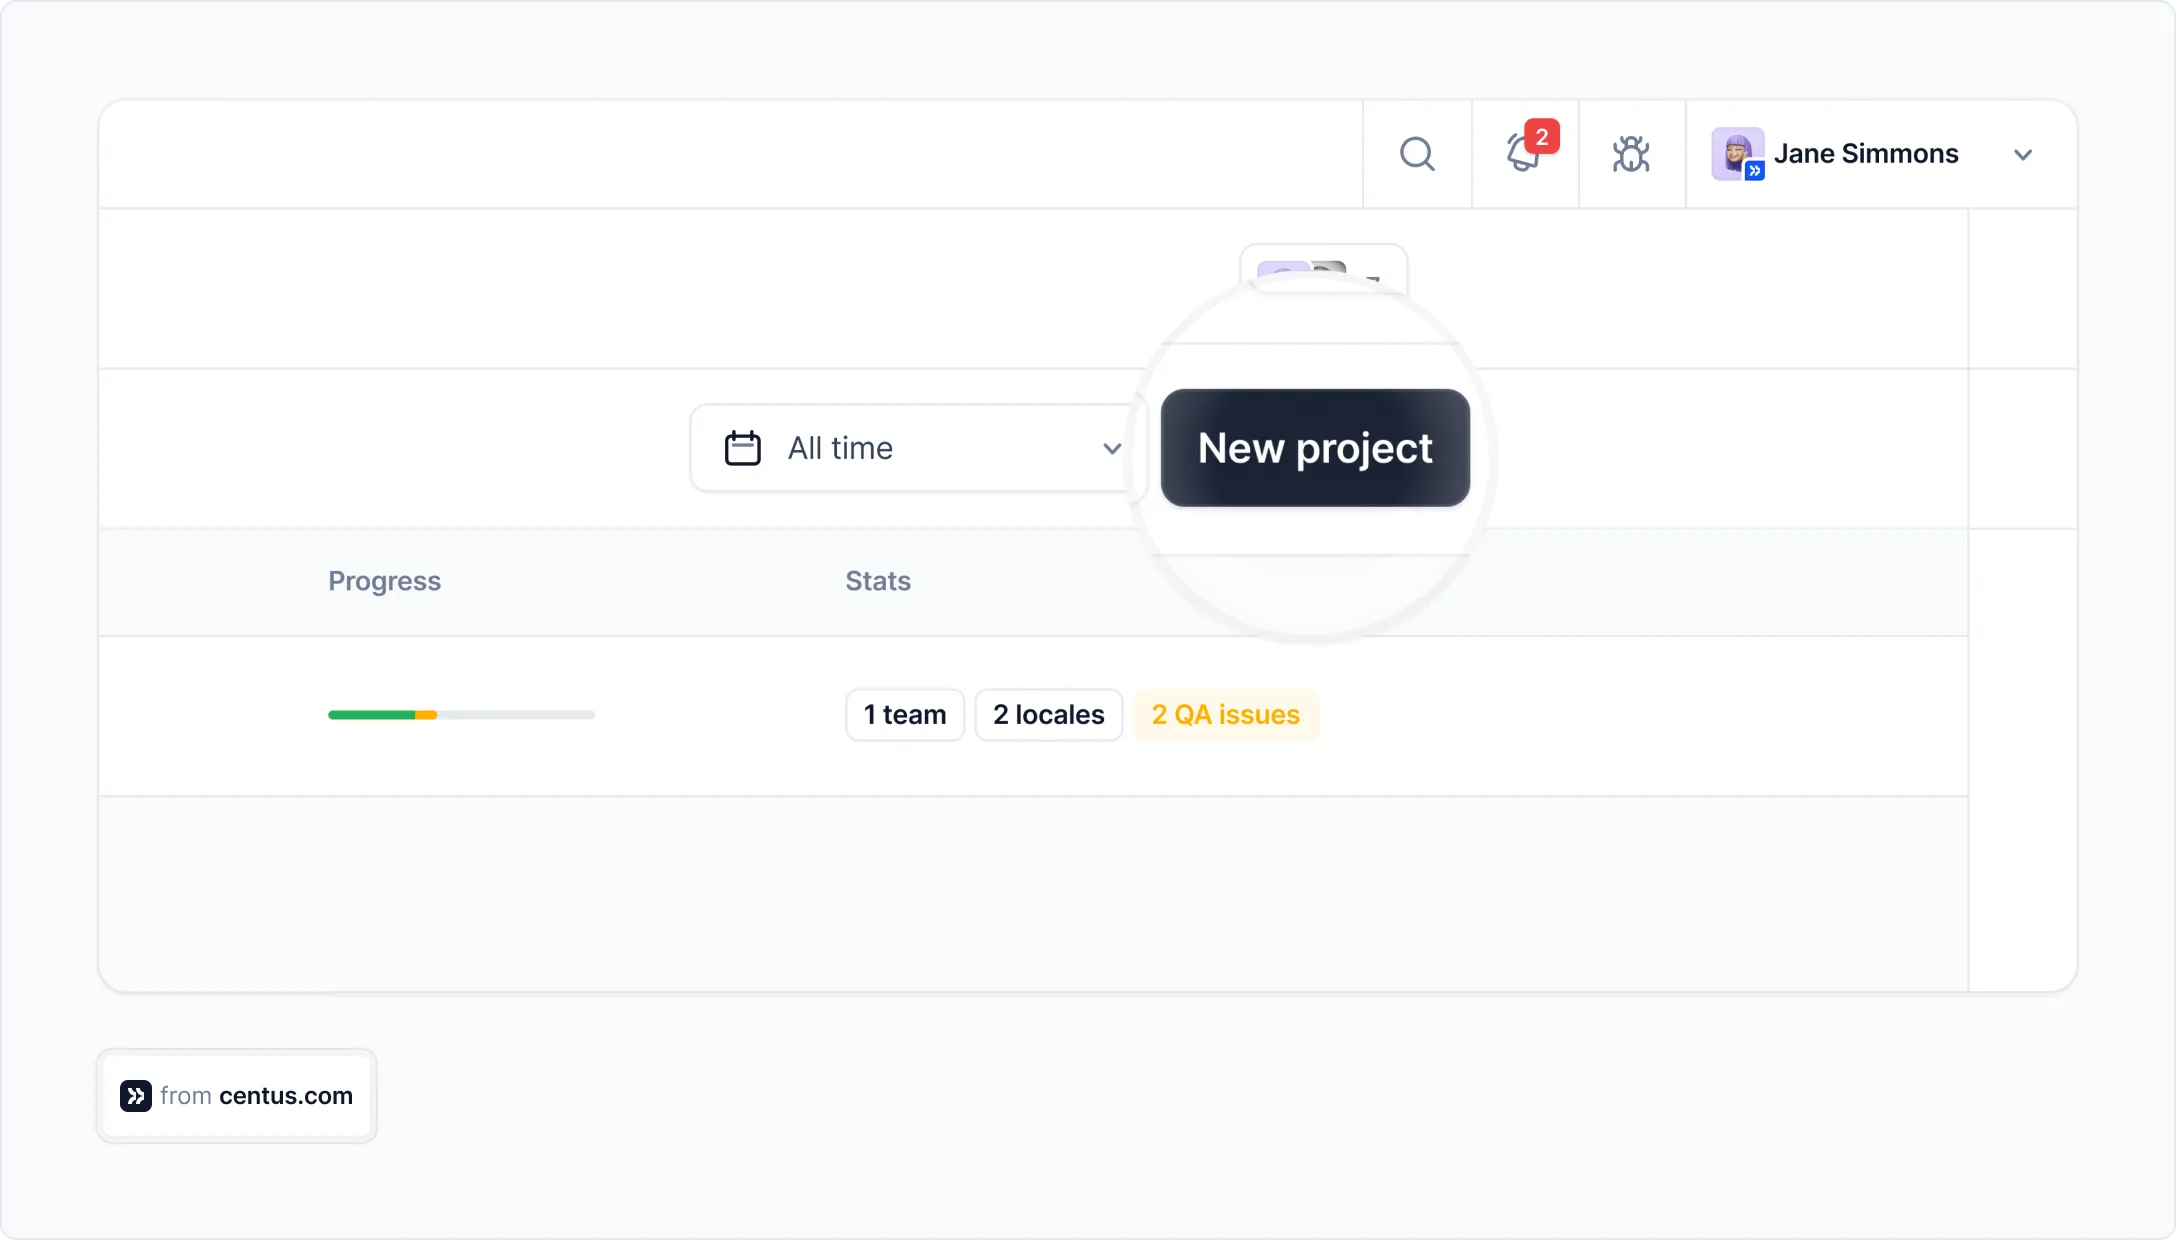
To keep you on track, use a localization workflow automation platform, like Centus. The platform makes it super easy to set up and streamline custom localization workflows.
Start by signing up to Centus and creating a new project.
Then, bring individual contributors or entire teams to your project.
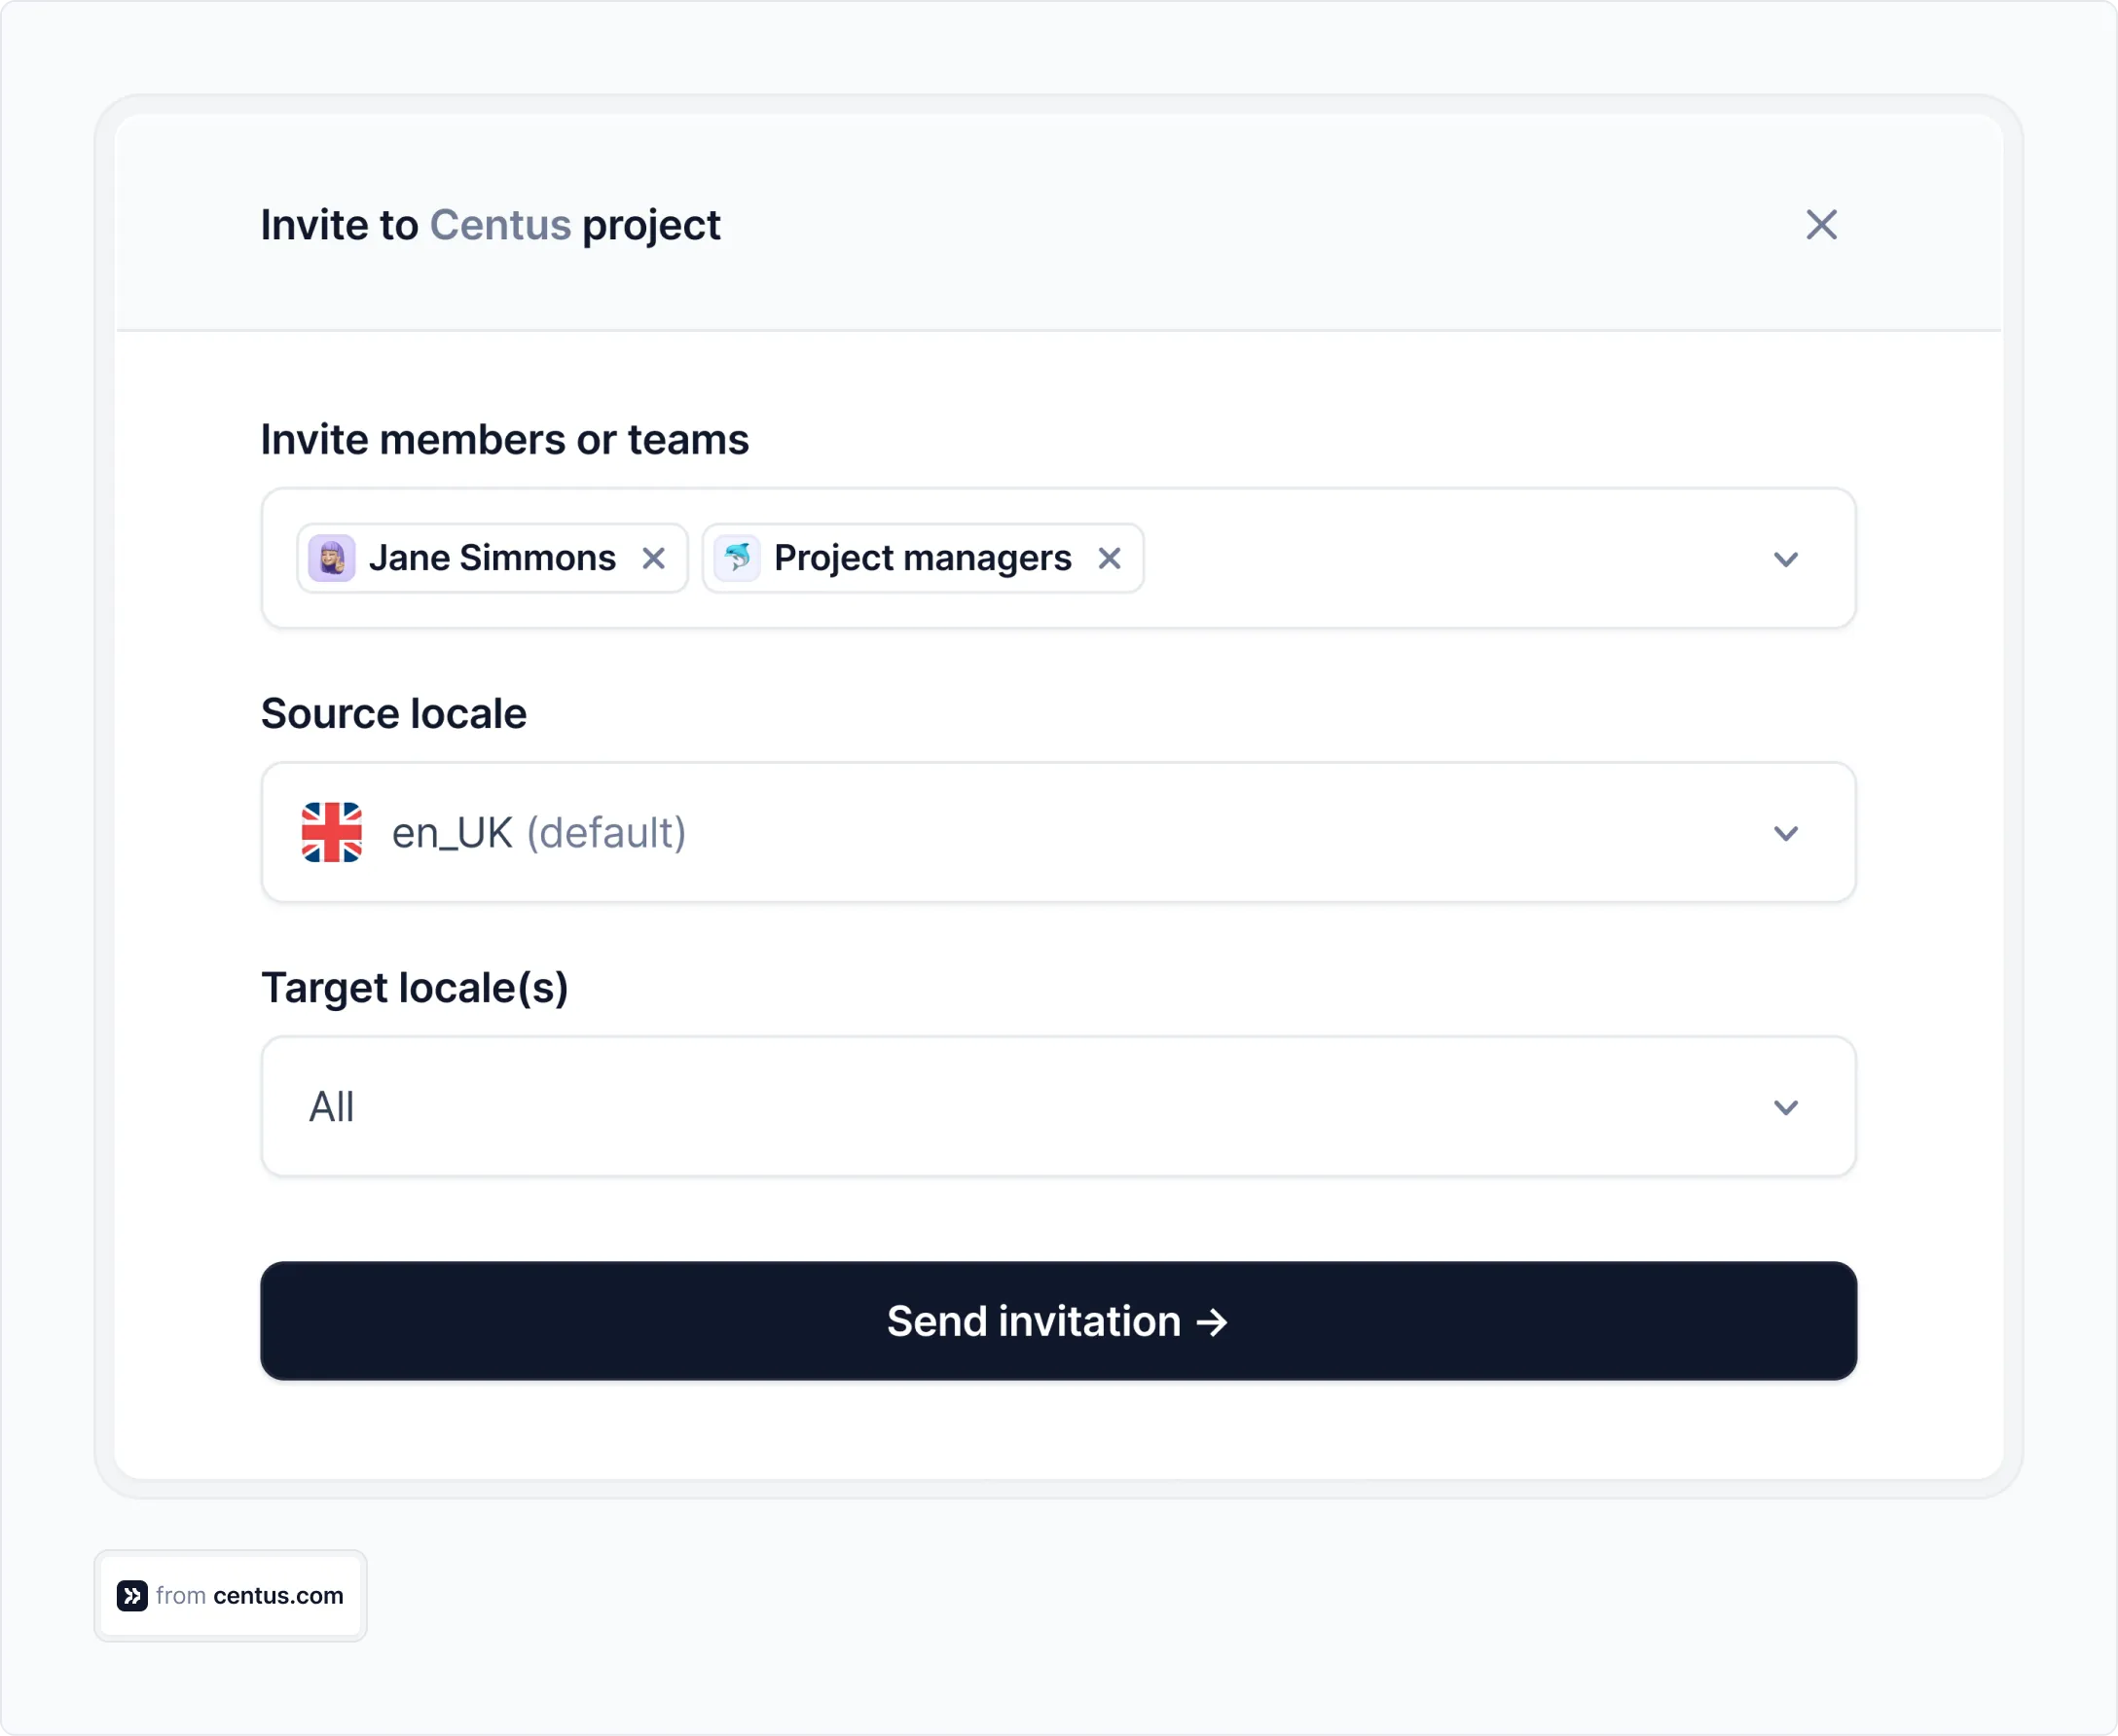
You can assign each contributor a role and manage their permissions to ensure that everyone has access to the right tools while safeguarding sensitive information.
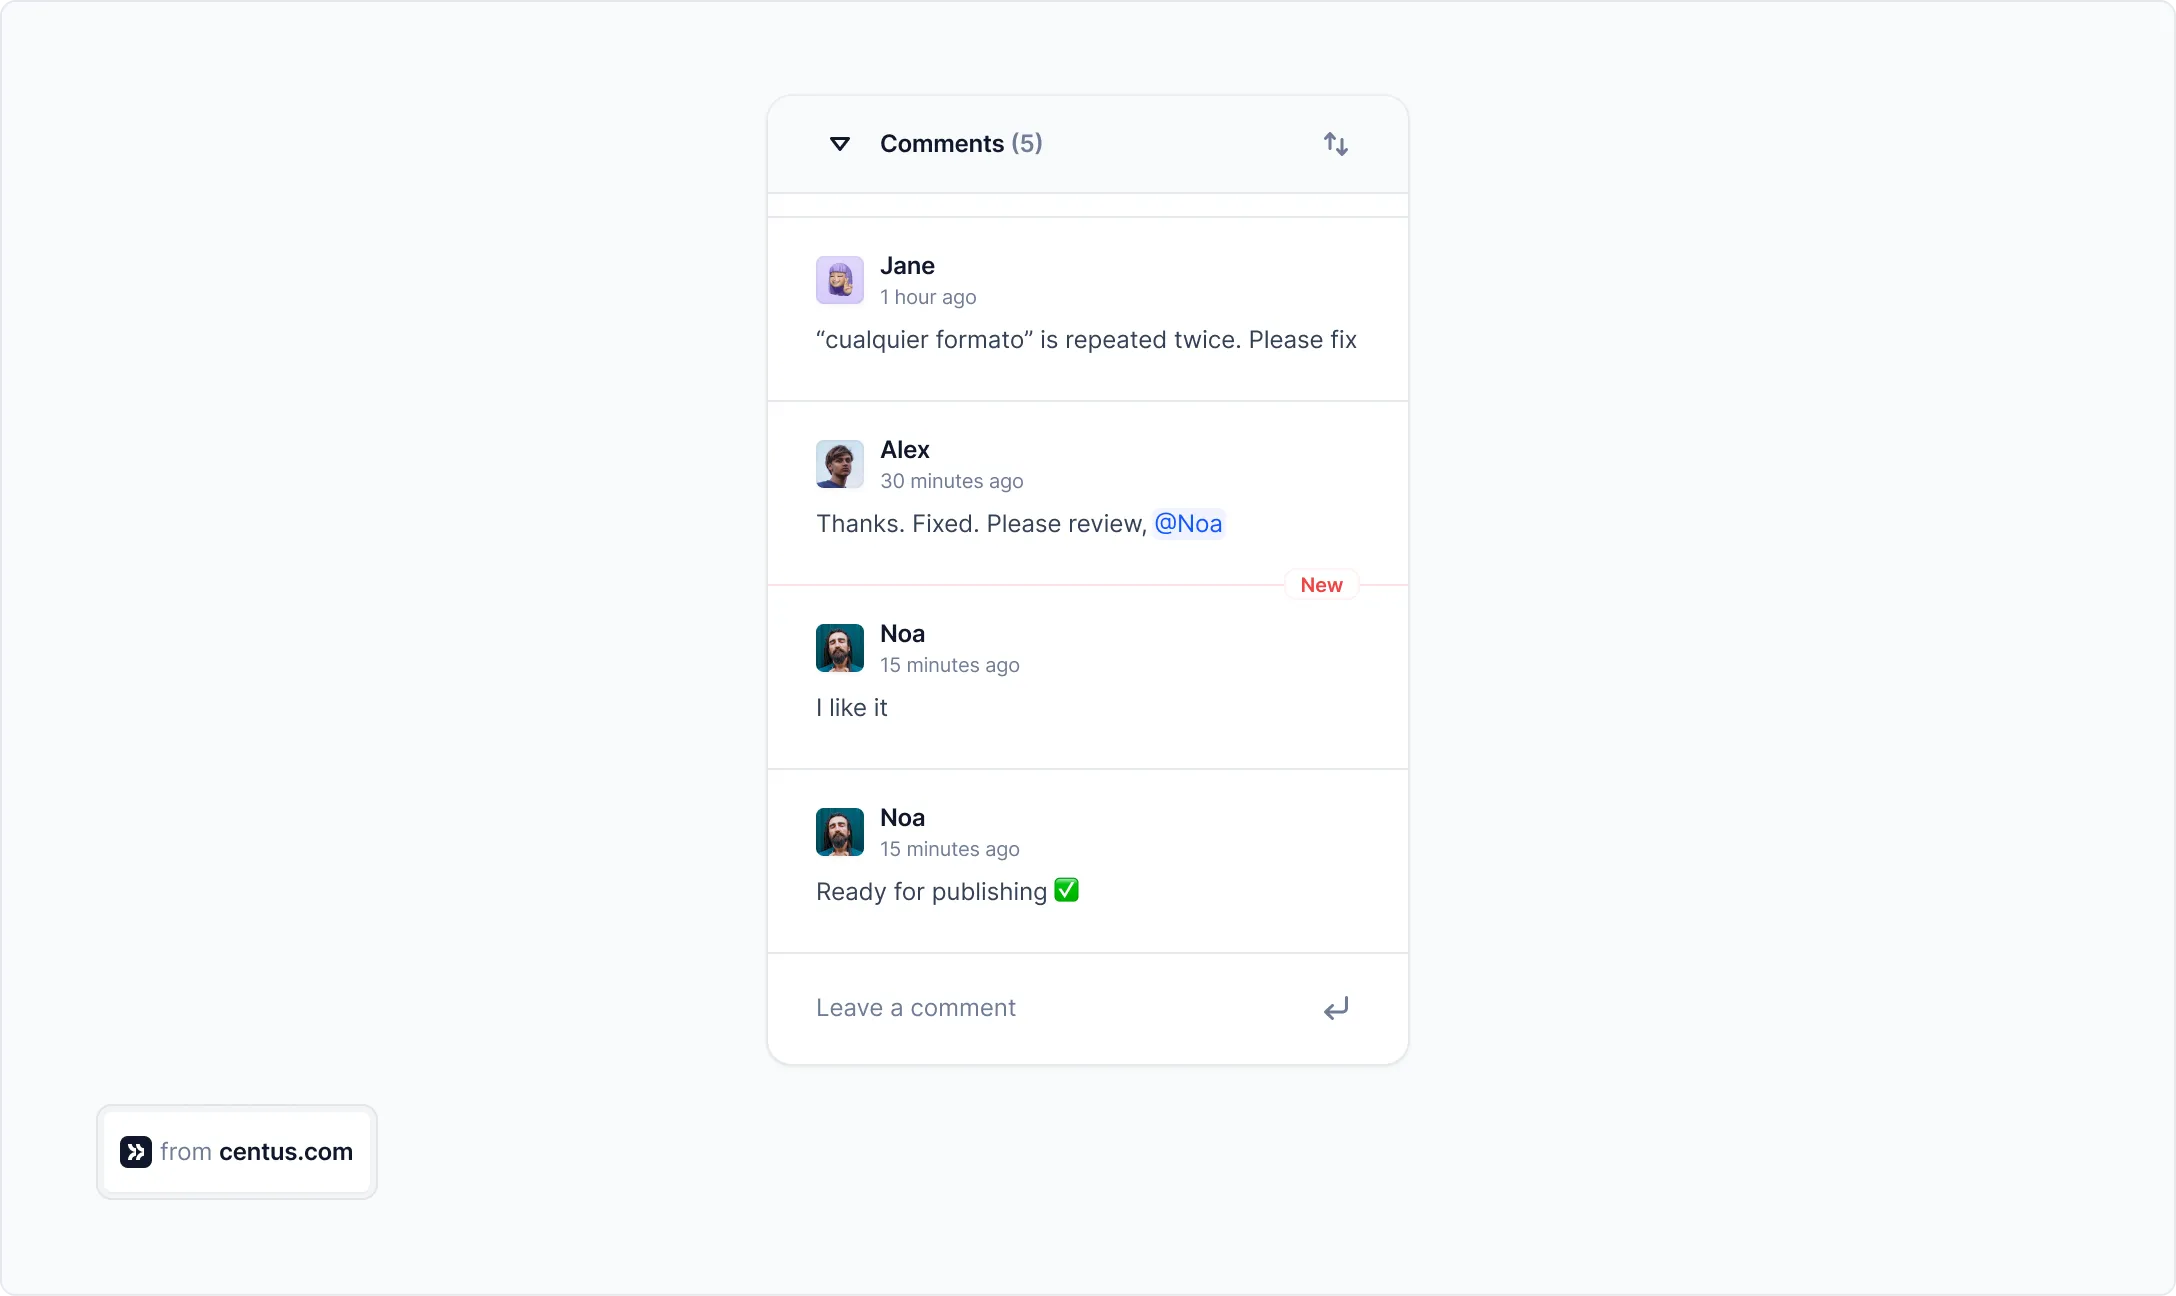
After everything is set, encourage your project contributors to communicate and share feedback.
To monitor the project’s progress and key statistics, navigate to the Home panel.
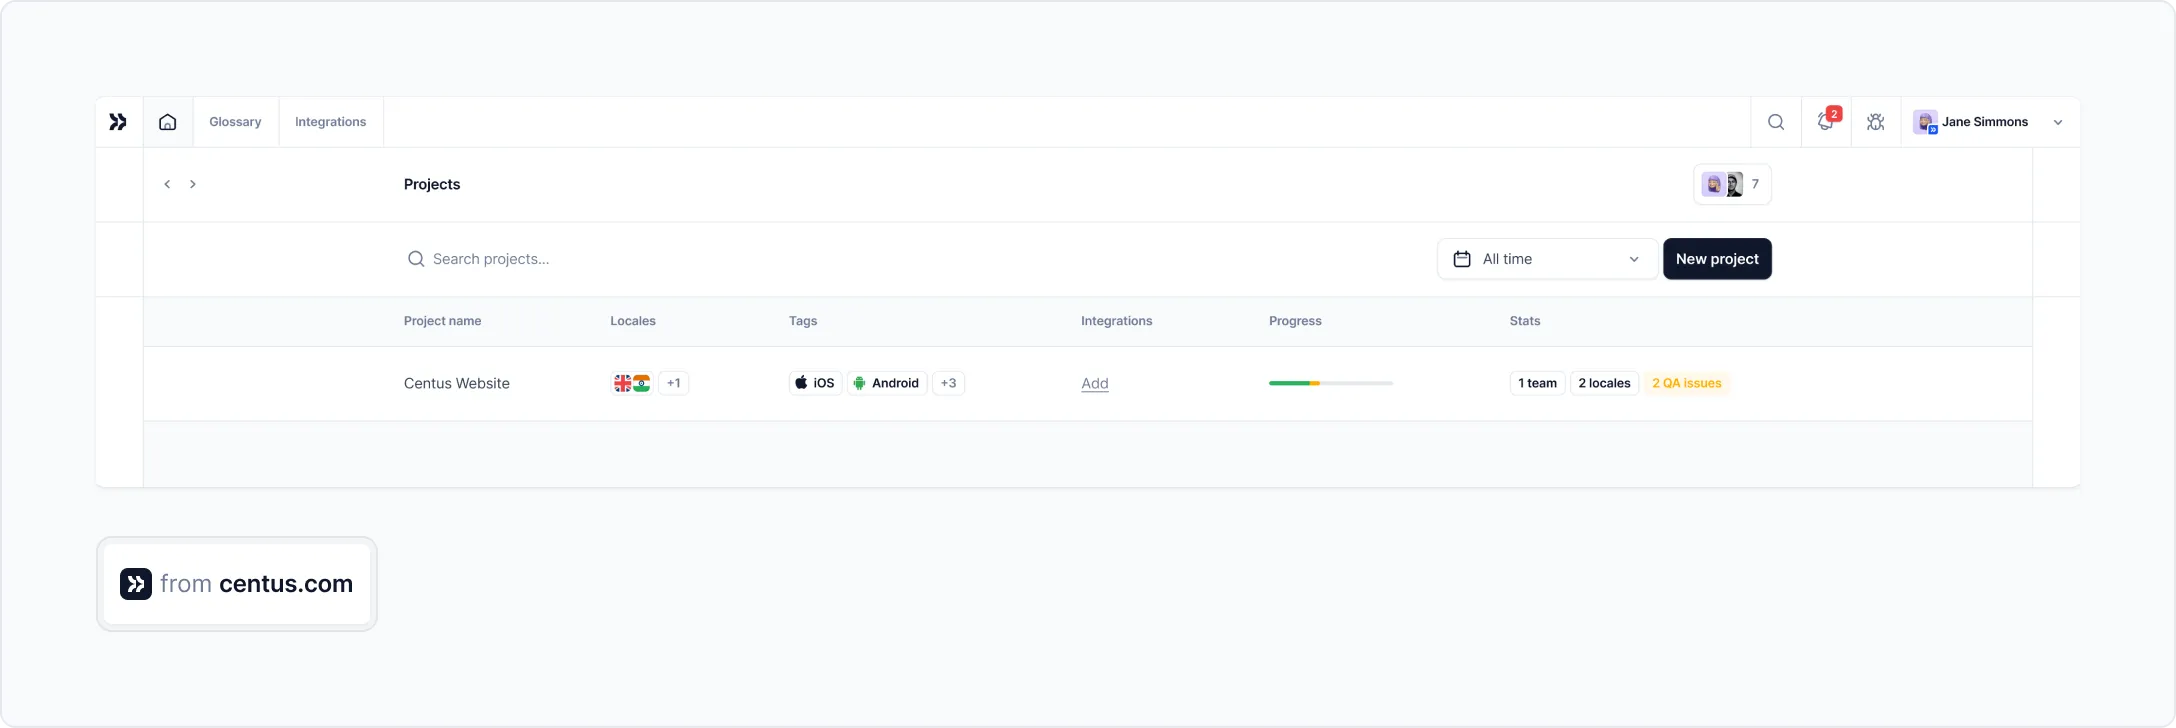
For more granular control, drill down into individual tasks to see precisely what has been done and by whom.
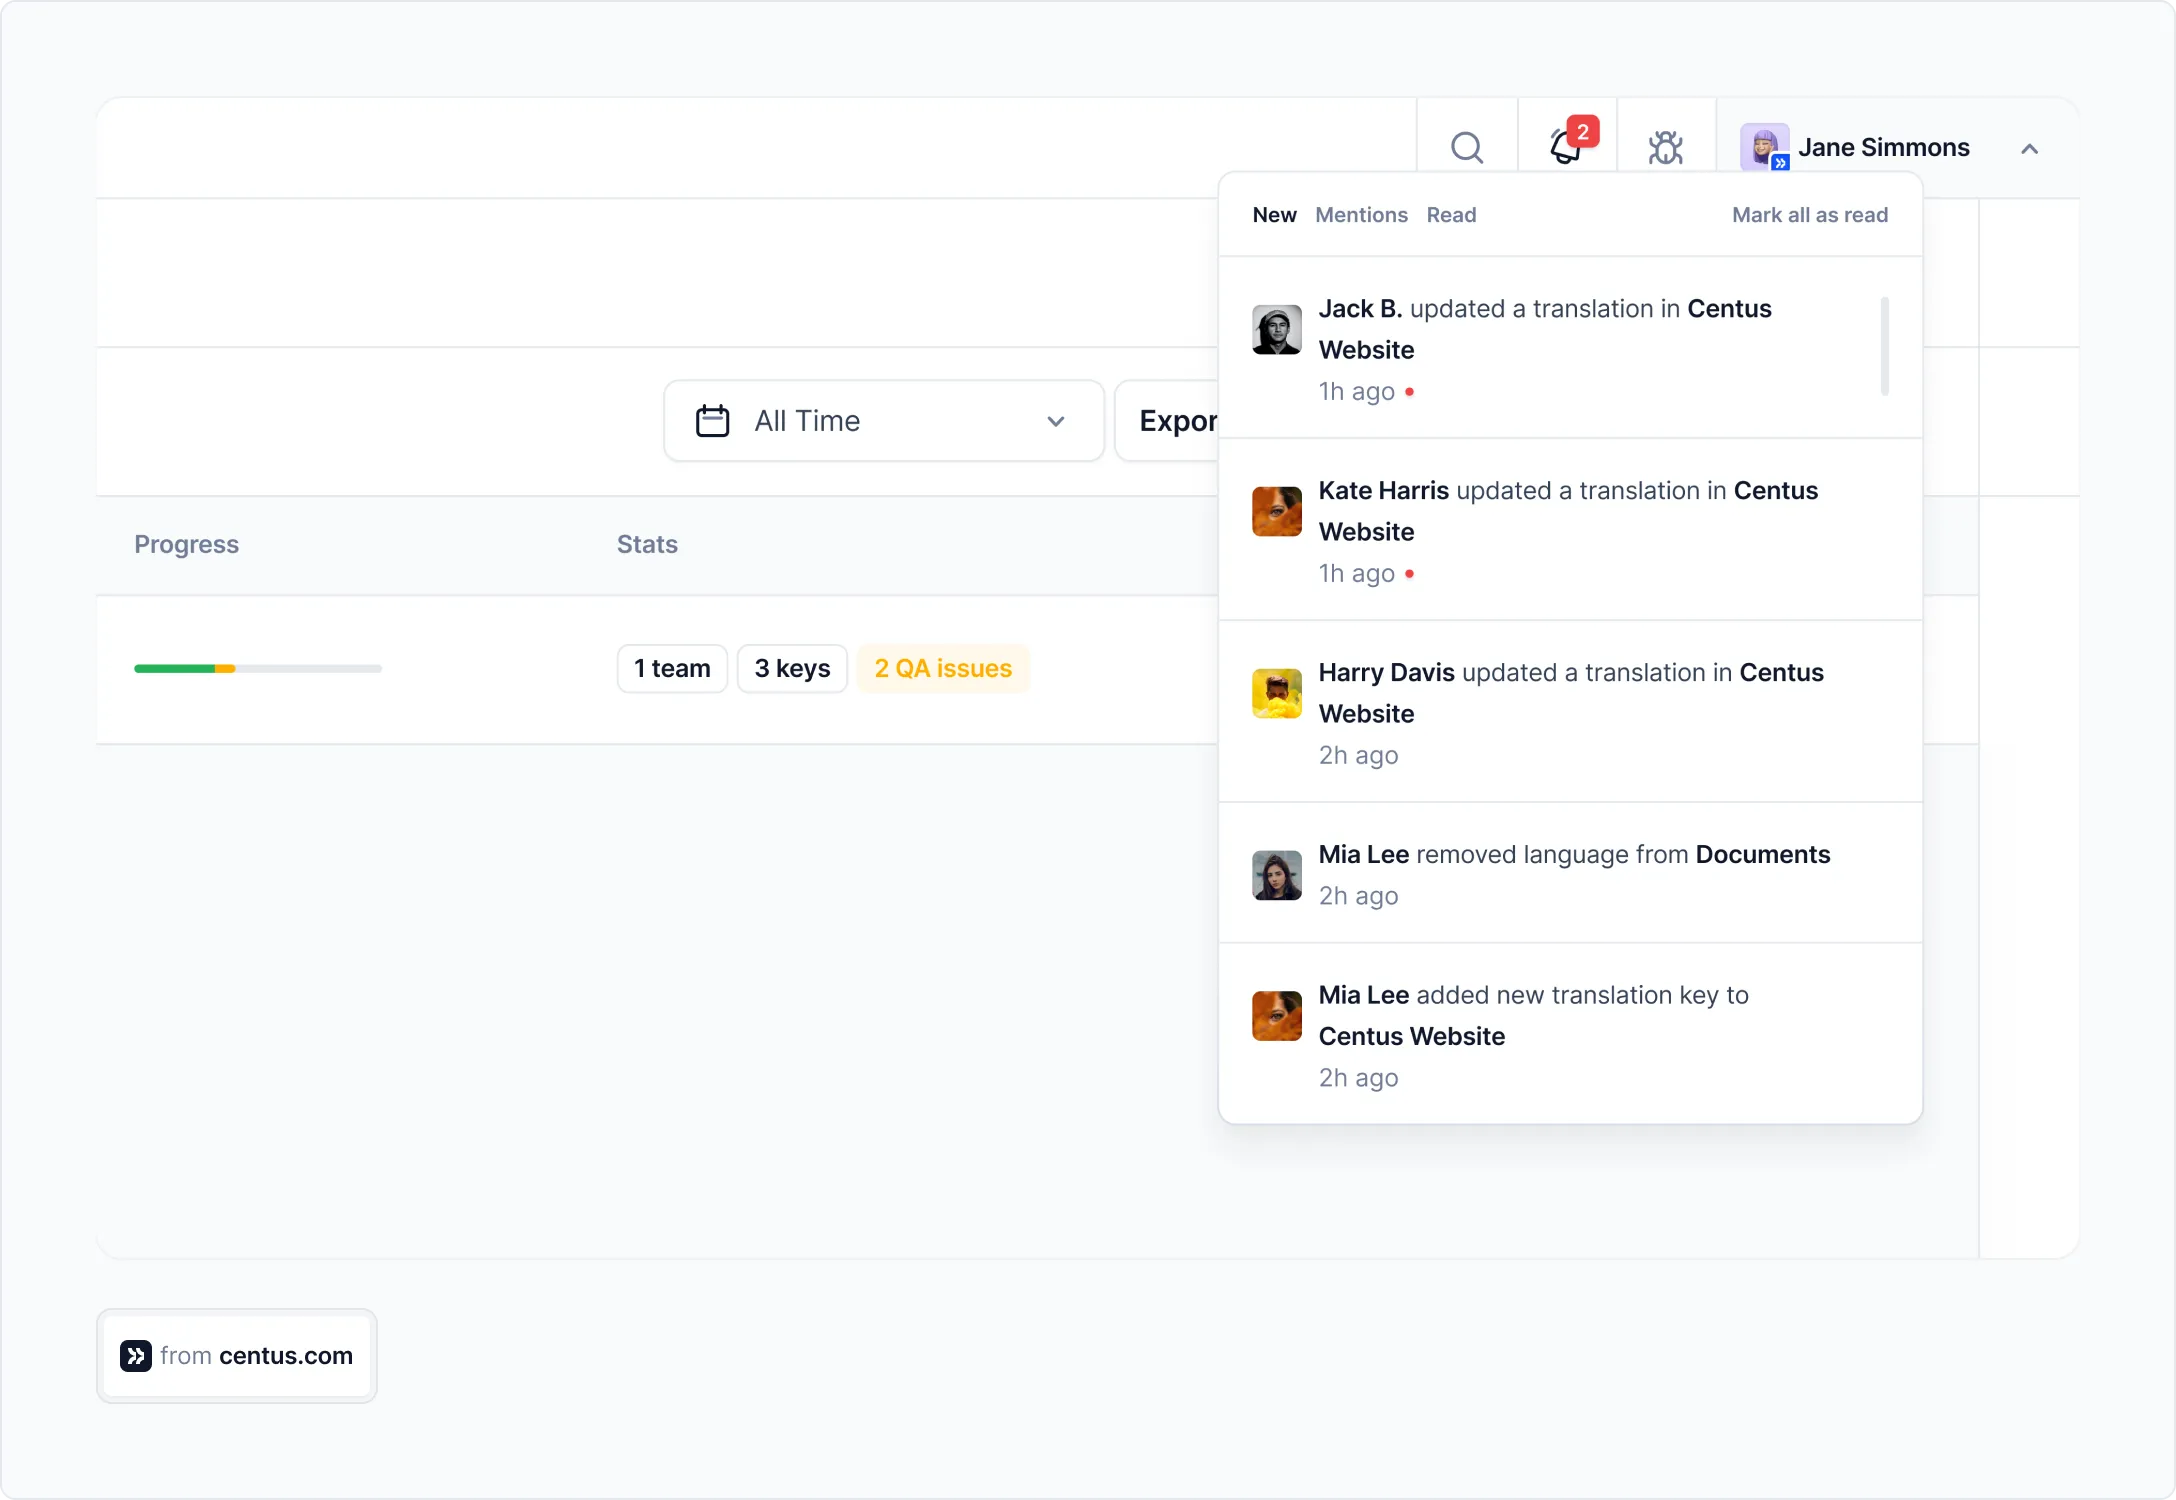
You can also use the notification panel to stay on top of the key steps and changes in the project.
There’s no way around it. Those who have tried coordinating and controlling localization projects via emails and spreadsheets soon realize their efforts aren’t scalable.
Managing localization into a language or two via manual means is certainly doable. But when it’s time to localize into multiple languages at once, managers turn to localization workflow technology and never look back.
4. Arrange translation and editing
Now let’s get to the meat and potatoes of your localization workflow–translation. You need to translate content (and fast!) while ensuring its quality is high. The solution?
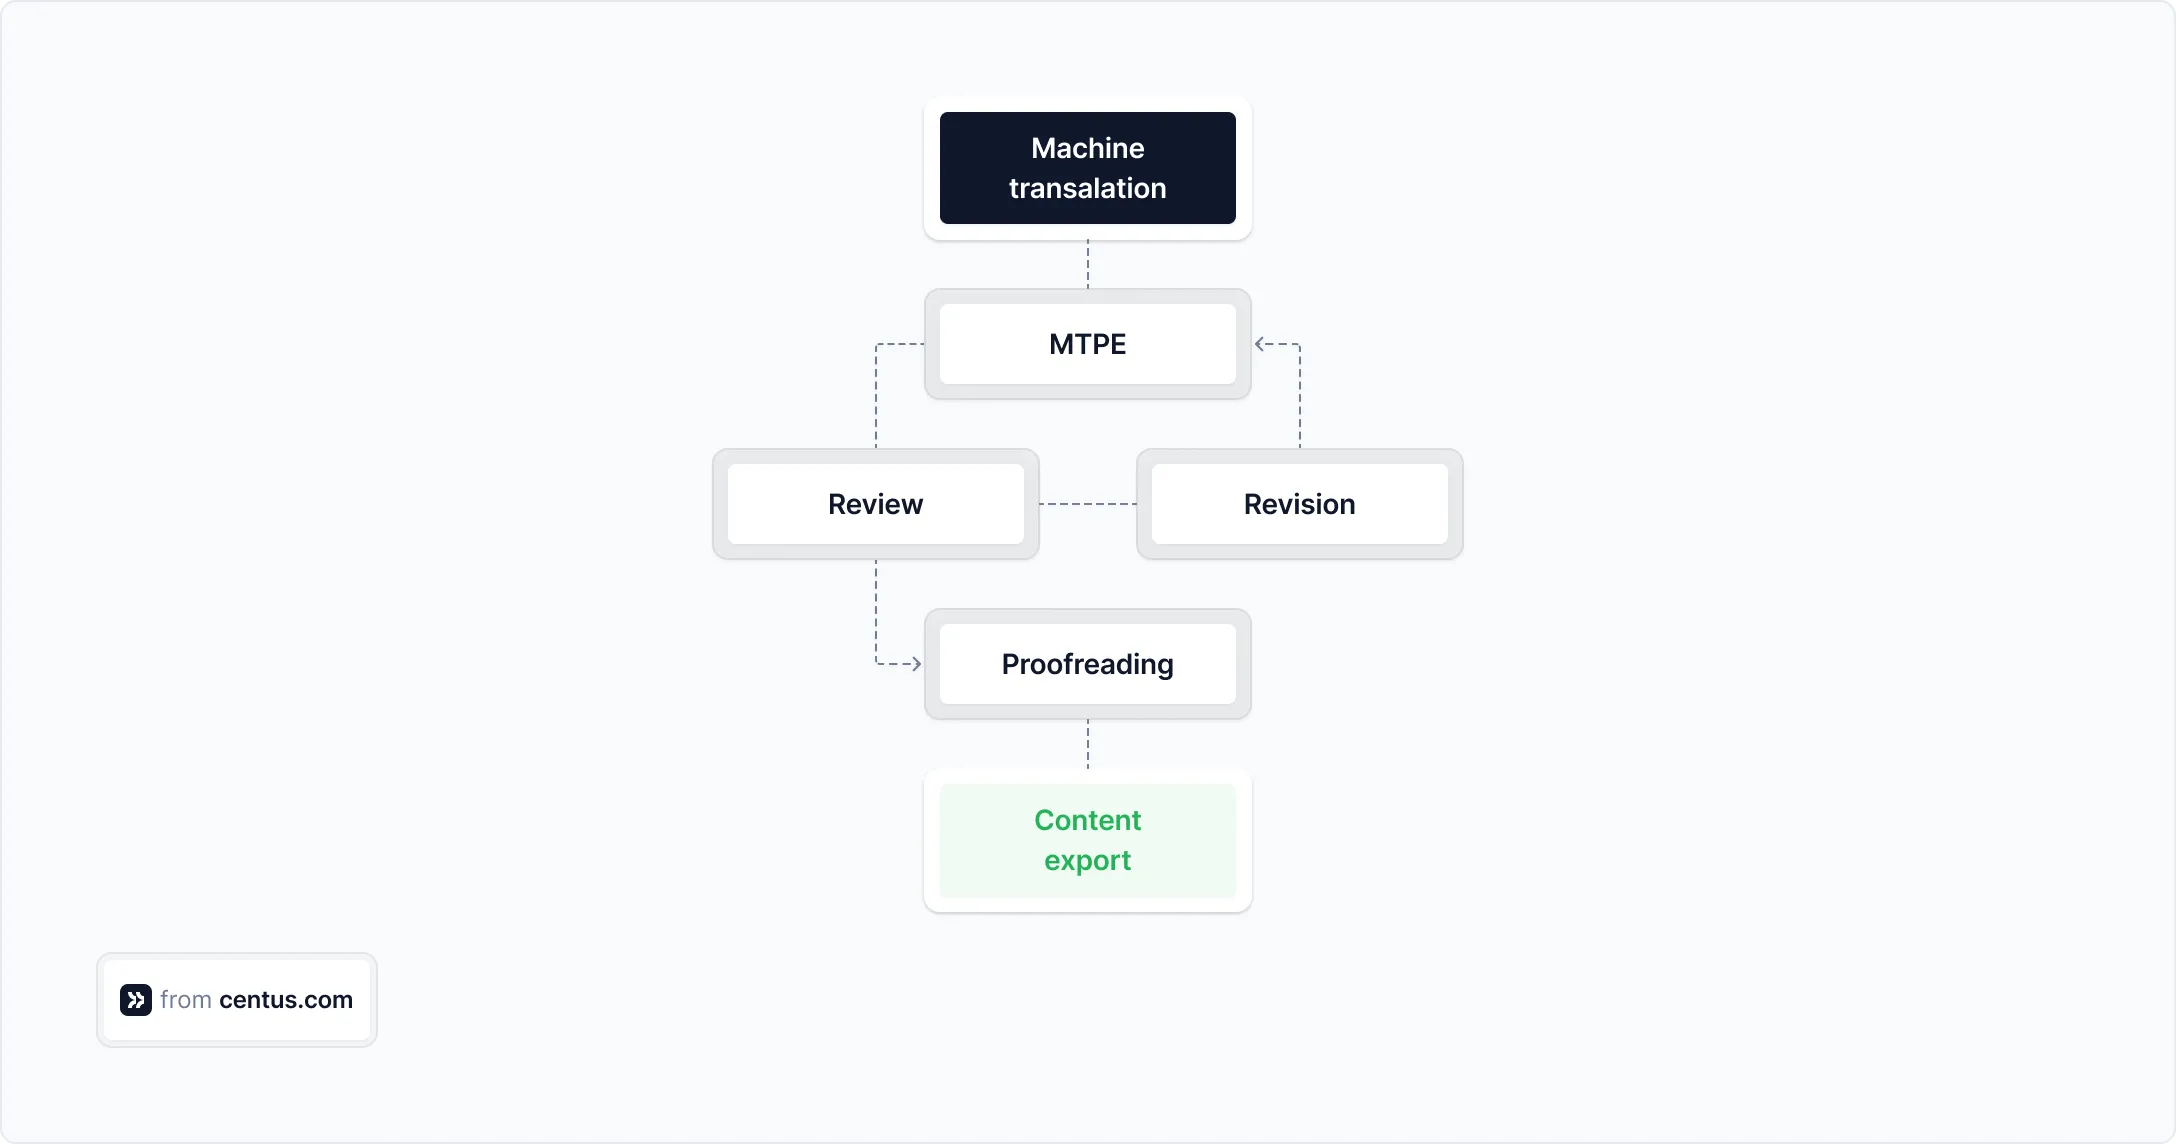
Machine translation post-editing (MTPE)
MTPE is the editing of machine-translated content by a human expert.
Instead of translating content from scratch, ask your experts to edit content generated by Google Translate, Microsoft Translator, or DeepL—Centus supports them all!
Essentially, it’s the same old translation but with a twist. Here’s how to organize it in Centus:
- Navigate to the Imports section and upload content files. Centus supports dozens of file types, such as XLIFF, JSON, YAML, PHP, and XLSX.

- In the Editor, review automatically segmented content
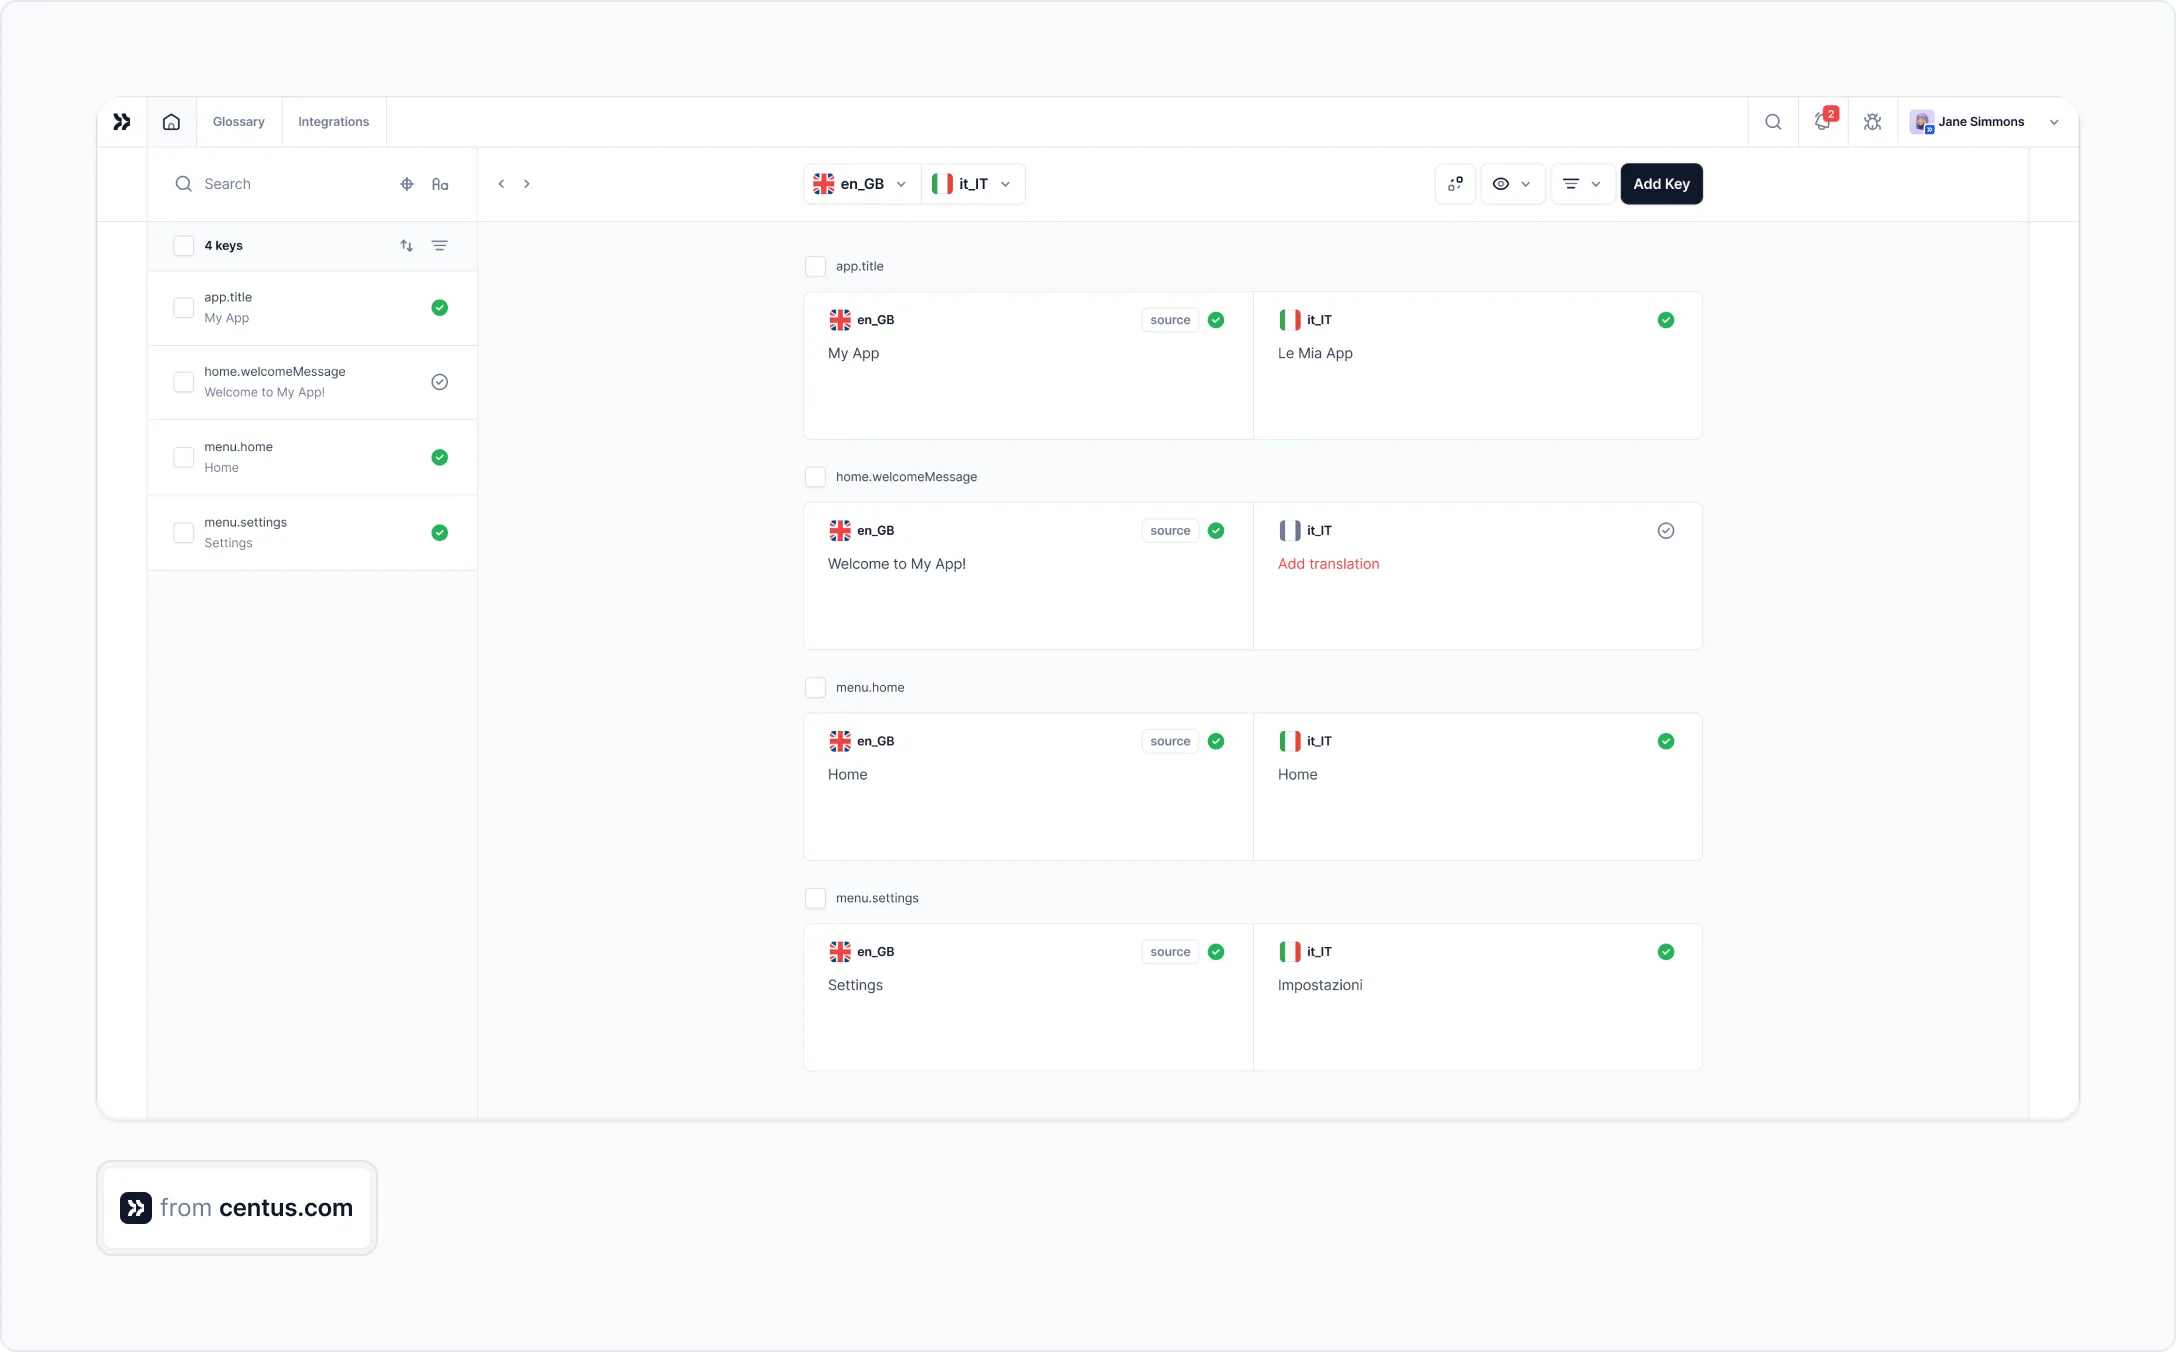
- Generate bulk translations using Google Translate, DeepL, or Microsoft Translate
- Click Save
After generating bulk translations, assign them to your translators for adjustments.
Using the MTPE approach, it will take just a fraction of the time and effort to create high-quality translations. Once the translations are ready, assign them for proofreading and review.
The MTPE process flowchart below illustrates how you can structure your localization workflow:
Keep in mind that the use of MTPE alone is not enough to optimize your translation workflow. You also need terminology management and translation memory tools.
Terminology management
Great translations are consistent. You can’t use alternative translations for the same term and expect your audience to follow along. They are bound to get confused.
To maintain consistency, you need a way to keep track of previous translations. You need a terminology management tool.
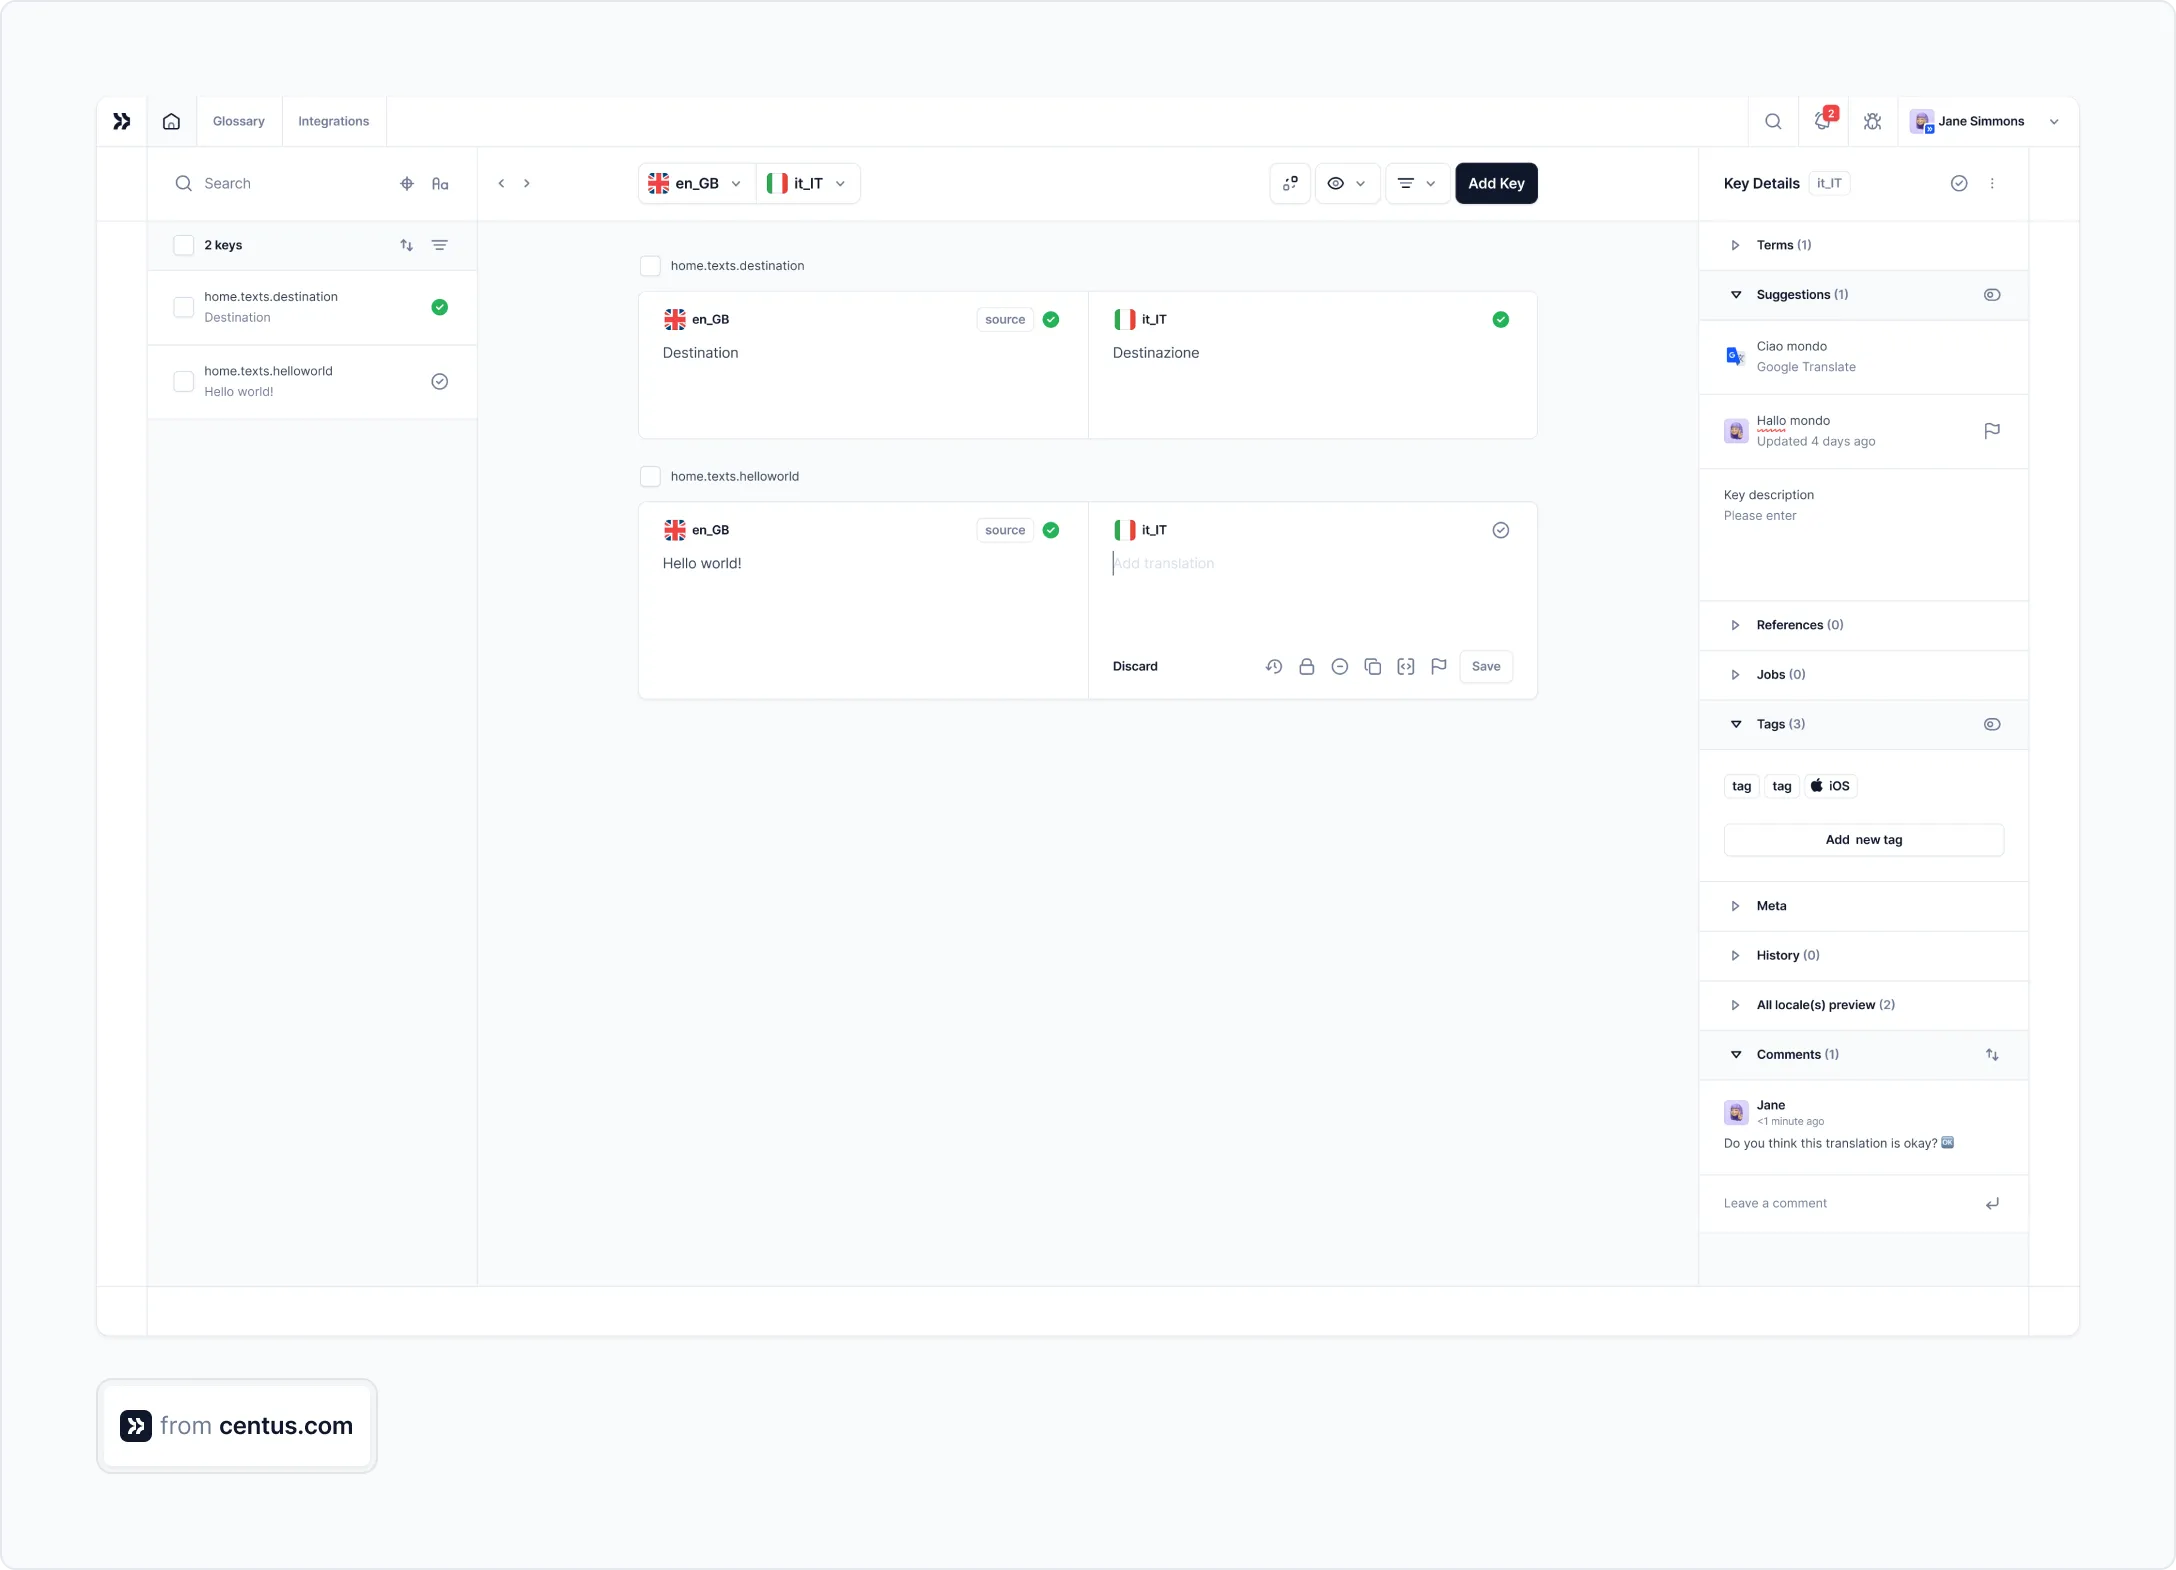
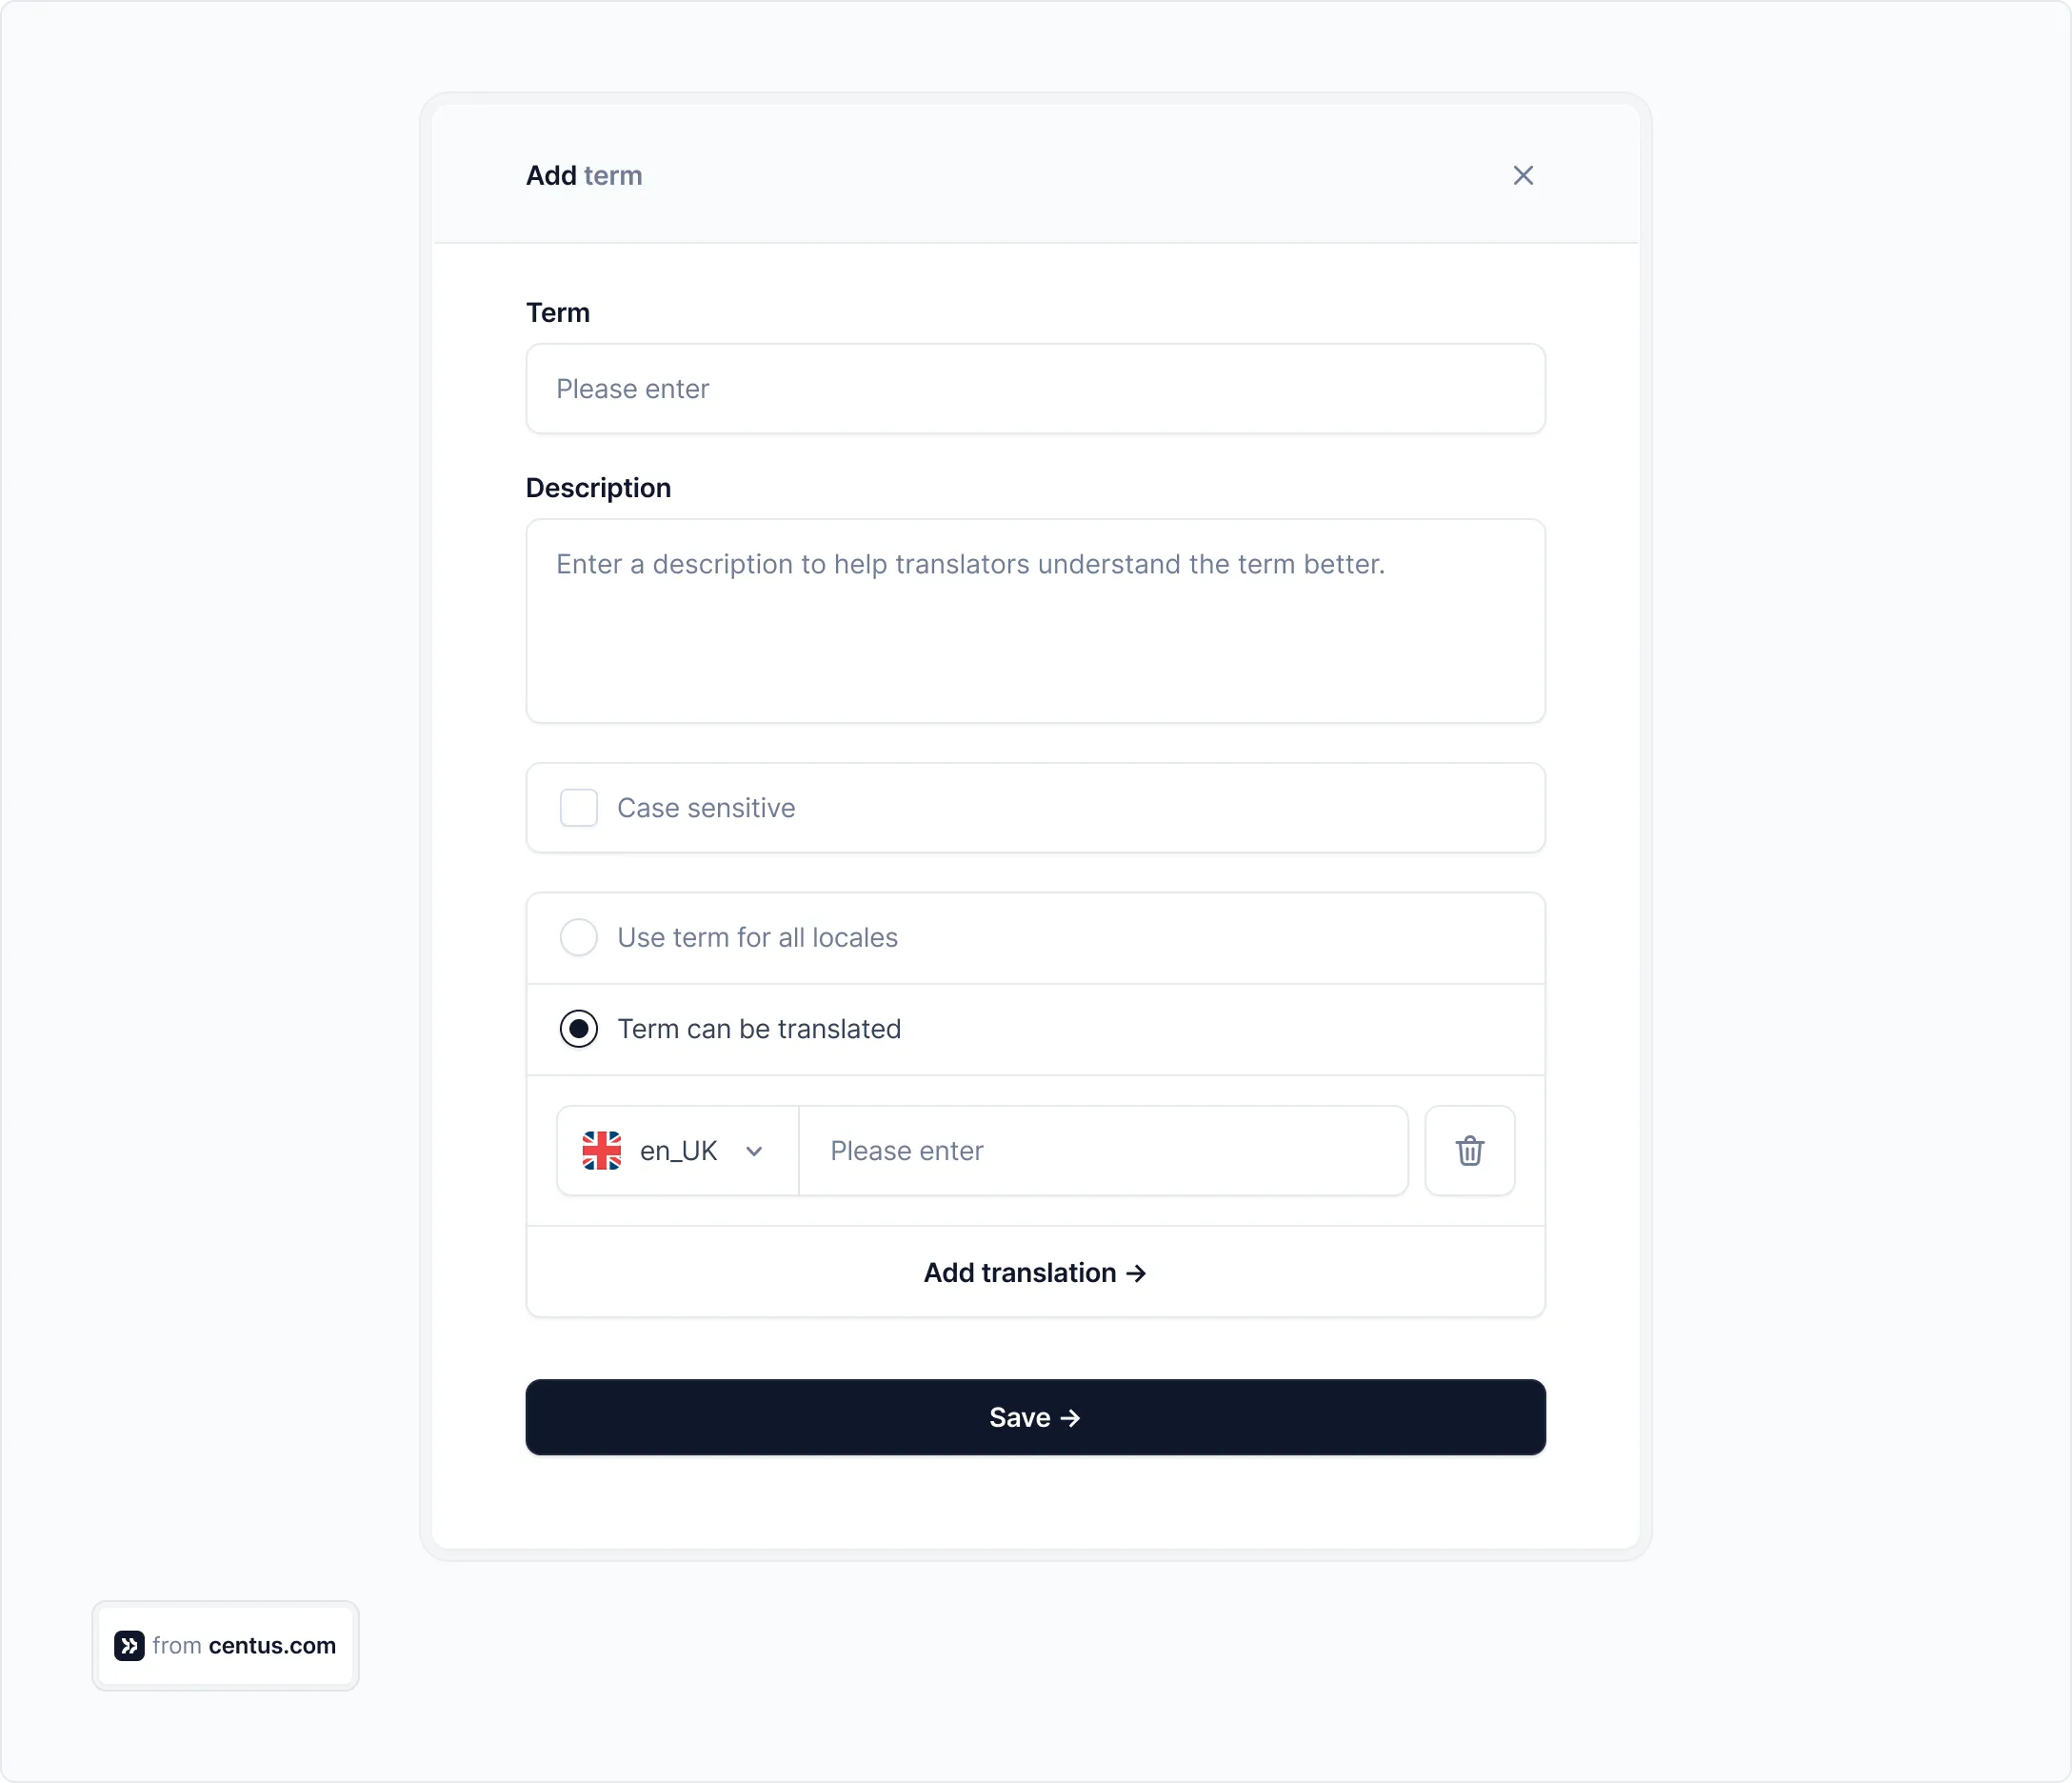
Centus comes with a built-in terminology management functionality that allows you to create glossary entries for each term.
Simply add a term followed by its description and translations into target languages. The terms can be added by all team members with requisite permissions, making your life easier.
Your team will see the term translations as suggestions in the Editor:
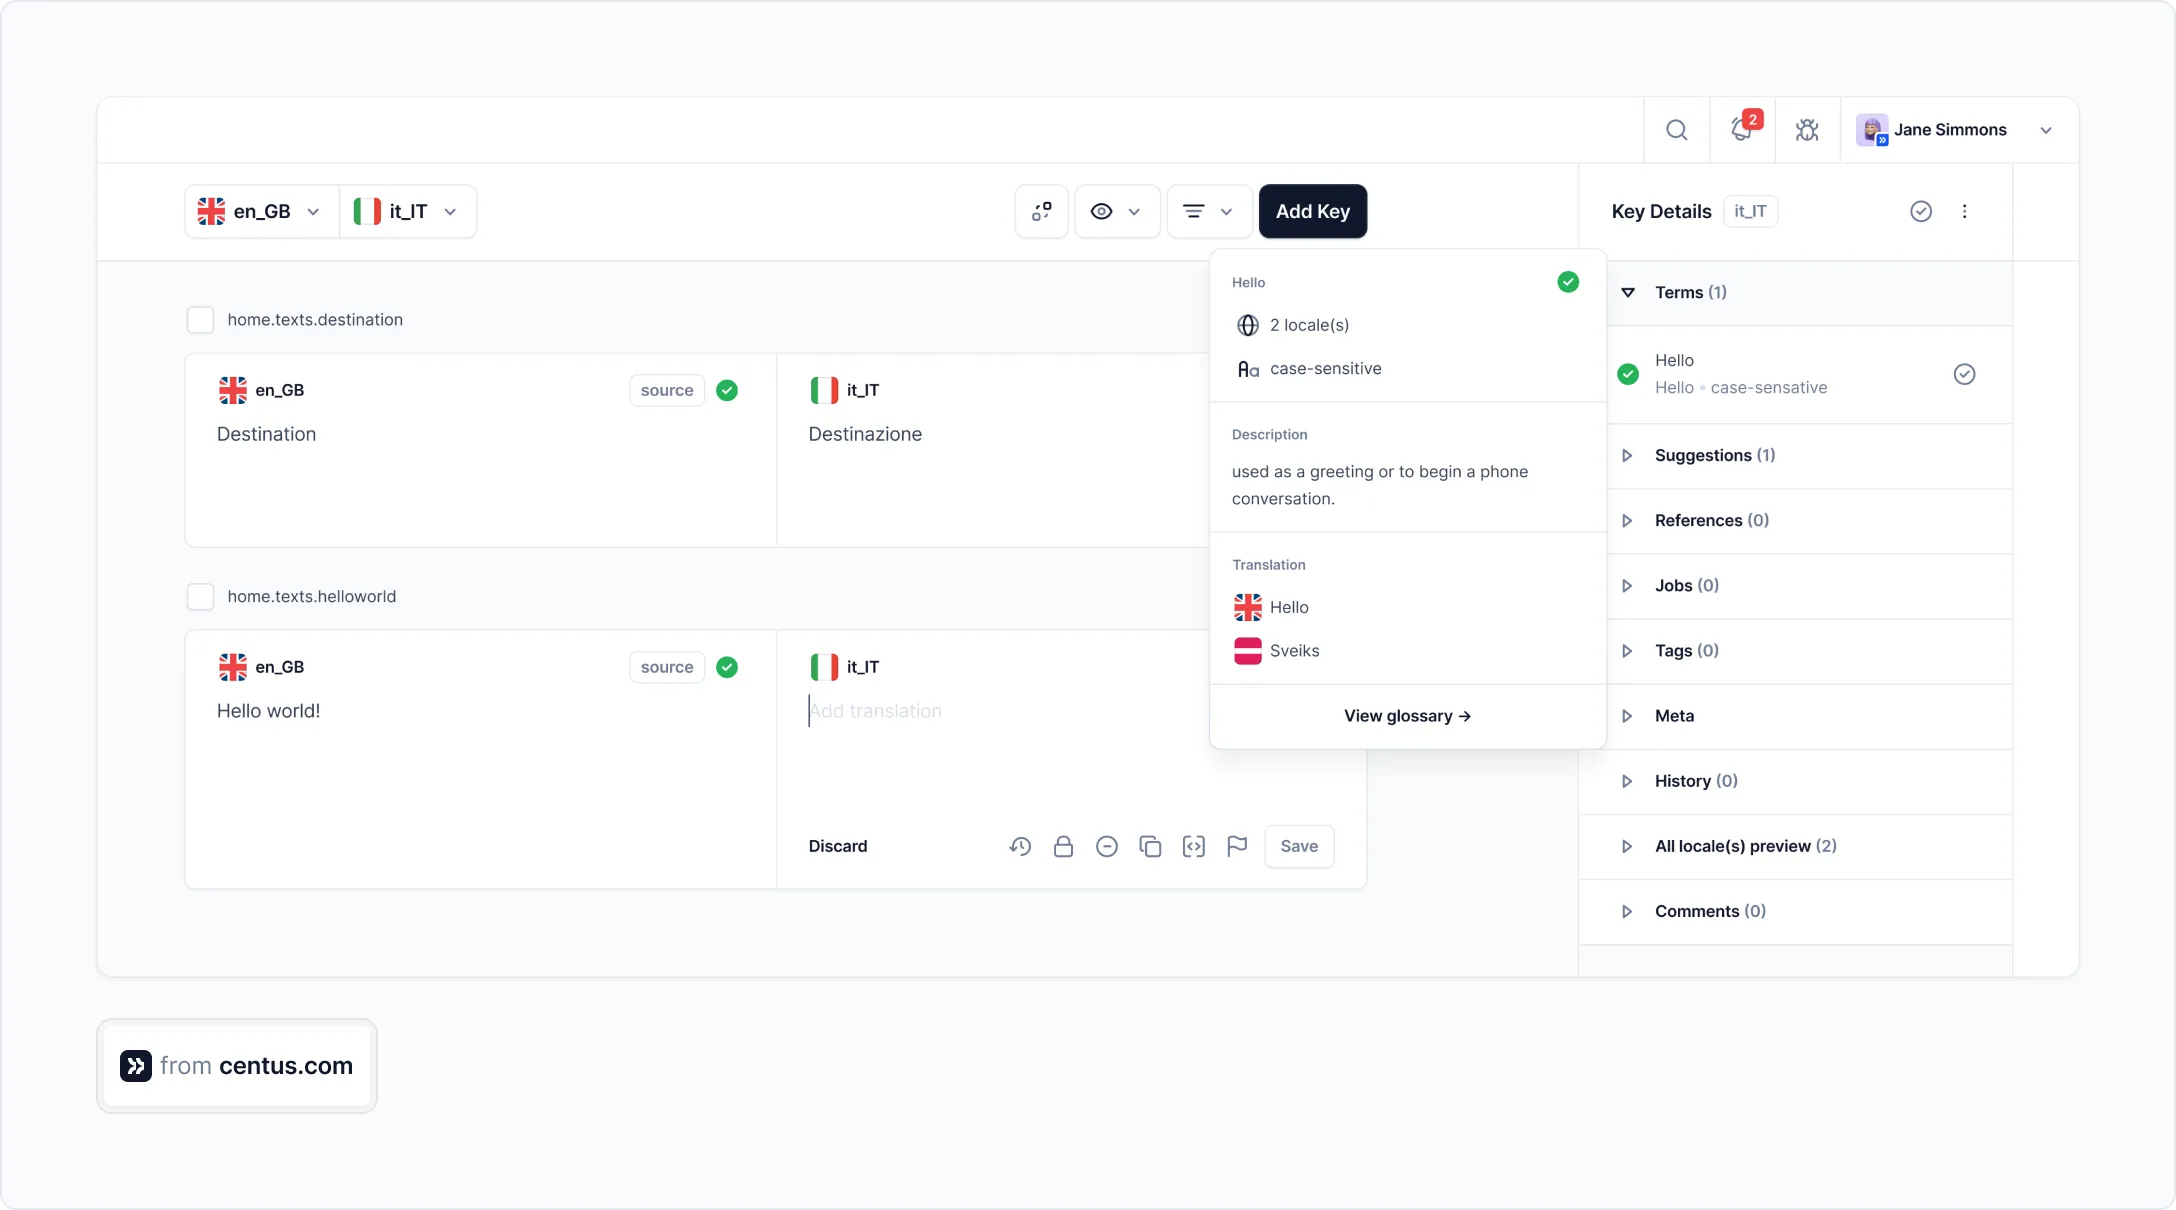
Your language experts can also automatically pull translations from the glossary without having to translate the same terms repeatedly. Convenient? You bet!
Translation memories
Translation memories (TMs) are not dissimilar to glossaries. They store previously translated phrases allowing you to reuse them. However, unlike glossaries, TMs are created automatically, sparing you time and effort.
When editing content in Centus, you’ll see inline suggestions from your TMs. You can add them manually or fetch all TM matches at once.
With the TM feature enabled, you can significantly reduce the time (and cost!) of translating your project.
5. Arrange design adjustments
Localization doesn’t stop at translation. Very often, you need to adjust your design too.
Sometimes, the adjustments could be as simple as aligning translations to avoid overlaps. Other times, your designers might need to flip the entire design to accommodate right-to-left languages.
To localize images and UI, ensure that translators and designers work together closely. Their collaboration is especially crucial when translations need to be shortened or expanded to fit the design.
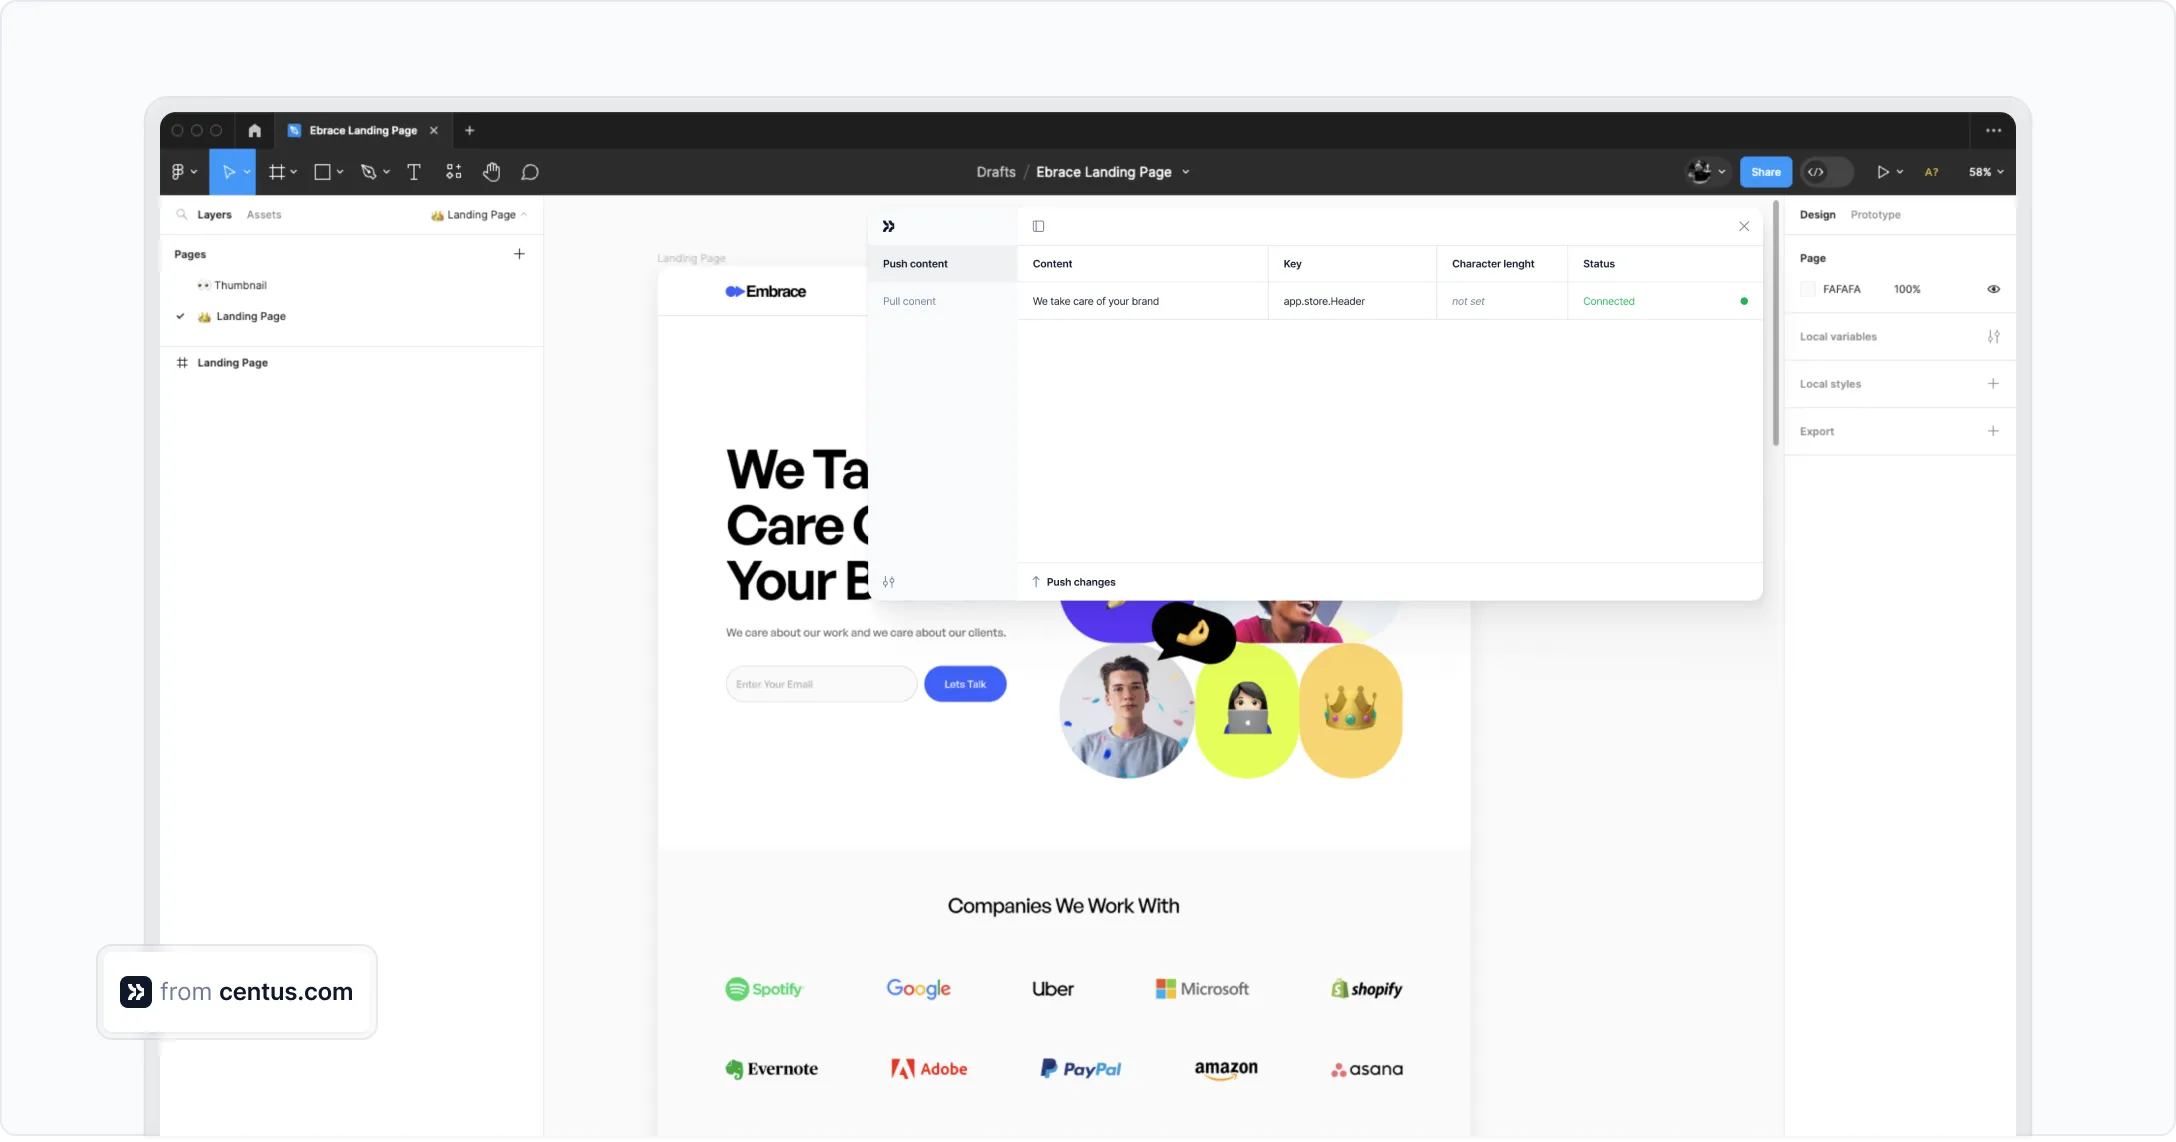
The easiest way to facilitate this collaboration is by using Centus. Simply install a convenient Centus plugin for Figma, allowing your team to automatically pull and push translations between the two tools.
6. Perform quality control
Reviews by editors, proofreaders, QA engineers, SEO specialists, marketing experts, legal professionals, and C-suite members all account for the quality control stage of your project.
However, this stage doesn’t necessarily come at the very end of your localization workflow.
Some reviews, like editing, should be performed right after translations. Others, like legal reviews, are done after the final adjustments. The graphs in the previous sections could help you figure out the right sequence of reviews for your project.
All those reviews should guarantee the highest quality of localized materials, right?
Wrong.
You shouldn’t rely solely on human experts to keep your translations error-free. No matter how rigorous, even multi-staged reviews don’t eliminate the possibility of errors slipping through.
To ensure the highest quality of translations, combine human expertise with QA task automation.
For example, if you enable automatic quality checks in Centus, you can detect the following issues:
- Spelling, grammar, and punctuation errors
- Placeholder differences in the source and target text
- Leading and trailing whitespaces
- Bracket differences in the source and target text
- Number differences in the source and target text
- Email address differences in the source and target text
- URL differences in the source and target text
After thorough quality control, your localized materials are ready for publication.
Parting thoughts
If starting this article you didn’t know the first thing about localization workflows, I hope it was genuinely helpful.
If you’re a localization industry veteran, I hope you found it interesting and, perhaps, occasionally insightful. Particularly, regarding the benefits of our localization management platform. Seriously, it’s that good.
Regardless of your background, give Centus a try! It will transform your localization workflow and you’ll wonder how you managed without it.
Smooth sailing!
Get the week's best content!
By subscribing, you are agreeing to have your personal information managed in accordance with the terms of Centus Privacy Policy ->
Keep learning

4 min. read
How to Measure Localization ROI and Maximize Returns

5 min. read
Localization Quality Assurance: Your In-Depth Guide

10 min. read
Master Localized Numbers in 5 Minutes
11 min. read
How to Build a Localization Strategy and Do it Right
11 min. read
What Is Localization? A Comprehensive Overview
16 min. read