Internationalization allows users to interact with technology in a way that feels natural to them.
Over the past few months, I’ve worked on several localization projects—covering React, Vue, PHP, and more. And today it’s time to explore localization in Spring Boot.
In this guide, I’ve documented the steps I took to localize a Spring Boot application from scratch. Let’s get right into it.
Reasons to localize your Spring Boot web application
Localization helps make users feel at home when they interact with your app.
While over 5.52 billion people across the globe have access to the Internet, only about 350 million netizens are from English-speaking countries.
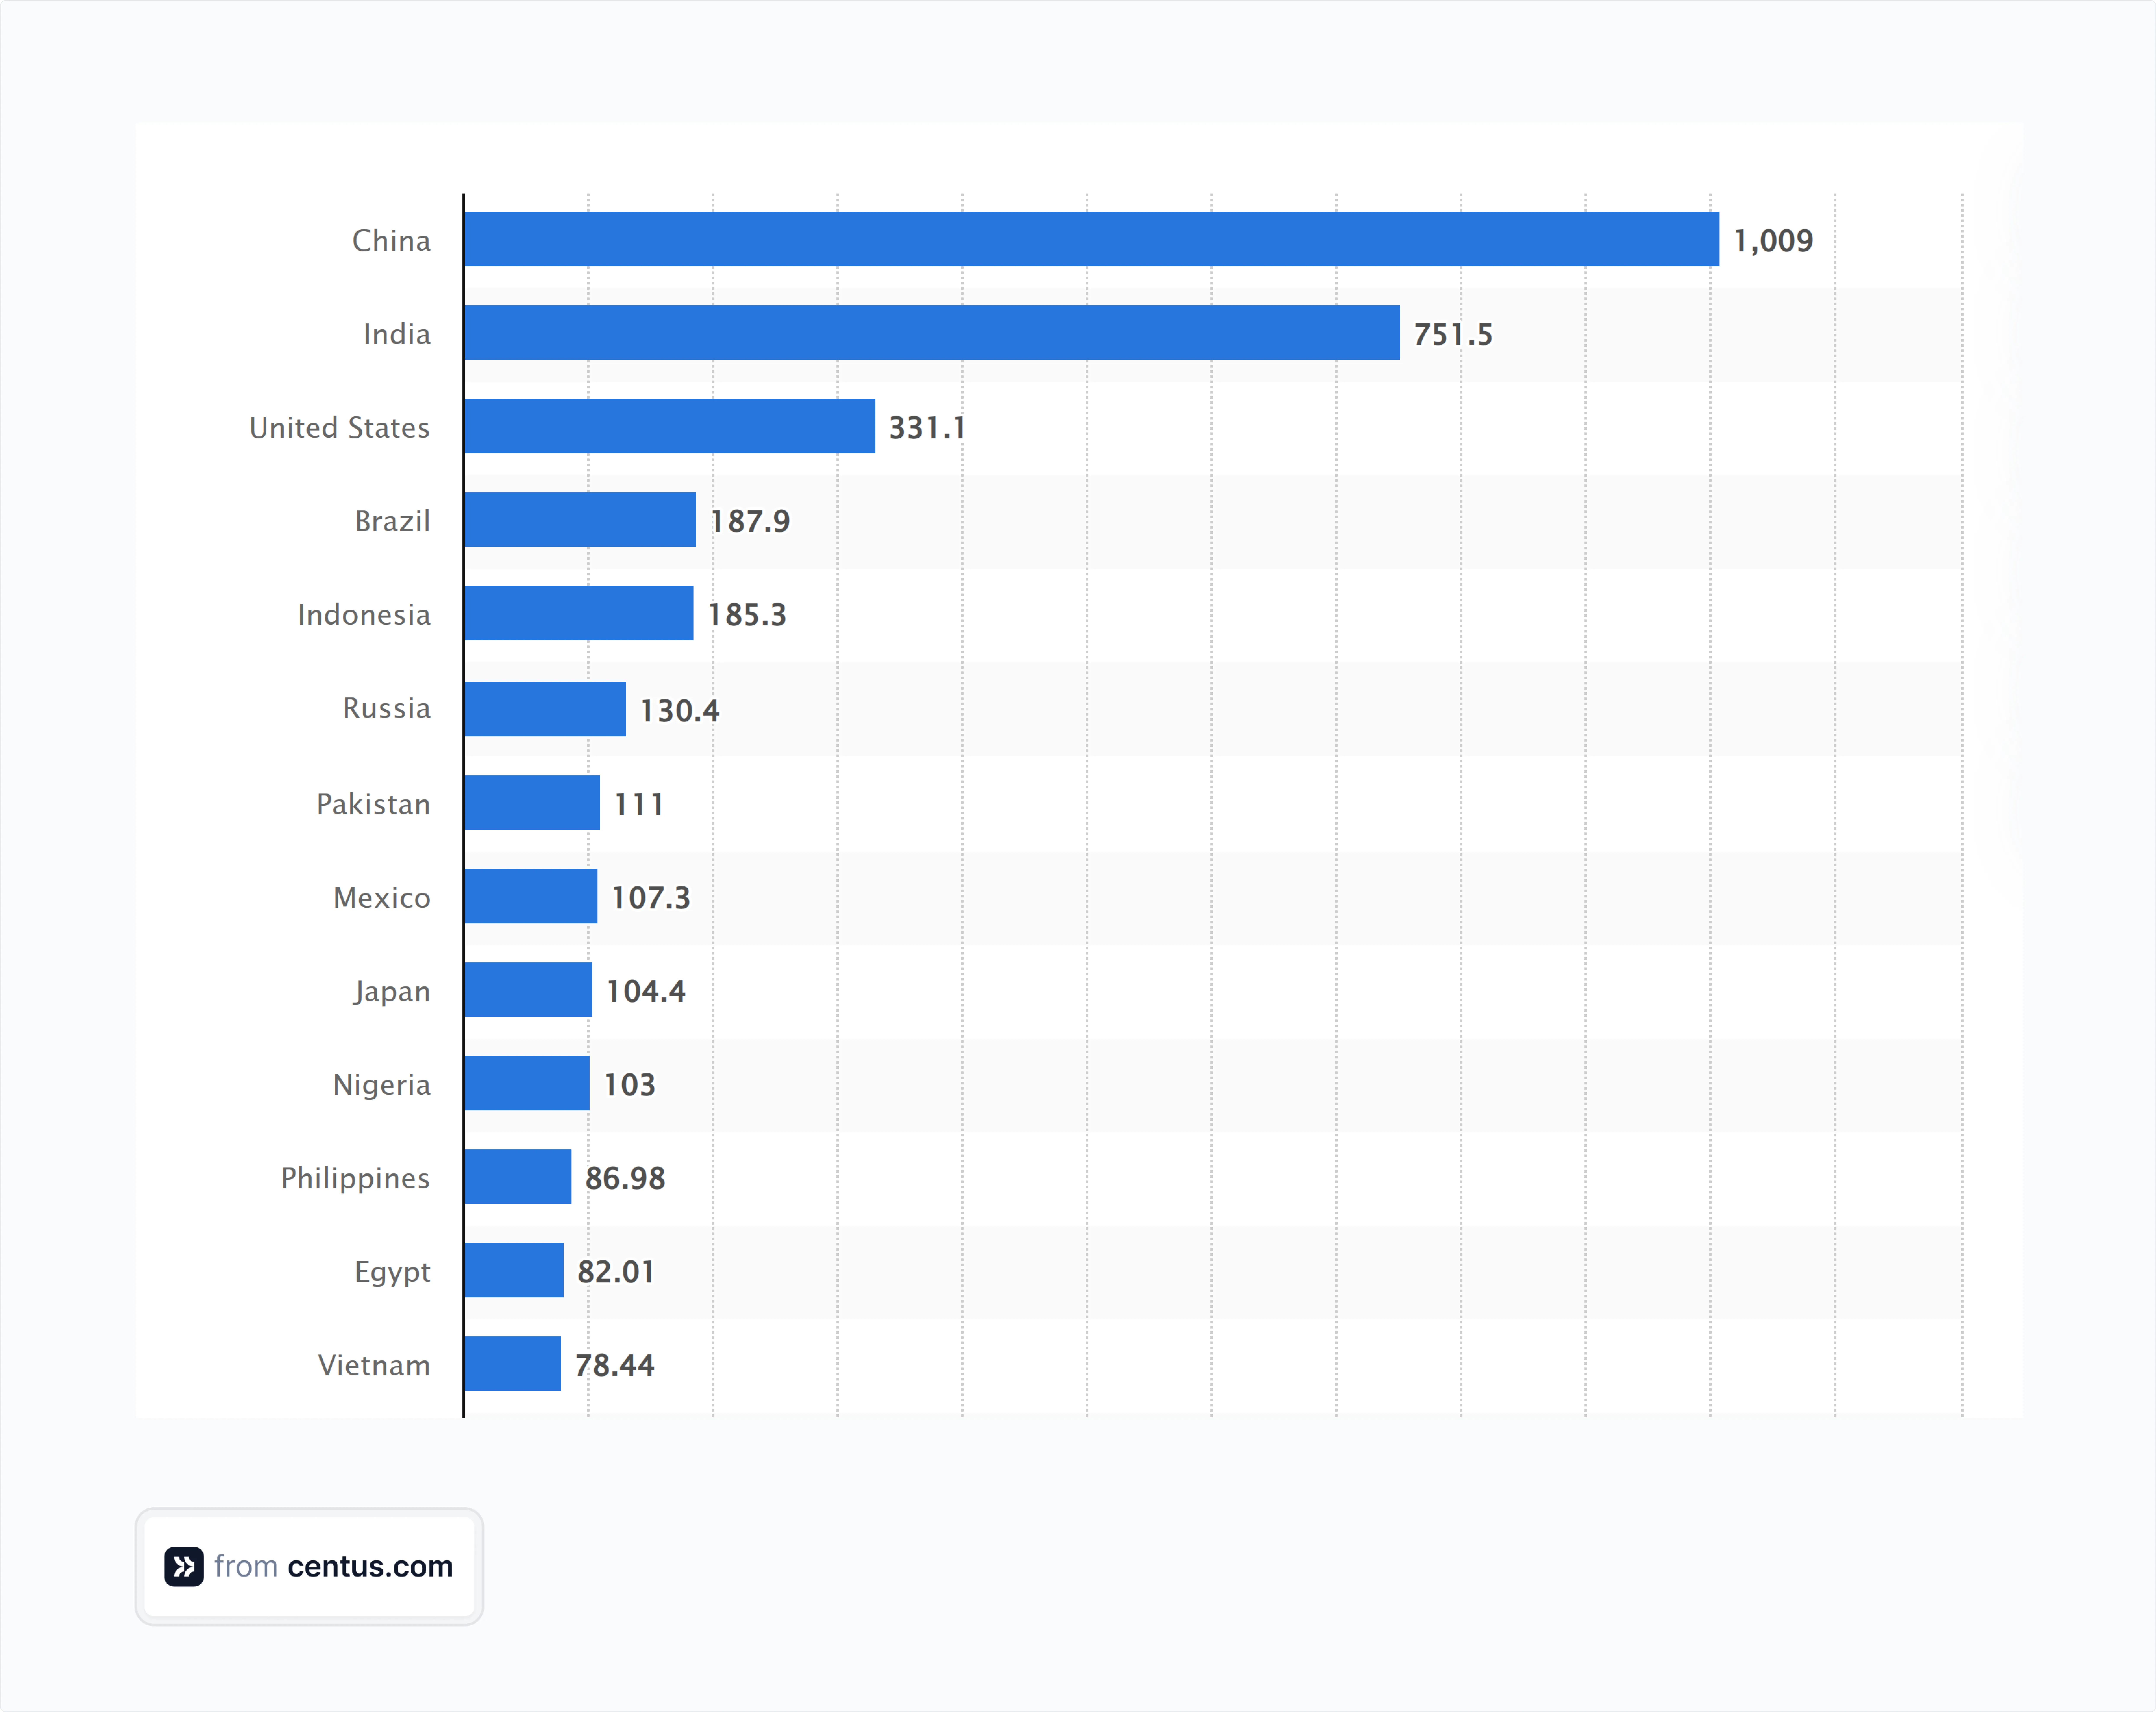
China (1.09 billion) and India (751 million), on the other hand, have the highest number of internet users.
And still, 49% of the top 10 million websites use English as their first language.
Localizing your web app is the first step towards representing this large subset of users and will help you create better experiences for your users.
How to internationalize your Spring Boot app
Let me share the exact setup I use for production-grade Spring Boot internationalization projects
First, ensure you have these prerequisites installed:
-
Java Development Kit (JDK) 21
-
Gradle 8.5 or newer
-
Your favorite IDE: I’m using VS Code, but IntelliJ IDEA is a better Java-specific IDE.
With this stack in place, let’s create a project from scratch and gradually build it into a localized application.
Step 1: Set up your Spring Boot project
I’ll be using Spring Initializr to make things simple. However, you can achieve the same output by creating the files from scratch as you go.
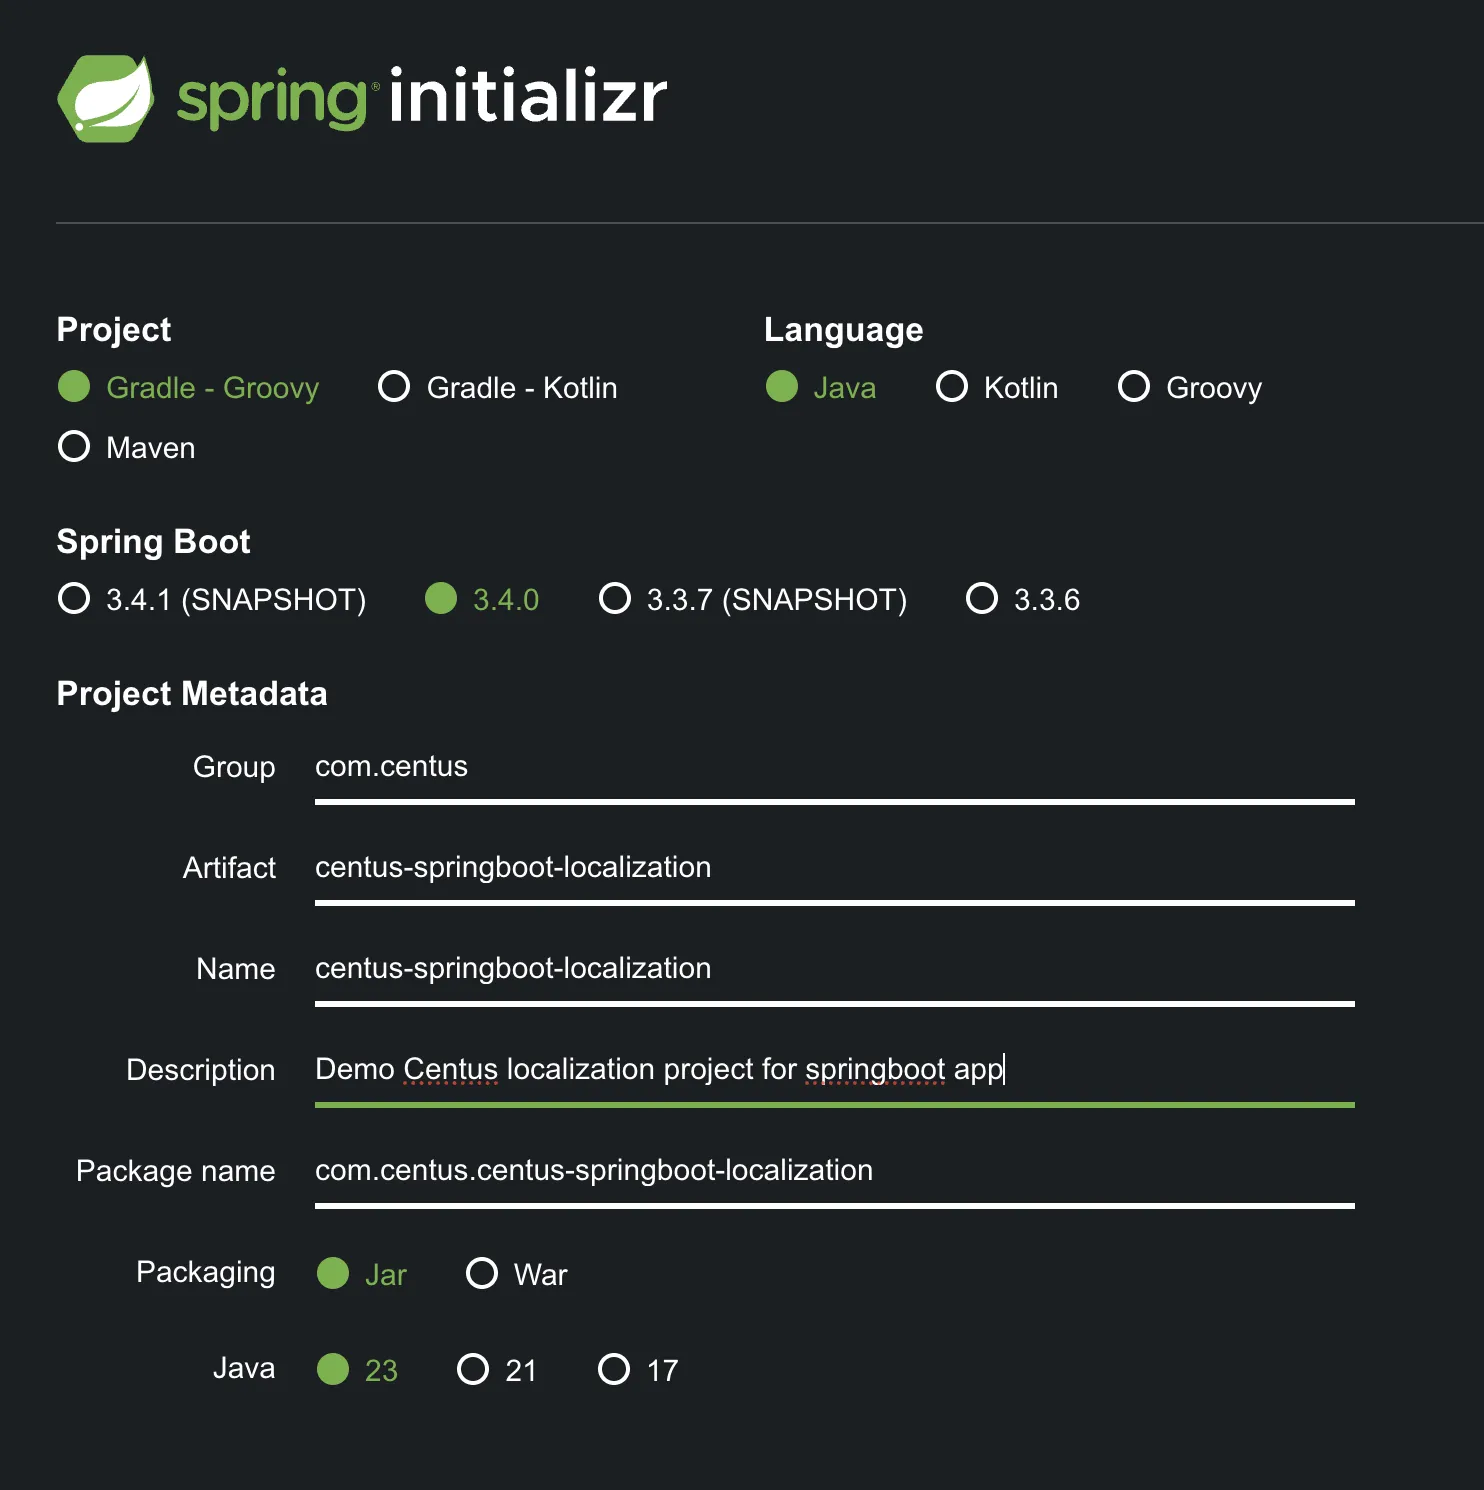
Here are my Spring Initializr settings:
-
Project: Gradle (Groovy)
-
Language: Java
-
Spring Boot Version: 3.4.0
-
Group: com.centus
-
Artifact: centus-springboot-localization
-
Packaging: Jar
-
Java Version: 21
Add the following dependencies:
- Spring Web: For creating RESTful web applications
Once everything is complete, download the project, extract the ZIP file, and launch it in your IDE.
Then, edit your build.gradle file to include the following dependencies:
plugins {
    id 'java'
    id 'org.springframework.boot' version '3.4.0'
    id 'io.spring.dependency-management' version '1.1.0'
}

group = 'com.centus'
version = '0.0.1-SNAPSHOT'
sourceCompatibility = '21'

repositories {
    mavenCentral()
}

dependencies {
    implementation 'org.springframework.boot:spring-boot-starter-web'
    implementation 'org.springframework.boot:spring-boot-starter-thymeleaf'
    implementation 'org.springframework.boot:spring-boot-starter-validation'
    testImplementation 'org.springframework.boot:spring-boot-starter-test'
}

test {
    useJUnitPlatform()
}
Run the following command to confirm the correct installation of the dependencies:
./gradlew clean build
If the command runs fine and you see > :bootRun at the end of the terminal output like below, you’re all good to proceed to the next step.

Step 2: Add translation files
Let's create our translation files. I've found organizing translations by feature rather than dumping everything into a single file makes maintenance much easier.
I’ve created the messages/common folder inside the resources directory.
mkdir -p src/main/resources/messages/common
I’ll add all the common translations for the homepage text, navigation, footer, repetitive buttons, etc.
File name: src/main/resources/messages/common/messages.properties
Add the default language strings:
# Navigation
nav.home=Home
nav.about=About Us
nav.contact=Contact Us

# Basic UI Elements
greeting=Welcome to Centus localization demo!
welcome.message=Experience seamless internationalization with Centus and Spring Boot
language.switch=Change Language

# Footer
footer.rights=All Rights Reserved
footer.language=Language Preference
For additional languages, follow this naming convention: messages_{locale}.properties. Create one for Spanish:
File name: src/main/resources/messages/common/messages_es.properties
Add the translated strings:
# Navigation
nav.home=Inicio
nav.about=Sobre Nosotros
nav.contact=Contáctenos

#Main content
greeting=¡Bienvenido a la demostración de localización de Centus!
welcome.message=Experimente una internacionalización perfecta con Centus y Spring Boot
language.switch=Cambiar Idioma

# Footer
footer.rights=Todos los Derechos Reservados
footer.language=Preferencia de Idioma
Spring Boot uses the default file when no locale matches. Always ensure every language file has the same keys.
We also need to tell SpringBoot where the translation files will be located. Update your application.properties file to include the following.
File name: src/main/resources/application.properties
# Basic Spring Boot Configuration
spring.application.name=centus-springboot-localization
server.port=8080

# Thymeleaf Configuration
spring.thymeleaf.cache=false
spring.thymeleaf.enabled=true
spring.thymeleaf.prefix=classpath:/templates/
spring.thymeleaf.suffix=.html

# Internationalization
spring.messages.basename=messages/common/messages
spring.messages.encoding=UTF-8
spring.messages.fallback-to-system-locale=false
I’ve added a couple more elements to the file. First, I’ve added the default port. Next, I've specified the path for storing the HTML templates. Finally, I’ve added the details for internationalization, including the message file location and encoding.
Now let’s create the template that will display these translations.
Step 3: Create a simple interface with a language switcher button
While many localization tutorials focused solely on translations, I’ve learned that user experience makes all the difference in how people learn. So this is my attempt at helping you understand localization better with a minimalist web page.
I’ve created a modern, responsive interface featuring:
<!DOCTYPE html>
<html xmlns:th="http://www.thymeleaf.org">
<head>
    <title th:text="#{greeting}">Welcome</title>
    <meta charset="UTF-8">
    <meta name="viewport" content="width=device-width, initial-scale=1.0">
    <link href="https://cdnjs.cloudflare.com/ajax/libs/flag-icon-css/3.5.0/css/flag-icon.min.css" rel="stylesheet">
    <style>
        :root {
            --primary-color: #0066cc;
            --bg-color: #f8f9fa;
            --text-color: #333;
            --max-width: 1200px;
        }

        body {
            font-family: -apple-system, BlinkMacSystemFont, 'Segoe UI', Roboto, Oxygen, Ubuntu, Cantarell, sans-serif;
            margin: 0;
            padding: 0;
            line-height: 1.6;
            color: var(--text-color);
            display: flex;
            flex-direction: column;
            min-height: 100vh;
        }

        /* Centered Navigation */
        .navbar {
            background-color: var(--primary-color);
            padding: 1rem 0;
            box-shadow: 0 2px 4px rgba(0,0,0,0.1);
        }

        .navbar-content {
            max-width: var(--max-width);
            margin: 0 auto;
            display: flex;
            justify-content: center;
            align-items: center;
            padding: 0 20px;
        }

        .navbar-links {
            display: flex;
            gap: 3rem;
        }

        .navbar-links a {
            color: white;
            text-decoration: none;
            font-weight: 500;
            transition: color 0.3s;
            font-size: 1.1rem;
        }

        .navbar-links a:hover {
            color: #e0e0e0;
        }

        /* Main Content */
        .container {
            max-width: var(--max-width);
            margin: 0 auto;
            padding: 2rem 20px;
            flex-grow: 1;
            text-align: center;
        }

        .content-header {
            margin-bottom: 3rem;
        }

        .content-header h1 {
            font-size: 2.5rem;
            color: var(--primary-color);
            margin-bottom: 1rem;
        }

        .content-header p {
            font-size: 1.2rem;
            color: #666;
            max-width: 800px;
            margin: 0 auto;
        }

        /* Footer & Language Switcher */
        .footer {
            background-color: var(--bg-color);
            padding: 2rem 0;
            border-top: 1px solid #eee;
            margin-top: auto;
        }

        .footer-content {
            max-width: var(--max-width);
            margin: 0 auto;
            text-align: center;
            padding: 0 20px;
        }

        .language-switcher {
            display: flex;
            align-items: center;
            justify-content: center;
            gap: 1.5rem;
            margin-bottom: 1.5rem;
        }

        .language-switcher-label {
            font-size: 1.1rem;
            color: #555;
        }

        .language-options {
            display: flex;
            gap: 1rem;
        }

        .language-option {
            display: flex;
            align-items: center;
            gap: 0.5rem;
            padding: 0.5rem 1rem;
            border: 2px solid #ddd;
            border-radius: 8px;
            cursor: pointer;
            transition: all 0.3s;
        }

        .language-option:hover {
            background-color: var(--primary-color);
            color: white;
            border-color: var(--primary-color);
        }

        .flag-icon {
            width: 1.5em;
            height: 1.5em;
            border-radius: 3px;
        }

        .copyright {
            margin-top: 1.5rem;
            color: #666;
            font-size: 0.9rem;
        }
    </style>
</head>
<body>
    <!-- Navigation -->
    <nav class="navbar">
        <div class="navbar-content">
            <div class="navbar-links">
                <a href="/" th:text="#{nav.home}">Home</a>
                <a href="/about" th:text="#{nav.about}">About</a>
                <a href="/contact" th:text="#{nav.contact}">Contact</a>
            </div>
        </div>
    </nav>

    <!-- Main Content -->
    <div class="container">
        <div class="content-header">
            <h1 th:text="#{greeting}">Welcome</h1>
            <p th:text="#{welcome.message}">Welcome message</p>
        </div>
    </div>

    <!-- Footer with Language Switcher -->
    <footer class="footer">
        <div class="footer-content">
            <div class="language-switcher">
                <div class="language-switcher-label" th:text="#{language.switch}">Select Language</div>
                <div class="language-options">
                    <div class="language-option" onclick="changeLanguage('en')">
                        <span class="flag-icon flag-icon-us"></span>
                        <span>English</span>
                    </div>
                    <div class="language-option" onclick="changeLanguage('es')">
                        <span class="flag-icon flag-icon-es"></span>
                        <span>Español</span>
                    </div>
                </div>
            </div>
            <div class="copyright">
                <small th:text="#{footer.rights}">All Rights Reserved</small>
            </div>
        </div>
    </footer>

    <script>
    function changeLanguage(lang) {
        window.location.href = window.location.pathname + '?lang=' + lang;
    }

    document.addEventListener('DOMContentLoaded', function() {
        const urlParams = new URLSearchParams(window.location.search);
        const currentLang = urlParams.get('lang') || 'en';
        document.documentElement.lang = currentLang;

        // Highlight current language
        const options = document.querySelectorAll('.language-option');
        options.forEach(option => {
            if (option.onclick.toString().includes(currentLang)) {
                option.style.backgroundColor = 'var(--primary-color)';
                option.style.color = 'white';
                option.style.borderColor = 'var(--primary-color)';
            }
        });
    });
    </script>
</body>
</html>
The page includes:
-
A clean navigation bar with localized menu items
-
A centered content area that adapts to different languages
-
A smart language switcher with flag icons for visual recognition
-
A sticky footer that keeps the language controls easily accessible
-
CSS variables for consistent theming and maintenance
Pro tip: Keep an eye on the URL when switching languages. The ?lang= parameter updates automatically, making it easy to share specific language versions of your pages.
Step 4: Add the web controller
We’re close to done with the basic setup. All we need now is a web controller to determine which page to load when someone accesses the localhost:8080 page.
Create a WebController.java file at the following path:
src/main/java/com/centus/centus_springboot_localization/ controller/WebController.java
package com.centus.centus_springboot_localization.controller;

import org.springframework.stereotype.Controller;
import org.springframework.ui.Model;
import org.springframework.web.bind.annotation.GetMapping;
import org.springframework.context.i18n.LocaleContextHolder;

@Controller
public class WebController {

    @GetMapping("/")
    public String home(Model model) {
        model.addAttribute("currentLocale", LocaleContextHolder.getLocale().getDisplayName());
        return "index";
    }
}
Step 5: Creating the localization config — the backbone of our web app
Next, create the LocalizationConfig.java file to allow the Spring app to change locales dynamically:
src/main/java/com/centus/centus_springboot_localization/ config/LocalizationConfig.java
package com.centus.centus_springboot_localization.config;

import org.springframework.context.MessageSource;
import org.springframework.context.annotation.Bean;
import org.springframework.context.annotation.Configuration;
import org.springframework.context.support.ResourceBundleMessageSource;
import org.springframework.web.servlet.LocaleResolver;
import org.springframework.web.servlet.config.annotation.InterceptorRegistry;
import org.springframework.web.servlet.config.annotation.WebMvcConfigurer;
import org.springframework.web.servlet.i18n.CookieLocaleResolver;
import org.springframework.web.servlet.i18n.LocaleChangeInterceptor;

import java.time.Duration;
import java.util.Locale;

@Configuration
public class LocalizationConfig implements WebMvcConfigurer {

    @Bean
    public MessageSource messageSource() {
        ResourceBundleMessageSource source = new ResourceBundleMessageSource();
        source.setBasenames("messages/common/messages");
        source.setDefaultEncoding("UTF-8");
        source.setUseCodeAsDefaultMessage(true);
        source.setFallbackToSystemLocale(false);
        return source;
    }

    @Bean
    public LocaleResolver localeResolver() {
        CookieLocaleResolver resolver = new CookieLocaleResolver("locale-cookie");
        resolver.setDefaultLocale(Locale.ENGLISH);
        resolver.setCookieMaxAge(Duration.ofDays(180));
        return resolver;
    }

    @Bean
    public LocaleChangeInterceptor localeChangeInterceptor() {
        LocaleChangeInterceptor interceptor = new LocaleChangeInterceptor();
        interceptor.setParamName("lang");
        return interceptor;
    }

    @Override
    public void addInterceptors(InterceptorRegistry registry) {
        registry.addInterceptor(localeChangeInterceptor());
    }
}
The LocalizationConfig.java is the backbone of how this application handles different languages and cultural preferences.
There are four parts to this class.
1. LocaleResolver
Think of LocaleResolver as your application's cultural interpreter. It decides how your application should behave for users from different regions.
@Bean
public LocaleResolver localeResolver() {
    CookieLocaleResolver resolver = new CookieLocaleResolver("locale-cookie");
    resolver.setDefaultLocale(Locale.ENGLISH);
    resolver.setCookieMaxAge(Duration.ofDays(180));
    return resolver;
}
Key elements of this method:
- Sets English as the fallback language
- Stores language preference for 180 days
- Uses cookies to remember user preferences
Pro tip: Always set a default locale to handle first-time visitors gracefully.
2. CookieLocaleResolver
The CookieLocaleResolver is your application's locale memory. When a user selects their preferred language, we don't want them to choose it again on their next visit. That’s why I’ve added the CookieResolver to store the language for 180 days (6 months).
resolver.setCookieMaxAge(Duration.ofDays(180));
Here's what this configuration achieves:
- Creates a cookie named "locale-cookie"
- Persists language preference for 6 months
- Automatically restores preference on return visits
Real-world insight: I initially used SessionLocaleResolver, but found that users got frustrated having to reselect their language after each session. CookieLocaleResolver solved this elegantly.
3. LocaleChangeInterceptor
The interceptor watches for a specific parameter in your URLs (lang in our case) and triggers the locale change when it appears.
@Bean
public LocaleChangeInterceptor localeChangeInterceptor() {
    LocaleChangeInterceptor interceptor = new LocaleChangeInterceptor();
    interceptor.setParamName("lang");
    return interceptor;
}
For example:
- //yourapp.com?lang=es switches to Spanish
- //yourapp.com?lang=en switches to English
Pro tip: Choose a parameter name that's intuitive but won't conflict with other parameters in your application.
4. Registering the interceptor
If you don't register the interceptor, your language-switching mechanism remains built but unconnected. That's why I’m using the addInterceptors method here.
@Override
public void addInterceptors(InterceptorRegistry registry) {
    registry.addInterceptor(localeChangeInterceptor());
}
Here's what happens behind the scenes:
- Spring intercepts incoming requests
- Checks for the "lang" parameter
- If found, it triggers the locale change
- Updates the cookie with the new preference
The complete configuration creates a seamless internationalization experience.
- Automatically detects user's preferred language
- Persists language preferences
- Enables easy language switching
- Maintains consistency across sessions
If you’re all set, let’s now run the build and see how it works.
Step 5: Run and test the build
At this point, your directory structure should look something like this:
centus-springboot-localization/
├── build.gradle
└── src/
    └── main/
        ├── java/
        │   └── com/
        │       └── centus/
        │           └── centus_springboot_localization/
        │               ├── CentusSpringbootLocalizationApplication.java
        │               ├── config/
        │               │   └── LocalizationConfig.java
        │               └── controller/
        │                   └── WebController.java
        └── resources/
            ├── application.properties
            ├── messages/
            │   └── common/
            │       ├── messages.properties
            │       └── messages_es.properties
            └── templates/
                └── index.html
Perform a fresh build to verify the correct placement and functionality of all the files.
./gradlew clean bootRun
If the command runs successfully, you can go to localhost:8080, and you should now see the following page:
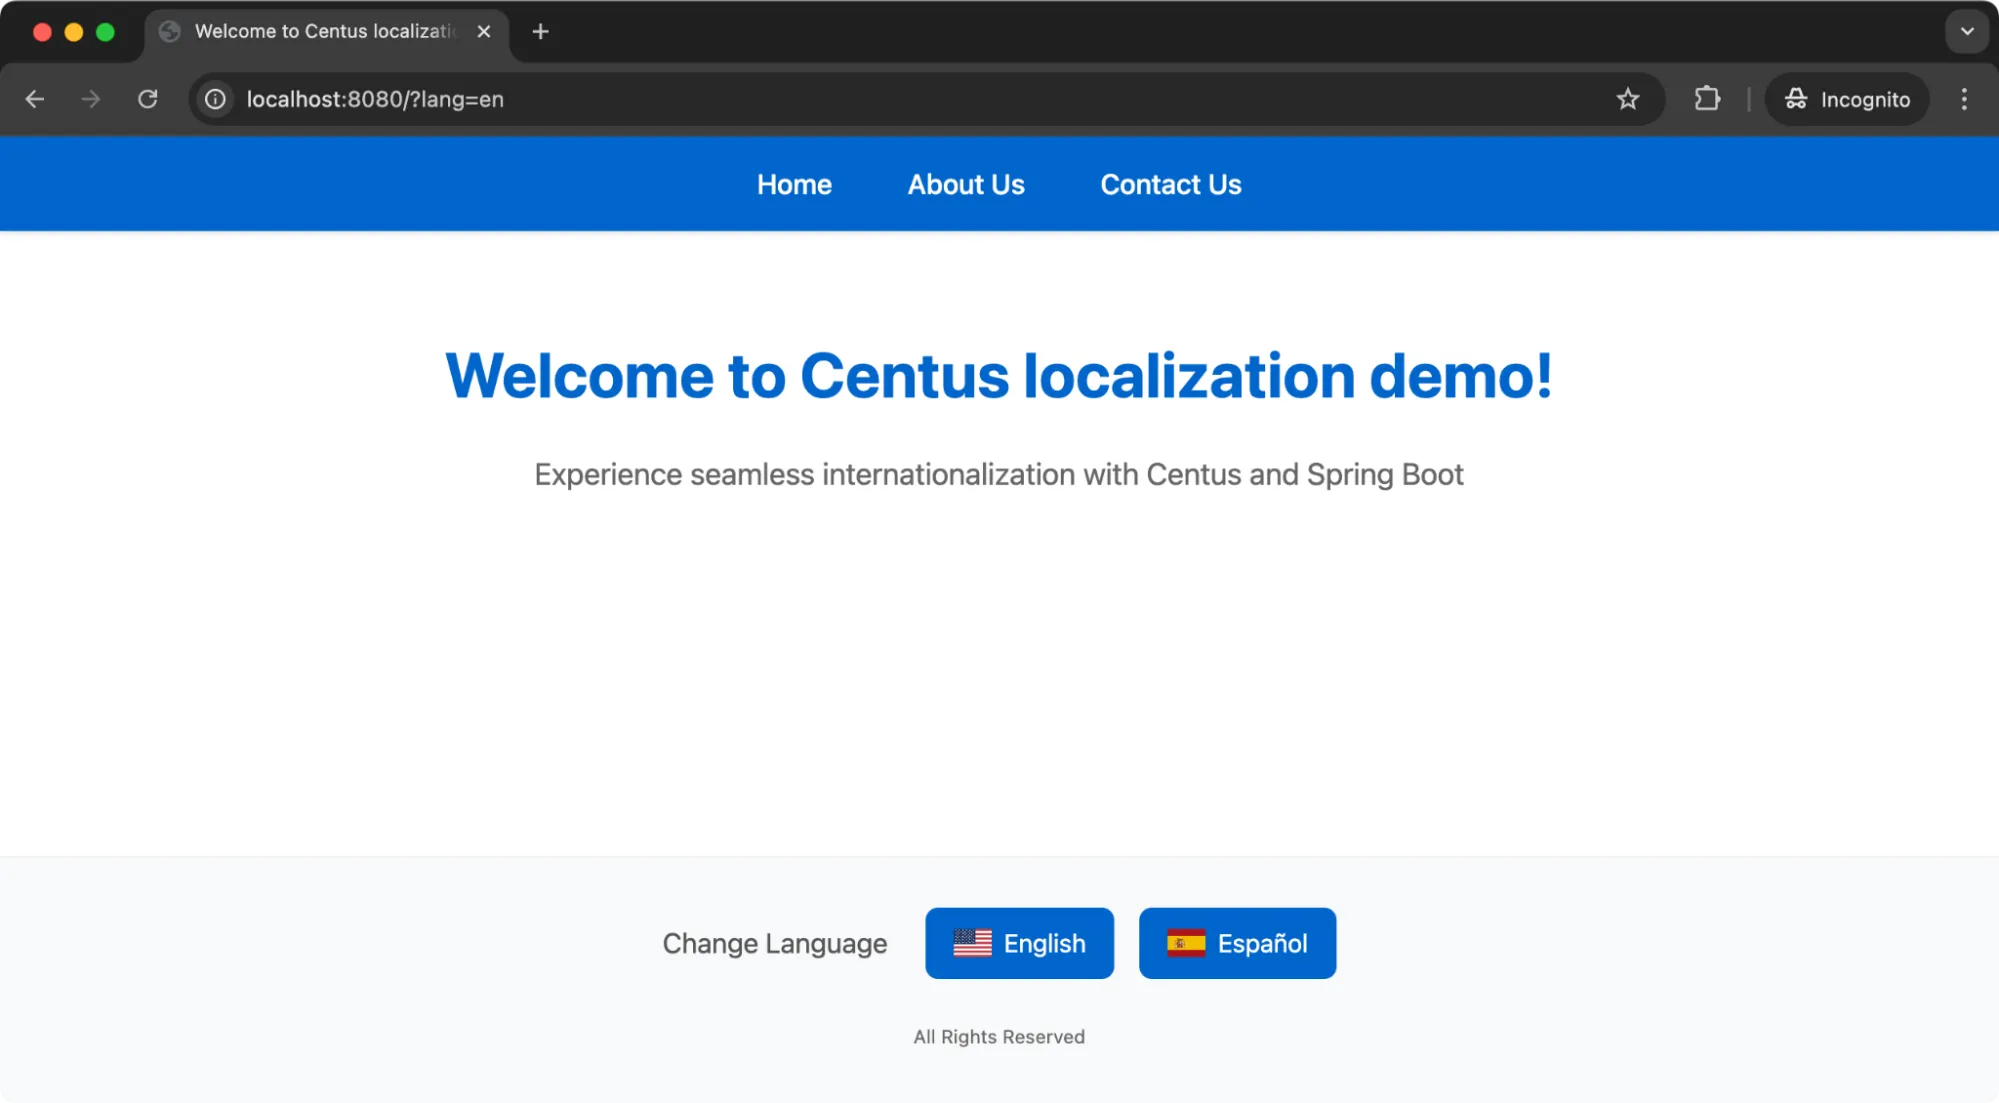
I’ve already implemented the language switcher buttons. Clicking on the buttons will add a parameter to the url lang=en or lang=es and our app will dynamically switch to the set language.
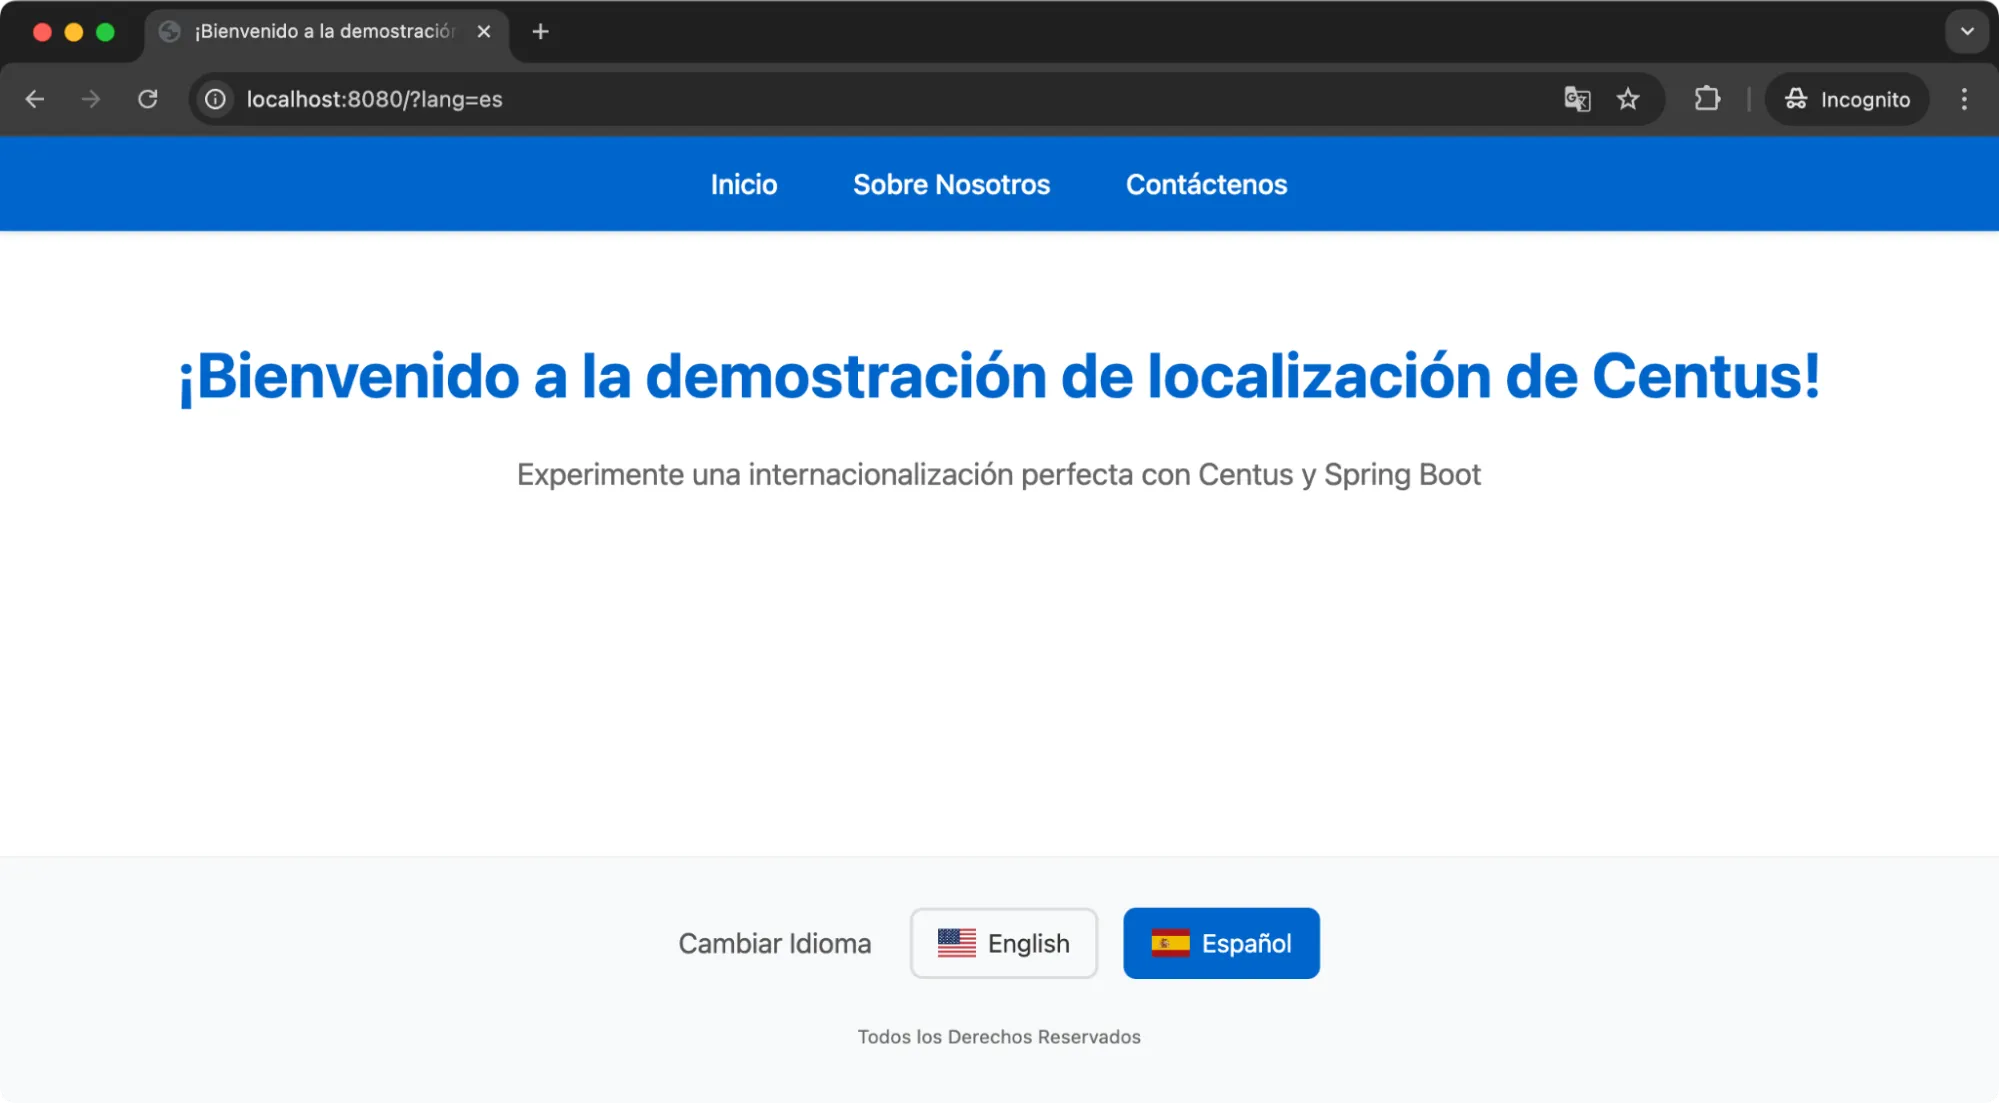
Awesome! You now have all the basics set for your app localization. Let’s move to some of the advanced localization techniques.
Advanced Spring Boot i18n techniques
Proper localization goes much beyond just translating text. It's about respecting how different cultures represent data. For example, in Spanish, a period separates thousands, and a comma separates decimals. In US English, we represent numbers in the exact opposite way.
The same applies to dates, genders, plurals, and other concepts.
Showing the same number or date to users from these locales will cause a great deal of confusion and create a bad user experience.
And it isn’t just limited to Spanish and English. A whole host of languages have different rules for representing these parts of their sentences.
Creating a formatting service
In my experience, I’ve relied on writing a formatting service to handle all these differences. It’s efficient and quick and lets me simply call the methods when required.
I’ve created this LocaleFormattingService.java file in the following directory:
src/main/java/com/centus/centus_springboot_localization/ service/LocaleFormattingService.java
This file contains all the methods required for handling pluralization, date formatting, currency formatting, time formatting, and more.
package com.centus.centus_springboot_localization.service;

import org.springframework.context.MessageSource;
import org.springframework.context.i18n.LocaleContextHolder;
import org.springframework.stereotype.Service;

import java.text.DateFormat;
import java.text.DecimalFormat;
import java.text.NumberFormat;
import java.util.Date;
import java.util.Locale;

import java.util.Currency;

@Service
public class LocaleFormattingService {

    private final MessageSource messageSource;

    public LocaleFormattingService(MessageSource messageSource) {
        this.messageSource = messageSource;
    }

    // Pluralization
    public String formatPlural(String key, long count) {
        return messageSource.getMessage(key, new Object[]{count},
            LocaleContextHolder.getLocale());
    }

    // Date Formatting
    public String formatDate(Date date, int style) {
        Locale currentLocale = LocaleContextHolder.getLocale();
        DateFormat dateFormatter = DateFormat.getDateInstance(style, currentLocale);
        return dateFormatter.format(date);
    }

    // Time Formatting
    public String formatTime(Date date, int style) {
        Locale currentLocale = LocaleContextHolder.getLocale();
        DateFormat timeFormatter = DateFormat.getTimeInstance(style, currentLocale);
        return timeFormatter.format(date);
    }

    // Combined Date & Time
    public String formatDateTime(Date date, int dateStyle, int timeStyle) {
        Locale currentLocale = LocaleContextHolder.getLocale();
        DateFormat formatter = DateFormat.getDateTimeInstance(
            dateStyle, timeStyle, currentLocale);
        return formatter.format(date);
    }

    // In the formatCurrency method
public String formatCurrency(double amount) {
    Locale currentLocale = LocaleContextHolder.getLocale();
    Currency currency;

    // Set appropriate currency based on locale
    if (currentLocale.getCountry().equals("ES")) {
        currency = Currency.getInstance("EUR");
    } else if (currentLocale.getLanguage().equals("en")) {
        currency = Currency.getInstance("USD");
    } else {
        // Default to USD if no specific mapping
        currency = Currency.getInstance("USD");
    }

    NumberFormat currencyFormatter = NumberFormat.getCurrencyInstance(currentLocale);
    ((DecimalFormat) currencyFormatter).setCurrency(currency);

    return currencyFormatter.format(amount);
}

    // Number Formatting
    public String formatNumber(double number) {
        Locale currentLocale = LocaleContextHolder.getLocale();
        NumberFormat numberFormatter = NumberFormat.getNumberInstance(currentLocale);
        return numberFormatter.format(number);
    }

    // Percentage Formatting
    public String formatPercentage(double number) {
        Locale currentLocale = LocaleContextHolder.getLocale();
        NumberFormat percentFormatter = NumberFormat.getPercentInstance(currentLocale);
        return percentFormatter.format(number);
    }

    // Gendered Messages
    public String getGenderedMessage(String gender, String name) {
        String key = switch (gender.toLowerCase()) {
            case "male" -> "welcome.message.male";
            case "female" -> "welcome.message.female";
            default -> "welcome.message.neutral";
        };
        return messageSource.getMessage(key,
            new Object[]{name},
            LocaleContextHolder.getLocale());
    }
}
We also need to update our WebController.java to call these methods when they’re requested from the front end.
Here’s what my WebController looks like right now:
package com.centus.centus_springboot_localization.controller;

import org.springframework.stereotype.Controller;
import org.springframework.ui.Model;
import org.springframework.web.bind.annotation.GetMapping;
import org.springframework.context.i18n.LocaleContextHolder;
import com.centus.centus_springboot_localization.service.LocaleFormattingService;
import java.text.DateFormat;
import java.util.Date;

@Controller
public class WebController {

    private final LocaleFormattingService formattingService;

    public WebController(LocaleFormattingService formattingService) {
        this.formattingService = formattingService;
    }

    @GetMapping("/")
    public String home(Model model) {
        // Original attributes
        model.addAttribute("currentLocale",
            LocaleContextHolder.getLocale().getDisplayName());

        // Pluralization examples
        model.addAttribute("singleItem",
            formattingService.formatPlural("items.count", 1));
        model.addAttribute("multipleItems",
            formattingService.formatPlural("items.count", 5));

        // Date/Time examples with built-in Java formatters
        Date now = new Date();
        model.addAttribute("shortDate",
            formattingService.formatDate(now, DateFormat.SHORT));
        model.addAttribute("longDateTime",
            formattingService.formatDateTime(now, DateFormat.LONG, DateFormat.SHORT));

        // Number formatting examples
        model.addAttribute("currencyValue",
            formattingService.formatCurrency(1234.56));
        model.addAttribute("largeNumber",
            formattingService.formatNumber(1234567.89));
        model.addAttribute("percentage",
            formattingService.formatPercentage(0.755));

        // Gendered message examples
        model.addAttribute("maleGreeting",
            formattingService.getGenderedMessage("male", "John"));
        model.addAttribute("femaleGreeting",
            formattingService.getGenderedMessage("female", "Jane"));

        return "index";
    }
}
I’ve hardcoded the values here, but you can create a configuration class to fetch the dynamic values from a properties file and pass them along to the WebController.
Run a clean build and see if everything is still running fine. If yes, you’re all set to start using these methods on the front end.
Numbers and currency formats
As I talked about earlier, we need to display number formats according to the selected locale.
But do you need to handle that manually? Absolutely not. The NumberFormat class handles it all without much configuration.
Since we’ve already added the function in the WebController, let’s implement the HTML to display it.
<div class="localization-grid">
        <!-- Numbers Column -->
        <div class="format-card">
            <h2>Numeric Formats</h2>
            <div class="format-value">
                <span>Currency: </span>
                <span th:text="${currencyValue}">$15123.12</span>
            </div>
            <div class="format-value">
                <span>Large Number: </span>
                <span th:text="${largeNumber}">1,234,567.89</span>
            </div>
            <div class="format-value">
                <span>Percentage: </span>
                <span th:text="${percentage}">75.5%</span>
            </div>
        </div>
</div>
I’ve also added some styling for the localization grid and cards.
.localization-grid {
    display: grid;
    grid-template-columns: repeat(3, 1fr);
    gap: 2rem;
    max-width: var(--max-width);
    margin: 4rem auto;
    padding: 0 2rem;
}

.format-card {
    background: #ffffff;
    border-radius: 12px;
    padding: 2rem;
    box-shadow: 0 2px 8px rgba(0,0,0,0.08);
    transition: transform 0.2s ease;
}

.format-card:hover {
    transform: translateY(-2px);
    box-shadow: 0 4px 12px rgba(0,0,0,0.12);
}

.format-card h2 {
    color: var(--primary-color);
    font-size: 1.5rem;
    margin-bottom: 1.5rem;
    padding-bottom: 0.5rem;
    border-bottom: 2px solid #f0f0f0;
}

.format-value {
    font-family: monospace;
    background: #f8f9fa;
    padding: 0.5rem;
    border-radius: 4px;
    margin: 0.5rem 0;
    font-size: 1rem;
}
Now, you should be able to run a clean build and see this output:

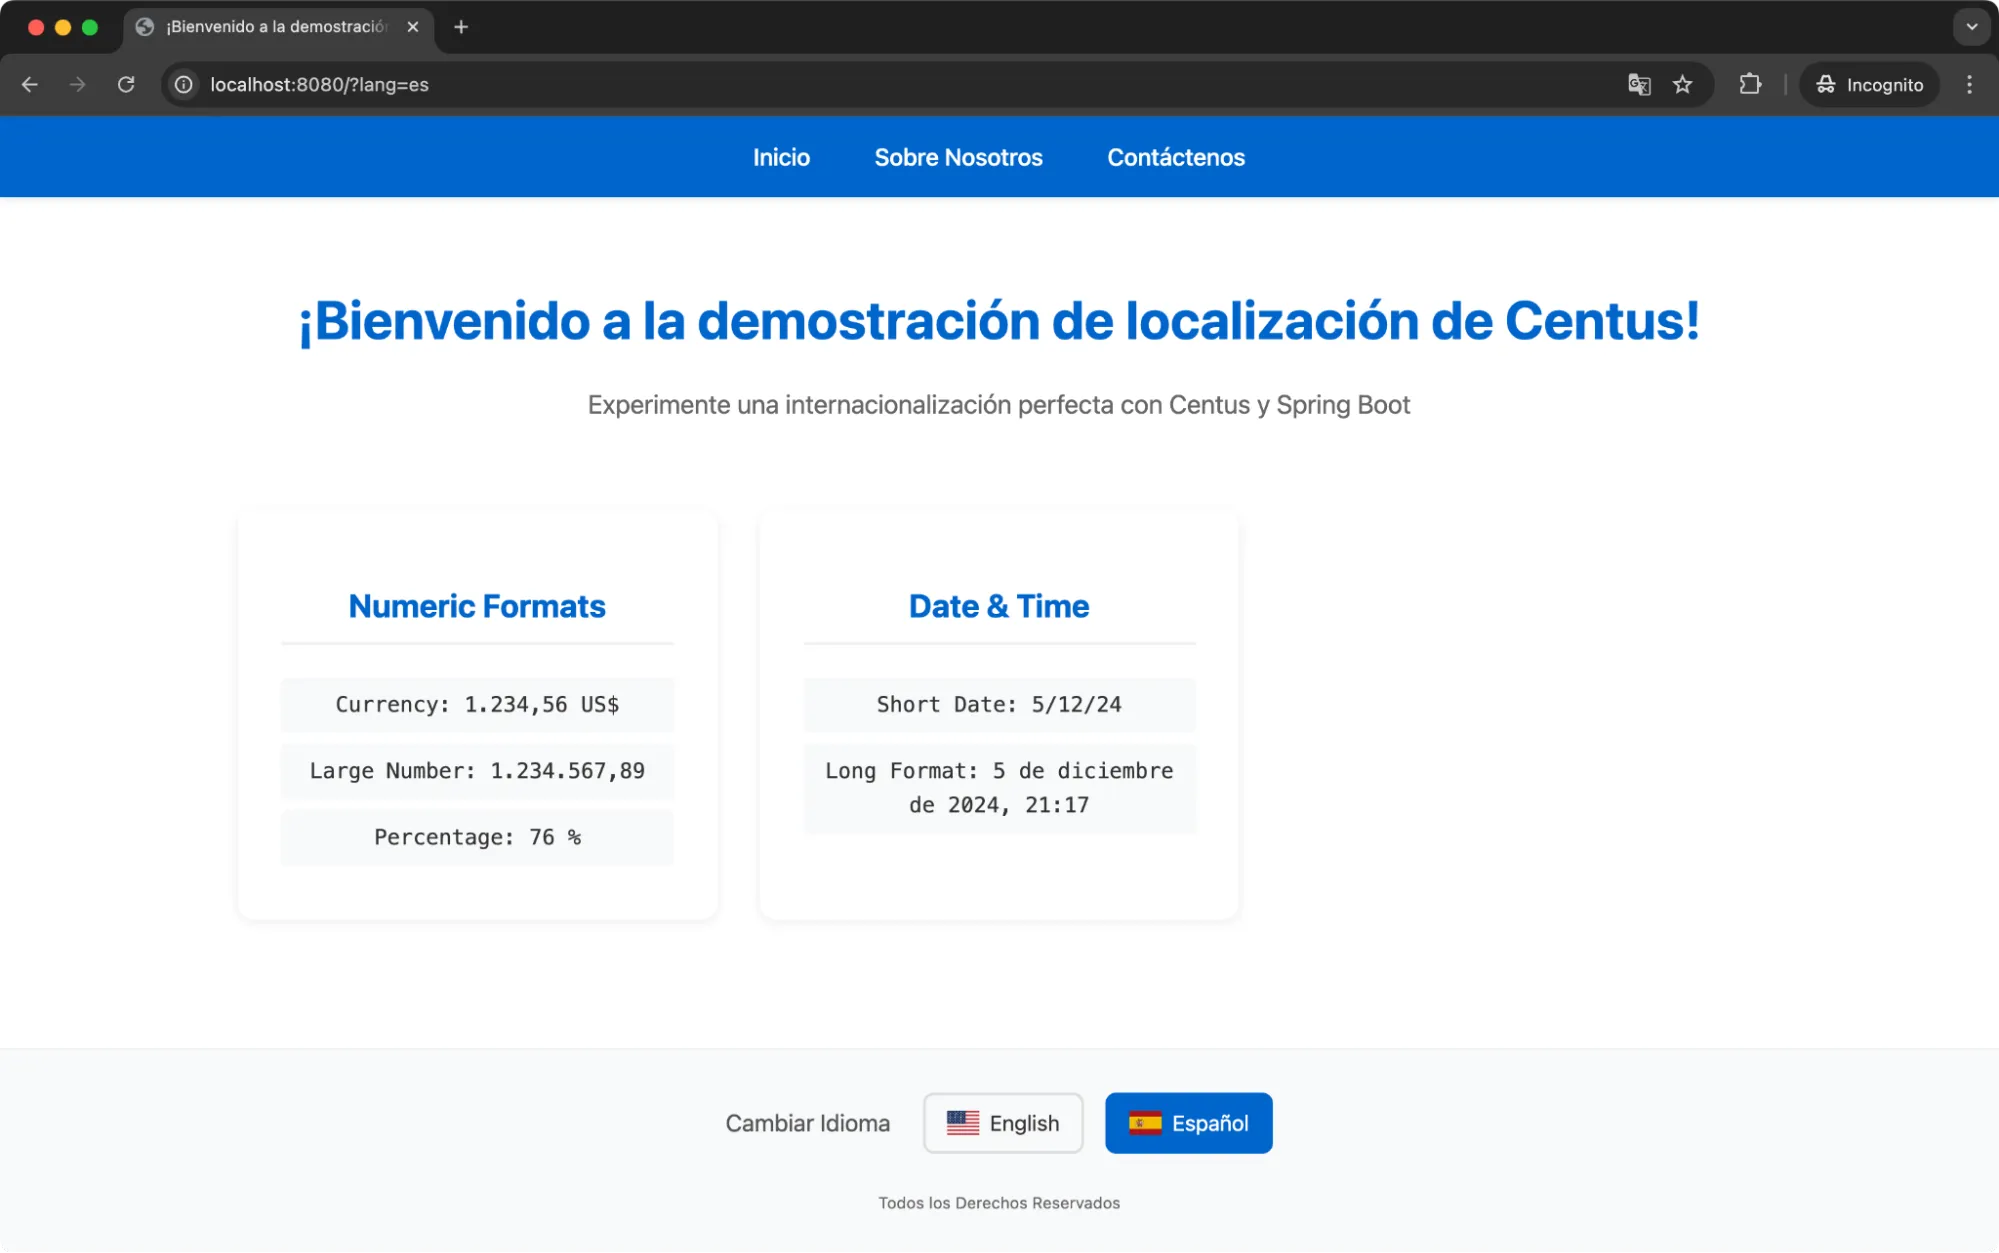
Switching to Espanol will give you the numbers and currency in a different format.
Date and time formats
Building upon the same controller and CSS styles, I’m simply adding a new HTML snippet here.
<div class="format-card">
            <h2>Date & Time</h2>
            <div class="format-value">
                <span>Short Date: </span>
                <span th:text="${shortDate}">01/01/2024</span>
            </div>
            <div class="format-value">
                <span>Long Format: </span>
                <span th:text="${longDateTime}">January 1, 2024 10:30 AM</span>
            </div>
        </div>
Run a clean build again and you’ll see the following output (I’ve switched to the Spanish locale for demonstration)
Pluralization and gendered sentences
Finally, we’ll move to pluralization. Now, managing pluralization becomes slightly more complex when dealing with a language such as Welsh, which has six distinct forms of plural.
For this demonstration, I’ve only added two forms of plurals in the WebController.
// Pluralization examples
model.addAttribute("singleItem",
    formattingService.formatPlural("items.count", 1));
model.addAttribute("multipleItems",
    formattingService.formatPlural("items.count", 5));
But you can always add more forms for two items, a few items, many items, etc. depending on your localization needs.
Similarly, you need to pass values for gendered sentences:
// Gendered message examples
model.addAttribute("maleGreeting",
    formattingService.getGenderedMessage("male", "John"));
model.addAttribute("femaleGreeting",
    formattingService.getGenderedMessage("female", "Jane"));
Unlike our previous advanced localization methods, pluralization and genders use language-specific words. So we need to update our messages files to include the words to be used depending on the plural or gender requested.
Here’s what I’m adding to our messages files:
messages.properties
# Pluralization
items.count={0} {0, choice, 0#items|1#item|1<items}
users.online={0} {0, choice, 0#users are|1#user is|1<users are} online

# Gendered Messages
welcome.message.male=Welcome Mr. {0}
welcome.message.female=Welcome Ms. {0}
welcome.message.neutral=Welcome {0}
messages_es.properties
# Pluralization
items.count={0} {0, choice, 0#artículos|1#artículo|1<artículos}
users.online={0} {0, choice, 0#usuarios están|1#usuario está|1<usuarios están} en línea

# Gendered Messages
welcome.message.male=Bienvenido Sr. {0}
welcome.message.female=Bienvenida Sra. {0}
welcome.message.neutral=Bienvenido/a {0}
That’s it! You can now add the following HTML block to display the values on a card:
<div class="format-card">
            <h2>Context-Aware Text</h2>
            <div class="format-value">
                <span th:text="${singleItem}">1 item</span>
            </div>
            <div class="format-value">
                <span th:text="${multipleItems}">5 items</span>
            </div>
            <div class="format-value">
                <span th:text="${maleGreeting}">Welcome Mr. John</span>
            </div>
            <div class="format-value">
                <span th:text="${femaleGreeting}">Welcome Ms. Jane</span>
            </div>
        </div>
Run a clean build and go to localhost:8080 or refresh the page.
You’ll now see a new card titled “Context-Aware Text”.
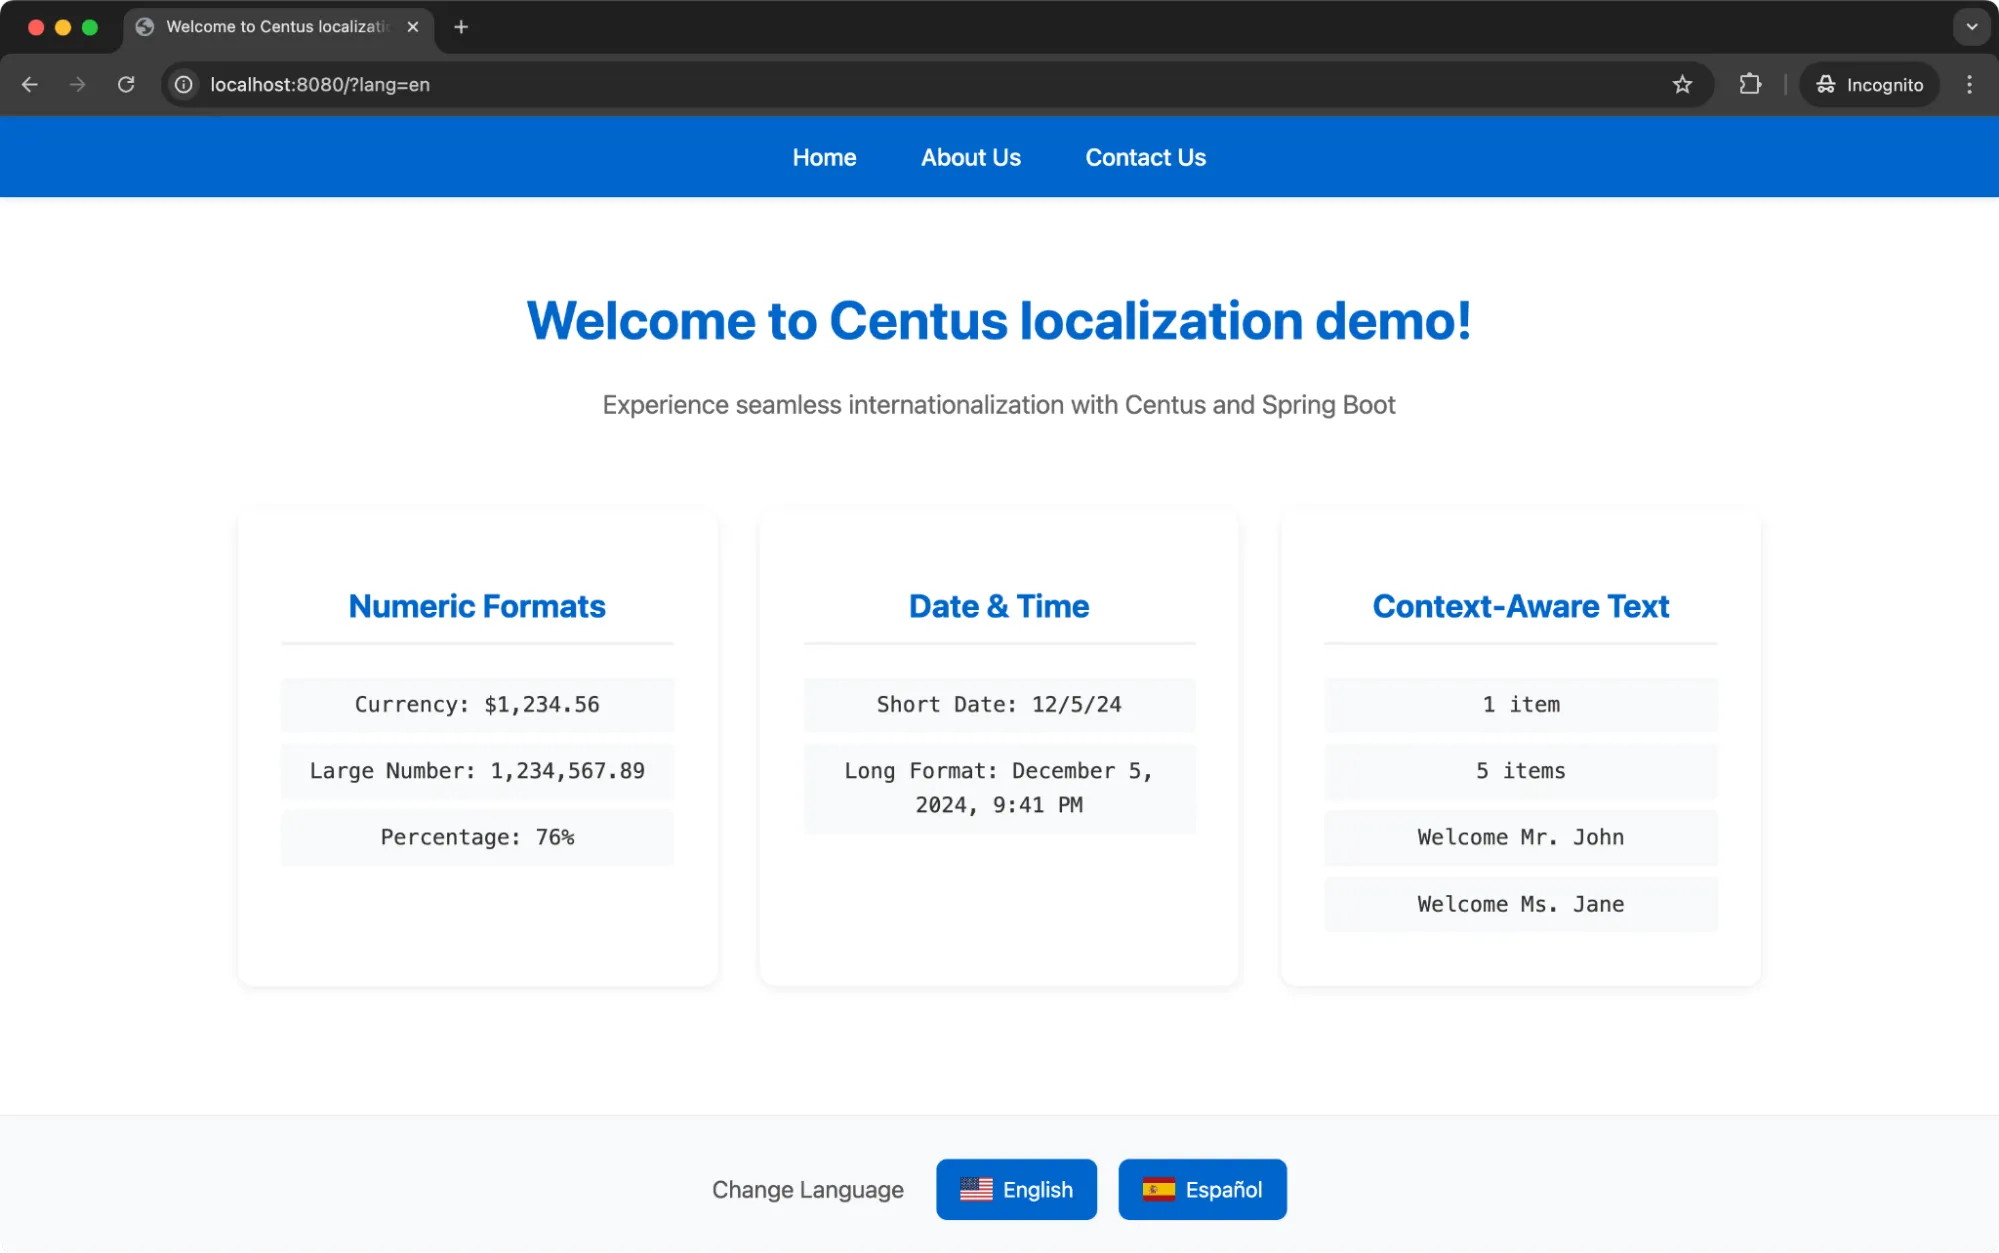
That’s it! You’re all set to localize your Spring Boot application.
How to simplify Spring Boot translation management
Managing just a few strings of text is already complicated enough. Think of how cumbersome it would get when your app grows larger, spanning multiple pages and countless strings.
Case in point: Even Aliexpress occasionally fails to replace placeholders with translated text.

This is where translation management systems, like Centus come into play.
I rely on Centus to manage translations across multiple languages, coordinating effectively with teams and stakeholders. It goes like this:
First, I import my strings to Centus where they can be translated automatically with Google Translate, DeepL, or Microsoft Translator. Then, my language experts refine automatic translations in the convenient Centus Editor.
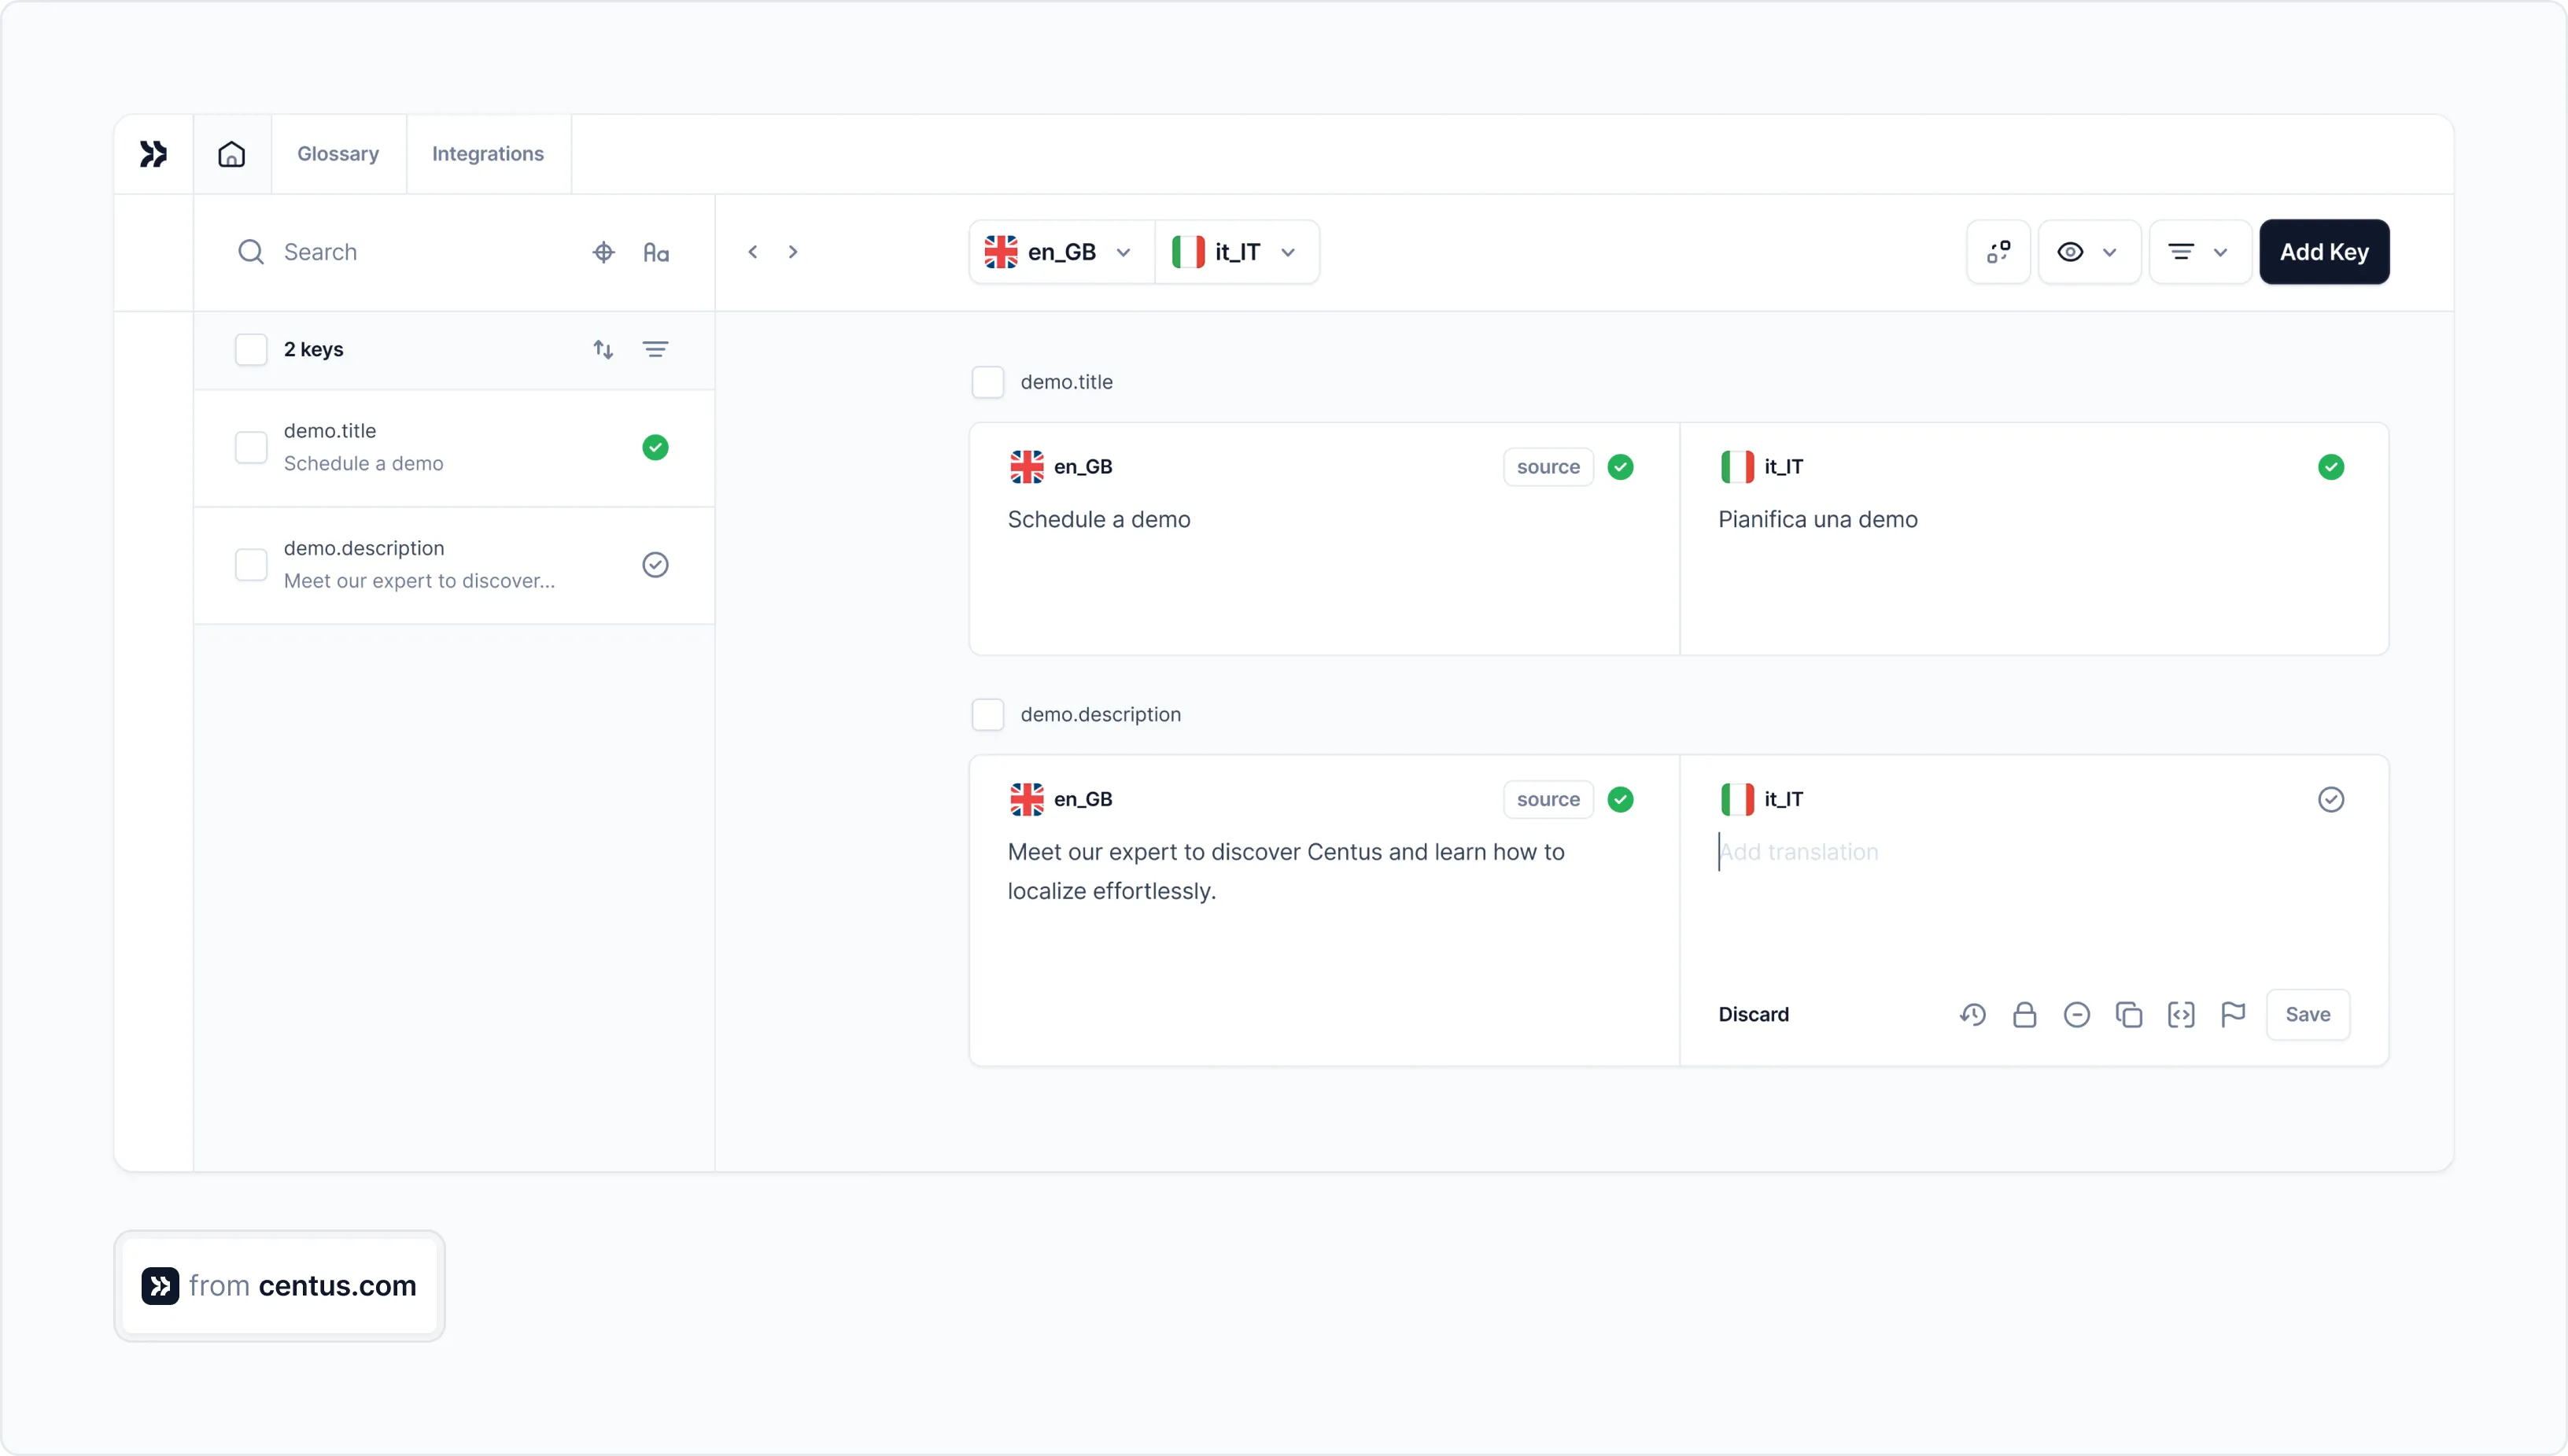
To use terms and names consistently across the app, my team relies on Centus glossaries. Once a term is added to the glossary, it is automatically suggested in the Centus Editor.
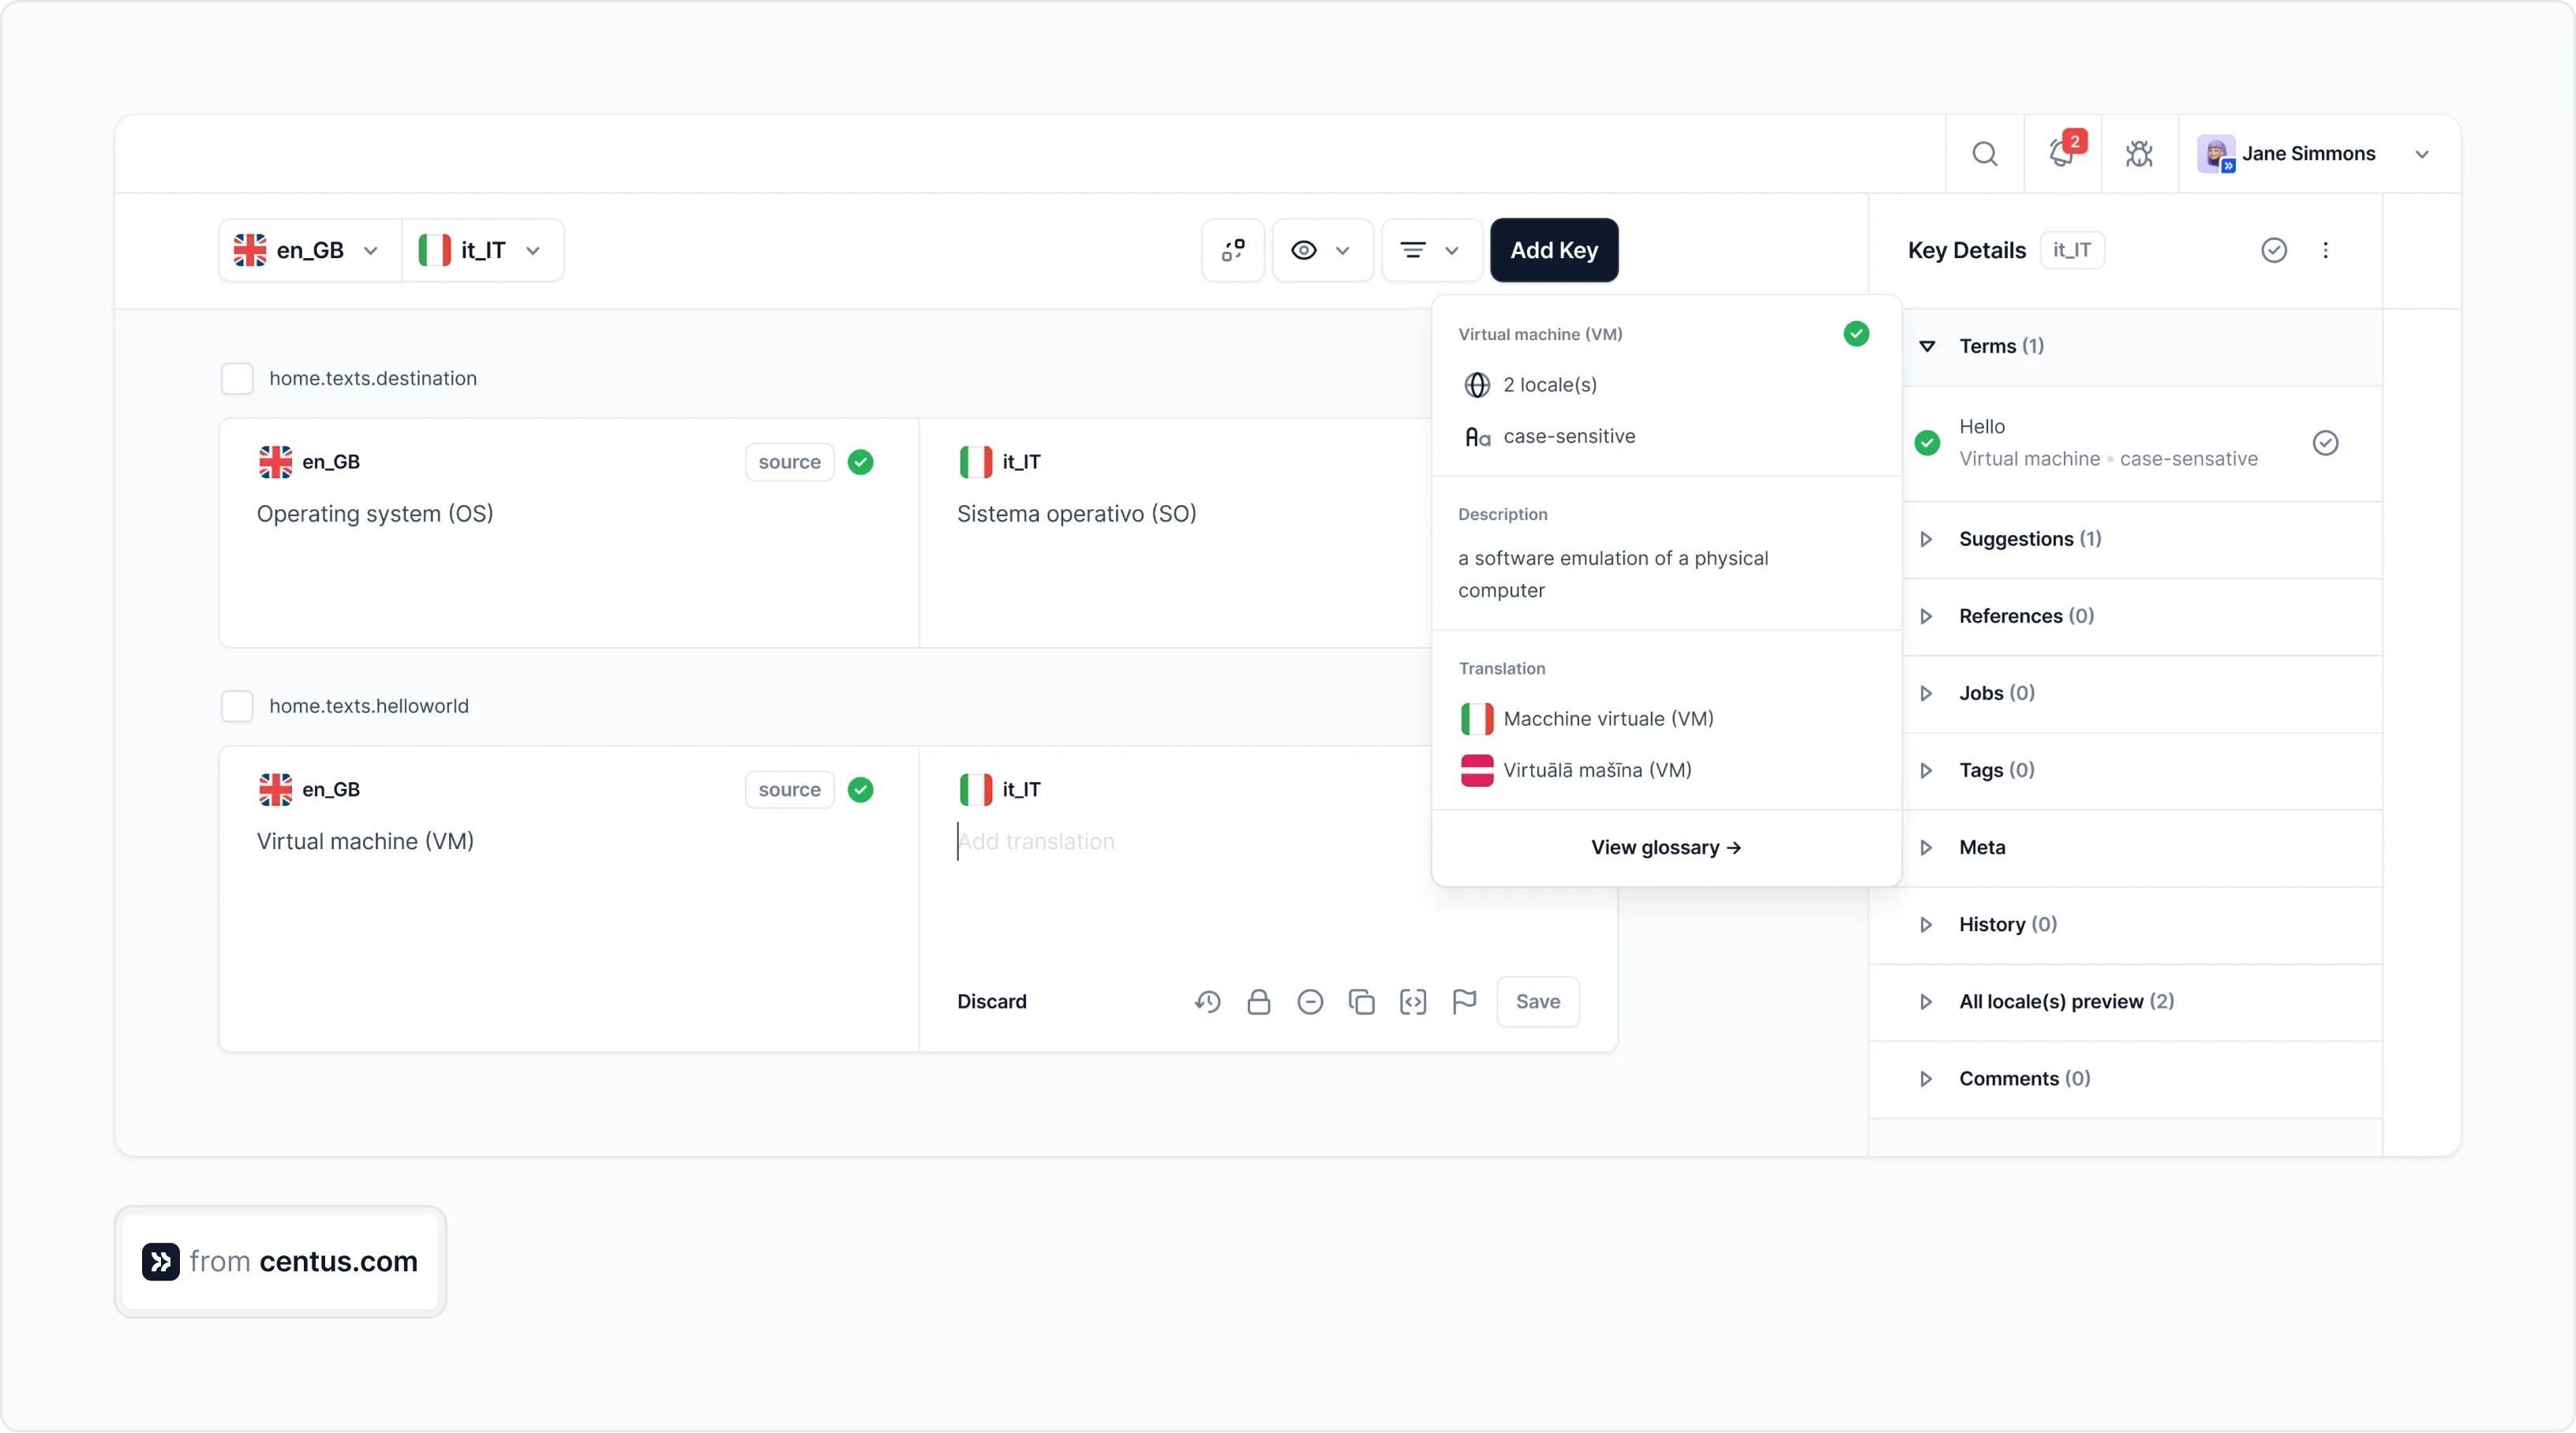
Centus also makes collaboration a breeze, helping you to keep localization projects on track.

Another benefit of using Centus for localizing your Spring Boot app, or any other app for that matter, is the streamlined bug-fixing process.
With Centus, localization bug fixing takes minutes instead of days.
Here’s the traditional bug-fixing process:
- You notice the truncated text in the app.
- You email translators asking them to shorten the text.
- You wait for translations and run regression testing. If the text still doesn’t fit, you repeat step 2.
This back-and-forth through emails wastes time, causing release delays.
But with Centus, bug-fixing looks like this:
- You notice the truncated text in the app.
- You leave a comment for translators directly in Centus.
- Translators make adjustments, and strings are automatically updated via Centus API.
With this streamlined process, bug fixing takes mere minutes.
The same applies to fixing design issues. Using the Centus-Figma integration, your designers preview and make layout changes in real time. They can also pull and push all translations into Figma, avoiding the bottleneck of manual copy-pasting.
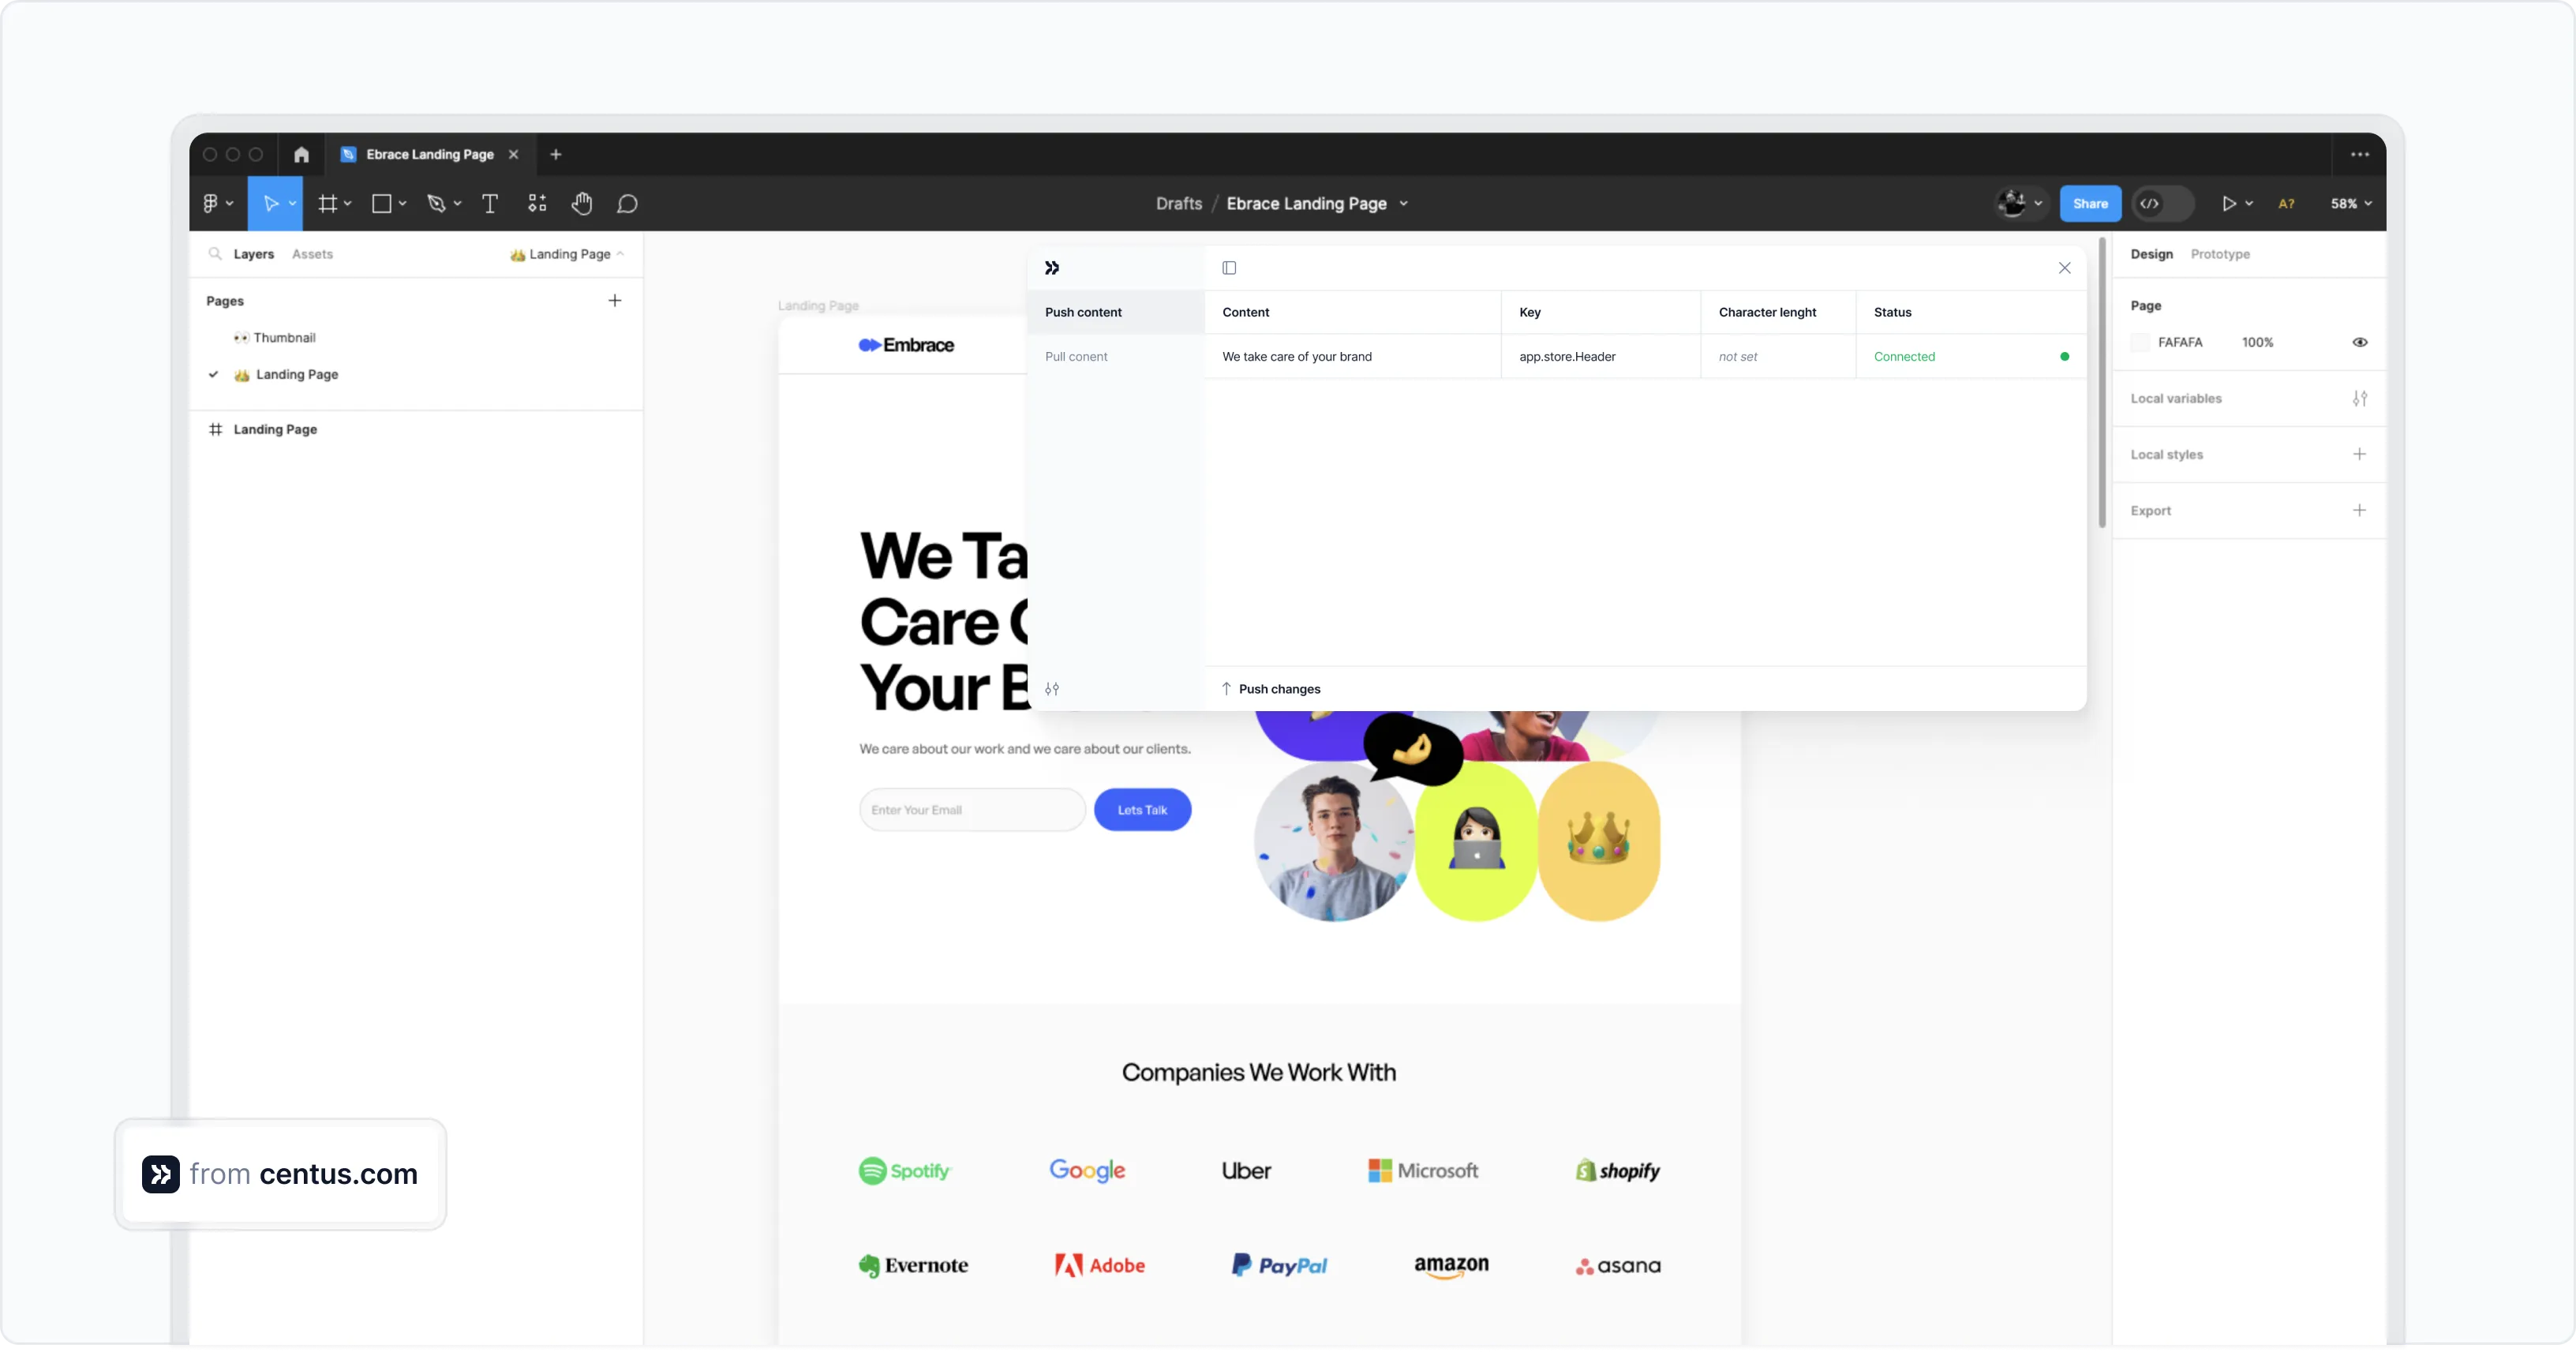
Centus has a host of other features streamlining the translation process, but I won’t take your time listing them all here. Sign up for Centus to discover them yourself.
Wrapping up
Congratulations! You've learned a lot about localization in a very short time.
Although Spring Boot provides excellent tools for implementing localization, it is quite difficult to keep track of translations, collaborate with team members, and bring consistency across your application.
This is where localization management platforms come in.
Centus improves your localization workflow by:
- Centralizing translation management
- Facilitating team collaboration
- Tracking localization progress
- Ensuring consistency across your application
- Integrating deeply with your development workflow
Are you ready to expand your Spring Boot application?
Try Centus today to see how seamless localization management can be.
Get the week's best content!
By subscribing, you are agreeing to have your personal information managed in accordance with the terms of Centus Privacy Policy ->
Keep learning
19 min. read
NextJS Internationalization: A Complete Walkthrough
30 min. read
Your Complete Guide to Django i18n
18 min. read